前回の記事を書いてから、scikit-learn を使った機械学習による手書きカタカナ文字「ア・イ・ウ・エ・オ」及び記号「○・×」の認識用学習モデル作成について、さらに勉強しました☆
今回は、その記録と、今後の抱負です。
【もくじ】
1.さらに勉強した理由
2.HOGを知る
3.気分は「写経」
4.今後の抱負
5.まとめ
6.お願いとお断り
1.さらに勉強した理由
なぜ、さらに勉強したかというと、前回の記事では、画像のピクセル値をそのまま利用する Flattening という特徴量抽出の手法を用いて学習モデルを作成したのですが、前回の記事にある通り、既知の(=学習に利用した)カタカナ文字については、アイウエオ各文字ともに 98 %正しく判定できたという好結果に力を得て、Delphi で GUI を作成した手書き答案の採点補助プログラムから、Python の文字認識スクリプトを実行できるよう、新しくプログラムを書いて実験してみた結果、期待に反して1回も見たことのない新規の文字については、正しく判定できないことがありました。特に「オ」は全滅・・・
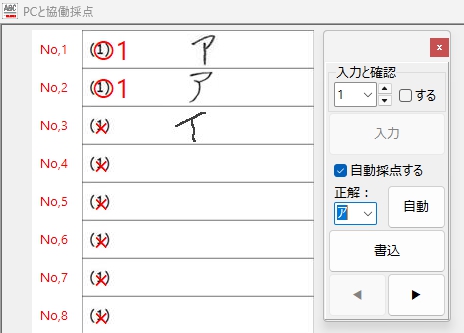
以下、かるーくやってみた実験の結果です。
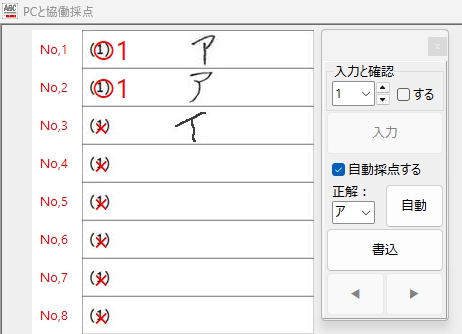
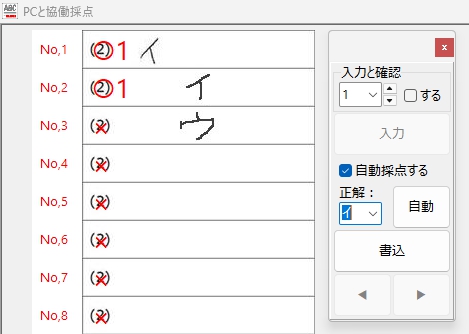
「ア」はふたつとも読めた・・・

記入位置の探索も、上手く行えてるようです・・・
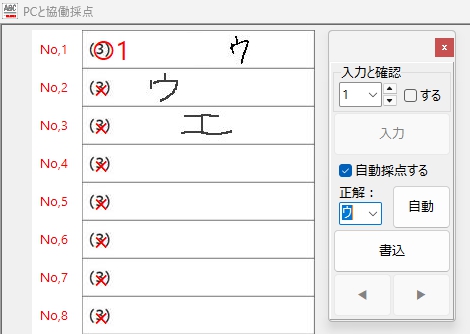
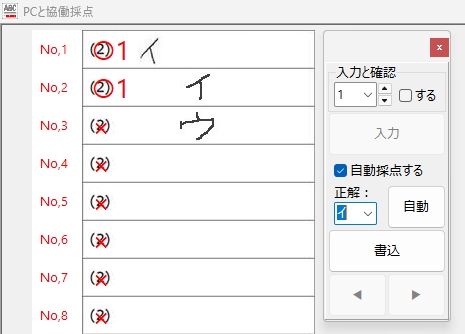
ふたつめの「ウ」の方が、典型的な「ウ」により近い? 気がするけど・・・
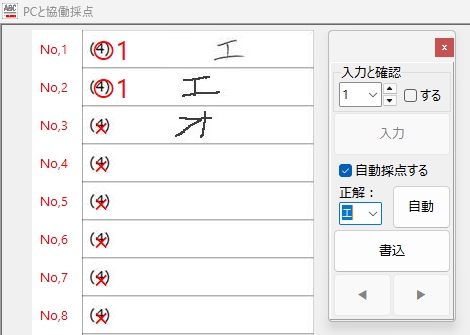
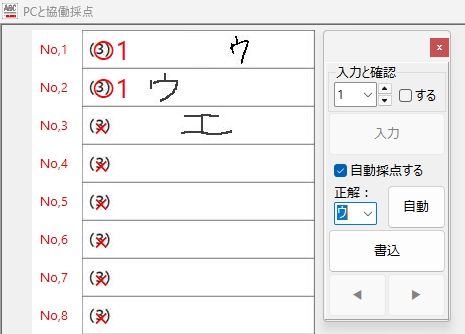
「エ」は得意なのかな・・・

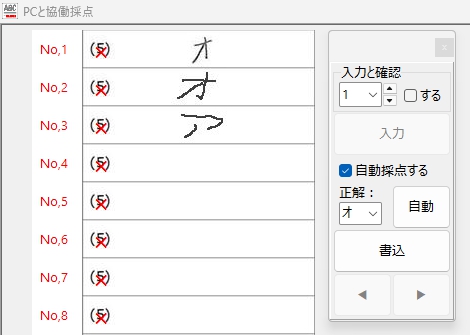
この「オ」の認識結果を見て、正直、これはダメだと思いました。また、失敗です。T_T
ちなみに「○・×」は・・・
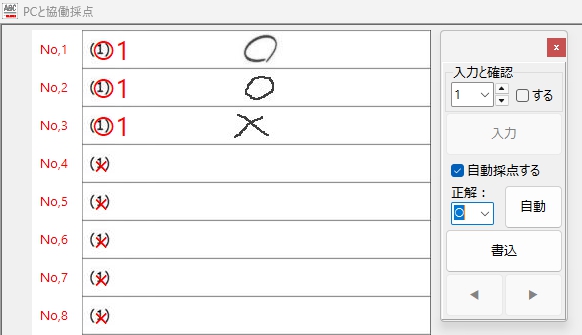
(空欄を識別しているのは、うれしい限りですが)
「○ or ×」認識テストの結果は、「オ」の場合よりさらにダメです。まぁ上の「オ」の場合の「ア」についても確信を持って見分けて「×」を付けているのか、どうか、この結果を見てだいぶ怪しくなってきました。(果たして、あの「オ」や「ア」をどう読んだのか・・・、それを確認する気力も失せました・・・)
さらに、お見せしたくないのが、「×」が正解ラベルの場合です。

THE END.
その想いで胸がいっぱいに!
実装が超シンプルで、かつ高速で軽量、文字画像のピクセル値(28×28)をそのまま利用する Flattening という手法では、これが限界なのでしょうか?
学習用データをさらに増やせば、もっと良い結果が得られるのではないか・・・ とも考えましたが、手元にその学習用データがありません。新規に学習用データを集めるには莫大な手間と時間が必要です。
ただ・・・失敗の中でも唯一救いに感じたのは、2年前の文字認識チャレンジでどうしてもクリア出来なかった解答欄中の文字が書かれている位置を正しく認識することに成功し、意図した通りに文字画像を取得出来ていることです。

プログラムはその記入位置を正確に見つけ出し、28×28の矩形画像への切り出しに成功しています。
実は、この Blog の過去の記事で「失敗の記録」として掲載した手書き文字認識チャレンジの試行錯誤の記事を書いた当時、文字の認識に失敗した最大の原因は「正しく文字を切り出せなかった」ことにありました。今回、テストしたのは、たった3枚の画像ですが、いずれも問題なく文字が記入されている位置をプログラムは特定し、その正確な切り出しに成功しています。
ここは出来れば改善したいところです。
2年前の僕の技術では、例えば「ア」について、文字を構成する線がすべて繋がっている場合は「ア」という文字1文字だと正しく認識できても、「つ」部分と「ノ」部分が離れている場合は、「ア」ではなく「つ」と「ノ」に分解して認識してしまうミスをどうしても防げなかったのです。今回のチャレンジでは、この問題を無事クリアできました。

ただ、やはり縦横比が・・・気になりますので、ここは何とかします!
さらに、解答欄から切り出した文字の位置が切り出し画像の中央にあることも、長い間ずっと・・・ この胸に思い描いた夢の通りです。
文字の縦横比は変わっていますが、文字位置の特定には何の問題もなく、成功しています☆
さらに、解答欄左にある(5)のような解答欄の番号を無視することにも成功しています☆☆
2年前にどうしてもクリア出来なかった複数の問題を、今回はすべてクリア出来ました☆☆☆
総合的な意味では今回も失敗でしたが、自分にとって、前回、クリア出来なかった幾つもの問題を解決できたことは、本当に大きな前進でした。だから、総合的には失敗でも、☆5つが完全な成功だとしたら、自分的には ☆☆☆ です。
また、今回、Flattening による学習モデル作成方法を学ぶことで、Python に 32 ビット環境の scikit-learn ライブラリを導入する手法を完全に理解できました。機械学習そのものが現在 64 ビット環境へ移行しつつある中で、32 ビット環境の最後の輝きを、今、僕は目の当たりにしている・・・ そんな気がしてなりませんでした。
2.HOGを知る
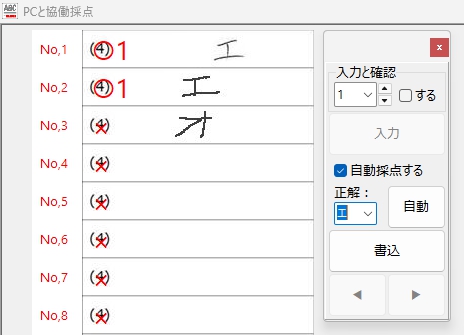
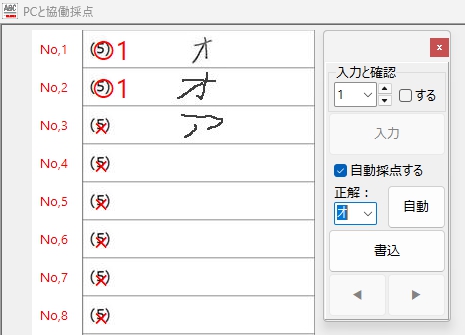
Flattening の欠点に気づいたのは、Python 環境で作成した学習モデルを Delphi の Object Pascal から操作できるようにプログラミングを終えた段階(上の画像は、その段階での試行の様子)だったので、・・・結果的に Delphi 側の最も重要なプログラムを最初から組み直すことにはなりましたが・・・ ここで僕は、エッジや輪郭の方向に強く、ノイズの影響も受けにくい HOG(Histogram of Oriented Gradients)という特徴量を抽出する手法があることを知ります。HOG を勉強してみたところ、こちらの手法の方が画像のピクセル値のそのまま利用する Flattening より、文字の識別精度が高いのではないかと思えてきました。
そこで HOG を用いて文字の特徴量を抽出して学習モデルを作成するスクリプトを書きました。最初に、ごく基本的なコードを書き、そこに必要な様々な処理を追加して行く方法で一歩一歩確実に進んだ結果、文字の認識能力が Flattening 特徴量抽出手法を使ったそれよりは高いのではないか?と、確かに思える学習モデルを作成することができました。HOG 特徴量抽出手法を使った学習モデルは、Delphi に組み込む前に、Python スクリプトを使って行った試行で、上の「オ」を2つともサラっと認識してくれたのです!
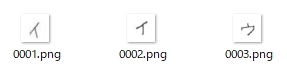
試行の様子がこちらです。

さらに解答欄の中の文字部分を探索して、切り抜いて・・・

(新しいプログラムではファイル名のIndexは1始まりにしました)
Delphi に埋め込む前に、Python 用のスクリプトで読んでみます・・・

以下、HOG特徴量抽出手法を適用した学習モデル作成に必要な、学習用の文字データを作成するために使用したスクリプトです(使用を推奨するものではありません。あくまでもご参考まで)。
このスクリプトは、輪郭検出と文字切り出し、周囲パディングを均一化して、文字を画像の中心に配置、GaussianBlurによるノイズ除去、傾き補正、28×28ピクセルに正規化して保存・・・と言った機能を備えています。万一、コピペして試される場合は PATH をご自身の環境に合わせて変更してください。
import cv2
import numpy as np
import os
from glob import glob
import re

# UTF-8 パス対応の画像読み込み
def imread_utf8(path):
    stream = np.fromfile(path, dtype=np.uint8)
    return cv2.imdecode(stream, cv2.IMREAD_COLOR)

# 傾き補正(修正: warpAffine に補間法と白背景を明示)
def deskew(img):
    m = cv2.moments(img)
    if abs(m['mu02']) < 1e-2:
        return img.copy()
    skew = m['mu11'] / m['mu02']
    M = np.float32([[1, skew, -0.5 * 28 * skew], [0, 1, 0]])
    return cv2.warpAffine(img, M, (28, 28), flags=cv2.INTER_NEAREST | cv2.WARP_INVERSE_MAP, borderValue=255)

# ファイル名から数値を抽出(img12.png → 12)
def extract_number(path):
    filename = os.path.basename(path)
    match = re.search(r'img(\d+)', filename)
    return int(match.group(1)) if match else float("inf")

# 入力・出力フォルダ(パスに全角文字が含まれていてもOK)
input_folder = r"C:\Python39-32\Images_tegaki\aiueo\ア"
output_folder = os.path.join(input_folder, "Trimed")
os.makedirs(output_folder, exist_ok=True)

# 対象画像拡張子
image_extensions = ['*.jpg', '*.jpeg', '*.png']
image_files = []
for ext in image_extensions:
    image_files.extend(glob(os.path.join(input_folder, ext)))

# 並べ替え(img番号順)
image_files.sort(key=extract_number)

index = 1
for image_path in image_files:
    image = imread_utf8(image_path)
    if image is None:
        print(f"読み込めない画像: {image_path}")
        continue

    h, w = image.shape[:2]
    gray_for_line = cv2.cvtColor(image, cv2.COLOR_BGR2GRAY)
    edges = cv2.Canny(gray_for_line, 50, 150, apertureSize=3)

    raw_lines = cv2.HoughLinesP(edges, 1, np.pi / 180, threshold=100,
                                minLineLength=min(w, h) // 3, maxLineGap=10)
    filtered_lines = []
    if raw_lines is not None:
        for line in raw_lines:
            x1, y1, x2, y2 = line[0]
            angle = abs(np.arctan2(y2 - y1, x2 - x1) * 180 / np.pi)
            length = np.hypot(x2 - x1, y2 - y1)
            if (angle < 10 or angle > 170) and length < w // 2:
                continue
            filtered_lines.append([[x1, y1, x2, y2]])

    if filtered_lines:
        for line in filtered_lines:
            x1, y1, x2, y2 = line[0]
            if abs(x2 - x1) < 10 or abs(y2 - y1) < 10:
                cv2.line(image, (x1, y1), (x2, y2), (255, 255, 255), thickness=3)

    if w > h:
        offset = w // 4
        cropped = image[:, offset:w - offset]
    else:
        offset = h // 4
        cropped = image[offset:h - offset, :]

    gray = cv2.cvtColor(cropped, cv2.COLOR_BGR2GRAY)
    _, thresh = cv2.threshold(gray, 200, 255, cv2.THRESH_BINARY_INV)

    kernel = cv2.getStructuringElement(cv2.MORPH_RECT, (10, 10))
    dilated = cv2.dilate(thresh, kernel, iterations=1)
    contours, _ = cv2.findContours(dilated, cv2.RETR_EXTERNAL, cv2.CHAIN_APPROX_SIMPLE)

    if contours:
        all_points = np.vstack(contours)
        x, y, w_box, h_box = cv2.boundingRect(all_points)
        padding = 20  # この値は、切り抜き画像を確認しつつ、適宜調整してください。
        if w > h:
            x += offset
        else:
            y += offset

        x1 = max(0, x - padding)
        y1 = max(0, y - padding)
        x2 = min(w, x + w_box + padding)
        y2 = min(h, y + h_box + padding)

        trimmed = image[y1:y2, x1:x2]
        trimmed_gray = cv2.cvtColor(trimmed, cv2.COLOR_BGR2GRAY)
        trimmed_blur = cv2.GaussianBlur(trimmed_gray, (3, 3), 0)

        h_trim, w_trim = trimmed_blur.shape[:2]
        scale = 20.0 / max(h_trim, w_trim)
        new_w = int(w_trim * scale)
        new_h = int(h_trim * scale)
        # resized = cv2.resize(trimmed_blur, (new_w, new_h), interpolation=cv2.INTER_AREA)
        resized = cv2.resize(trimmed_blur, (new_w, new_h), interpolation=cv2.INTER_NEAREST)

        canvas = np.full((28, 28), 255, dtype=np.uint8)
        x_offset = (28 - new_w) // 2
        y_offset = (28 - new_h) // 2
        canvas[y_offset:y_offset + new_h, x_offset:x_offset + new_w] = resized

        deskewed = deskew(canvas)

        # モーメントで中心を合わせる(修正: warpAffine に補間法と白背景を明示)
        M = cv2.moments(deskewed)
        if M['m00'] != 0:
            cx = int(M['m10'] / M['m00'])
            cy = int(M['m01'] / M['m00'])
            shift_x = 14 - cx
            shift_y = 14 - cy
            trans_mat = np.float32([[1, 0, shift_x], [0, 1, shift_y]])
            deskewed = cv2.warpAffine(deskewed, trans_mat, (28, 28), flags=cv2.INTER_NEAREST, borderValue=255)

        canvas = deskewed
    else:
        print(f"文字が検出されませんでした: {os.path.basename(image_path)}")
        canvas = np.full((28, 28), 255, dtype=np.uint8)

    # 保存(全角パスにも対応)
    save_path = os.path.join(output_folder, f"{index:04d}.png")
    is_success, encoded_img = cv2.imencode('.png', canvas)
    if is_success:
        encoded_img.tofile(save_path)
        print(f"{save_path} を保存しました。")
    else:
        print(f"{save_path} の保存に失敗しました。")

    index += 1

print("すべての画像の処理が完了しました。")
上のスクリプトで 28×28 ピクセルに整形して保存した大量の学習用データ画像を、次のスクリプトで処理して学習モデルを生成します。こちらについても、万一、コピペして試される場合は PATH をご自身の環境に合わせて変更してください(こちらも使用を推奨するものではありません。あくまでもご参考まで)。
import cv2
import numpy as np
from sklearn import svm
from sklearn.model_selection import train_test_split
import os
import joblib # モデルの保存と読み込みに使用
from skimage.feature import hog
from sklearn.svm import SVC
# カタカナのクラス
CATEGORIES = ["ア", "イ", "ウ", "エ", "オ"]
# Pathの中の日本語に対応
def imread(filename, flags=cv2.IMREAD_GRAYSCALE, dtype=np.uint8):
try:
n = np.fromfile(filename, dtype)
img = cv2.imdecode(n, flags)
return img
except Exception as e:
print(e)
return None
# HOG特徴量を抽出する関数
def extract_hog_features(img):
# 画像はすでに28x28の想定
features = hog(img,
orientations=9,
pixels_per_cell=(4, 4),
cells_per_block=(2, 2),
block_norm='L2-Hys')
return features
# データセットの準備(28x28 の手書きカタカナ画像)
def load_images_from_folder(folder, categories):
images = []
labels = []
for label, category in enumerate(categories):
path = os.path.join(folder, category)
print(f"Processing category: {category}, Path: {path}")
if not os.path.exists(path):
print(f"Warning: Path does not exist: {path}")
continue
for file in os.listdir(path):
if file.lower().endswith(('.png', '.jpg', '.jpeg')):
file_path = os.path.join(path, file)
try:
img = imread(file_path)
if img is not None:
img = cv2.resize(img, (28, 28))
hog_features = extract_hog_features(img)
images.append(hog_features)
labels.append(label)
else:
print(f"Failed to load image: {file_path}")
except Exception as e:
print(f"Error loading {file_path}: {e}")
else:
print(f"Skipping non-image file: {file}")
print(f"Loaded {len(images)} images")
return np.array(images), np.array(labels)
# データ読み込み
X, y = load_images_from_folder(r"C:\Python39-32\Images_tegaki\aiueo\Trimed", CATEGORIES)
if len(X) == 0:
raise ValueError("No images loaded. Please check the image files and paths.")
# 学習とテストの分割
X_train, X_test, y_train, y_test = train_test_split(X, y, test_size=0.2, random_state=42)
# SVM モデルの作成と学習
model = svm.SVC(kernel='linear')
model.fit(X_train, y_train)
# モデルを保存する
joblib.dump(model, 'katakana_hog_svm_model.pkl')
print("Model saved as 'katakana_hog_svm_model.pkl'")
# 予測用前処理(HOG版)
def preprocess_image(image_path):
img = imread(image_path)
h, w = img.shape
size = max(h, w)
square_img = np.full((size, size), 255, dtype=np.uint8)
x_offset = (size - w) // 2
y_offset = (size - h) // 2
square_img[y_offset:y_offset + h, x_offset:x_offset + w] = img
img_resized = cv2.resize(square_img, (28, 28))
hog_features = extract_hog_features(img_resized)
return hog_features
def predict_character(image_path):
img = preprocess_image(image_path)
model = joblib.load('katakana_hog_svm_model.pkl')
label = model.predict([img])[0]
return CATEGORIES[label]
# テスト画像の認識(テスト用の画像は実行中のスクリプトと同じフォルダに用意・保存する)
for image_path in [
"katakana_sample_a.jpg",
"katakana_sample_i.jpg",
"katakana_sample_u.jpg",
"katakana_sample_e.jpg",
"katakana_sample_o.jpg"
]:
result = predict_character(image_path)
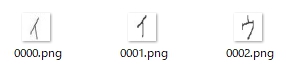
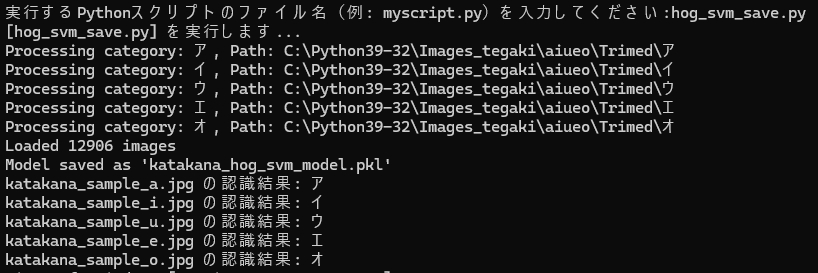
print(f"{os.path.basename(image_path)} の認識結果: {result}")テストに使用した画像は、次の通りです。文字の太さはテスト用に変化のあるものを選びました。


上記、学習モデルを作成するスクリプトの実行結果です。
3.気分は「写経」
次は、完成した学習モデルをDelphiから使えるようにすれば OK なのですが、この作業は毎回「写経」を行っているような気持ちを感じる作業です。・・・と、言う僕自身、写経の経験は皆無ですが・・・ この業界で一般的に使用される「写経」的意味合いと、ここでのそれは異なり、感覚的にはむしろ「修行」に近いものです。
次のコードを見ていただければ、なぜ「修行」なのか、ご理解いただけると思います。
procedure TFormCollaboration.btnAutoClick(Sender: TObject);
var
  strScrList:TStringList;
  strAnsList:TStringList;
  j:integer;
  intCols:integer;
  results: TArray<string>;
  s: string;
begin
  // ・・・ 略 ・・・
  try

    //Scriptを入れるStringList
    strScrList:=TStringList.Create;

    //手書き文字の認識結果
    strAnsList:=TStringList.Create;

    try

      strScrList.Add('import cv2');
      strScrList.Add('import numpy as np');
      strScrList.Add('import os');
      strScrList.Add('from glob import glob');
      strScrList.Add('import re');
      strScrList.Add('from skimage.feature import hog');
      strScrList.Add('import joblib');

      //カタカナラベル
      if (cmbAL.Text = 'ア') or (cmbAL.Text = 'イ') or (cmbAL.Text = 'ウ') or (cmbAL.Text = 'エ') or (cmbAL.Text = 'オ') then
      begin
        strScrList.Add('CATEGORIES = ["ア", "イ", "ウ", "エ", "オ"]');
      end;

      //○×ラベル
      if (cmbAL.Text = '○') or (cmbAL.Text = '×') then
      begin
        strScrList.Add('CATEGORIES = ["○", "×"]');
      end;

      //HOG特徴量抽出
      strScrList.Add('def extract_hog_features(img):');
      strScrList.Add('    features = hog(img, orientations=9, pixels_per_cell=(4, 4), cells_per_block=(2, 2), block_norm="L2-Hys")');
      strScrList.Add('    return features');

      //UTF-8 パス対応の画像読み込み
      strScrList.Add('def imread_utf8(path):');
      strScrList.Add('    stream = np.fromfile(path, dtype=np.uint8)');
      strScrList.Add('    return cv2.imdecode(stream, cv2.IMREAD_COLOR)');

      //傾き補正
      strScrList.Add('def deskew(img):');
      strScrList.Add('    m = cv2.moments(img)');
      strScrList.Add('    if abs(m["mu02"]) < 1e-2:');
      strScrList.Add('        return img.copy()');
      strScrList.Add('    skew = m["mu11"] / m["mu02"]');
      strScrList.Add('    M = np.float32([[1, skew, -0.5 * 28 * skew], [0, 1, 0]])');
      strScrList.Add('    return cv2.warpAffine(img, M, (28, 28), flags=cv2.WARP_INVERSE_MAP, borderValue=255)');

      //ファイル名から数値を抽出(crop_Img12.png → 12)
      strScrList.Add('def extract_number(path):');
      strScrList.Add('    filename = os.path.basename(path)');
      strScrList.Add('    match = re.search(r"crop_Img(\d+)", filename)');
      strScrList.Add('    return int(match.group(1)) if match else float("inf")');

      //文字認識処理
      strScrList.Add('def predict_character(img, model):');
      strScrList.Add('    hog_features = extract_hog_features(img)');
      strScrList.Add('    label = model.predict([hog_features])[0]');
      strScrList.Add('    return CATEGORIES[label]');

      //モデル読み込み
      //カタカナラベル
      if (cmbAL.Text = 'ア') or (cmbAL.Text = 'イ') or (cmbAL.Text = 'ウ') or (cmbAL.Text = 'エ') or (cmbAL.Text = 'オ') then
      begin
        strScrList.Add('model_path = r".\Python39-32\katakana_hog_svm_model.pkl"');
      end;

      //○×ラベル
      if (cmbAL.Text = '○') or (cmbAL.Text = '×') then
      begin
        strScrList.Add('model_path = r".\Python39-32\mb_hog_svm_model.pkl"');
      end;

      strScrList.Add('if not os.path.exists(model_path):');
      strScrList.Add('    raise FileNotFoundError(f"モデルファイルが見つかりません: {model_path}")');
      strScrList.Add('model = joblib.load(model_path)');

      //入力・出力フォルダ
      //strScrList.Add('base_path = r".\imgAuto\src"');
      strScrList.Add('input_folder = r".\imgAuto\src"');
      //strScrList.Add('folder_path = os.path.join(base_path, CORRECT_LABEL)');
      strScrList.Add('output_folder = os.path.join(input_folder, "'+ cmbAL.Text +'")');
      strScrList.Add('os.makedirs(output_folder, exist_ok=True)');

      //対象画像を取得
      strScrList.Add('image_extensions = ["*.jpg", "*.jpeg", "*.png"]');
      strScrList.Add('image_files = []');
      strScrList.Add('for ext in image_extensions:');
      strScrList.Add('    image_files.extend(glob(os.path.join(input_folder, ext)))');
      strScrList.Add('image_files.sort(key=extract_number)');

      strScrList.Add('results = []');

      strScrList.Add('index = 1');
      strScrList.Add('for image_path in image_files:');
      strScrList.Add('    image = imread_utf8(image_path)');
      strScrList.Add('    if image is None:');
      strScrList.Add('        print(f"読み込めない画像: {image_path}")');
      strScrList.Add('        continue');

      strScrList.Add('    h, w = image.shape[:2]');
      strScrList.Add('    gray_for_line = cv2.cvtColor(image, cv2.COLOR_BGR2GRAY)');
      strScrList.Add('    edges = cv2.Canny(gray_for_line, 50, 150, apertureSize=3)');

      strScrList.Add('    raw_lines = cv2.HoughLinesP(edges, 1, np.pi / 180, threshold=100, minLineLength=min(w, h) // 3, maxLineGap=10)');
      strScrList.Add('    filtered_lines = []');
      strScrList.Add('    if raw_lines is not None:');
      strScrList.Add('        for line in raw_lines:');
      strScrList.Add('            x1, y1, x2, y2 = line[0]');
      strScrList.Add('            angle = abs(np.arctan2(y2 - y1, x2 - x1) * 180 / np.pi)');
      strScrList.Add('            length = np.hypot(x2 - x1, y2 - y1)');
      strScrList.Add('            if (angle < 10 or angle > 170) and length < w // 2:');
      strScrList.Add('                continue');
      strScrList.Add('            filtered_lines.append([[x1, y1, x2, y2]])');

      strScrList.Add('    if filtered_lines:');
      strScrList.Add('        for line in filtered_lines:');
      strScrList.Add('            x1, y1, x2, y2 = line[0]');
      strScrList.Add('            if abs(x2 - x1) < 10 or abs(y2 - y1) < 10:');
      strScrList.Add('                cv2.line(image, (x1, y1), (x2, y2), (255, 255, 255), thickness=3)');

      strScrList.Add('    if w > h:');
      strScrList.Add('        offset = w // 4');
      strScrList.Add('        cropped = image[:, offset:w - offset]');
      strScrList.Add('    else:');
      strScrList.Add('        offset = h // 4');
      strScrList.Add('        cropped = image[offset:h - offset, :]');

      strScrList.Add('    gray = cv2.cvtColor(cropped, cv2.COLOR_BGR2GRAY)');
      strScrList.Add('    _, thresh = cv2.threshold(gray, 200, 255, cv2.THRESH_BINARY_INV)');

      strScrList.Add('    kernel = cv2.getStructuringElement(cv2.MORPH_RECT, (10, 10))');
      strScrList.Add('    dilated = cv2.dilate(thresh, kernel, iterations=1)');
      strScrList.Add('    contours, _ = cv2.findContours(dilated, cv2.RETR_EXTERNAL, cv2.CHAIN_APPROX_SIMPLE)');

      strScrList.Add('    if contours:');
      strScrList.Add('        all_points = np.vstack(contours)');
      strScrList.Add('        x, y, w_box, h_box = cv2.boundingRect(all_points)');

      //strScrList.Add('        padding = 20');
      strScrList.Add('        padding = 5');
      strScrList.Add('        if w > h:');
      strScrList.Add('            x += offset');
      strScrList.Add('        else:');
      strScrList.Add('            y += offset');

      strScrList.Add('        x1 = max(0, x - padding)');
      strScrList.Add('        y1 = max(0, y - padding)');
      strScrList.Add('        x2 = min(w, x + w_box + padding)');
      strScrList.Add('        y2 = min(h, y + h_box + padding)');

      strScrList.Add('        trimmed = image[y1:y2, x1:x2]');
      strScrList.Add('        trimmed_gray = cv2.cvtColor(trimmed, cv2.COLOR_BGR2GRAY)');
      strScrList.Add('        trimmed_blur = cv2.GaussianBlur(trimmed_gray, (3, 3), 0)');

      strScrList.Add('        h_trim, w_trim = trimmed_blur.shape[:2]');
      strScrList.Add('        scale = 20.0 / max(h_trim, w_trim)');
      strScrList.Add('        new_w = int(w_trim * scale)');
      strScrList.Add('        new_h = int(h_trim * scale)');
      strScrList.Add('        resized = cv2.resize(trimmed_blur, (new_w, new_h), interpolation=cv2.INTER_AREA)');

      strScrList.Add('        canvas = np.full((28, 28), 255, dtype=np.uint8)');
      strScrList.Add('        x_offset = (28 - new_w) // 2');
      strScrList.Add('        y_offset = (28 - new_h) // 2');
      strScrList.Add('        canvas[y_offset:y_offset + new_h, x_offset:x_offset + new_w] = resized');

      strScrList.Add('        deskewed = deskew(canvas)');

      strScrList.Add('        M = cv2.moments(deskewed)');
      strScrList.Add('        if M["m00"] != 0:');
      strScrList.Add('            cx = int(M["m10"] / M["m00"])');
      strScrList.Add('            cy = int(M["m01"] / M["m00"])');
      strScrList.Add('            shift_x = 14 - cx');
      strScrList.Add('            shift_y = 14 - cy');
      strScrList.Add('            trans_mat = np.float32([[1, 0, shift_x], [0, 1, shift_y]])');
      strScrList.Add('            deskewed = cv2.warpAffine(deskewed, trans_mat, (28, 28), borderValue=255)');

      strScrList.Add('        canvas = deskewed');
      strScrList.Add('        predicted_char = predict_character(canvas, model)');
      strScrList.Add('        results.append(str(predicted_char))');
      strScrList.Add('    else:');
      strScrList.Add('        results.append("")');
      strScrList.Add('        canvas = np.full((28, 28), 255, dtype=np.uint8)');

      strScrList.Add('    save_path = os.path.join(output_folder, f"{index:04d}.png")');
      strScrList.Add('    is_success, encoded_img = cv2.imencode(".png", canvas)');
      strScrList.Add('    if is_success:');
      strScrList.Add('        encoded_img.tofile(save_path)');
      strScrList.Add('    index += 1');

      strScrList.Add('var1.Value = ";".join(results)');

      try
        PythonEngine1.ExecStrings(strScrList);
      except
        on E: Exception do
        begin
          ShowMessage('Pythonスクリプトの実行中にエラーが発生しました: ' + E.Message);
          Exit;
        end;
      end;

      strAnsList.Clear;

      if Assigned(PythonDelphiVar1) then
      begin
        s := PythonDelphiVar1.ValueAsString;
        if s <> '' then
        begin
          results := SplitString(s, ';');
          for s in results do
            strAnsList.Add(s);
        end else begin
          ShowMessage('sは空欄!');
        end;
      end else begin
        ShowMessage('PythonDelphiVar1 が未定義です');
      end;

      if Assigned(PythonDelphiVar1) then
      begin
        for j := 0 to strAnsList.Count - 1 do
        begin
          if cmbAL.Text = strAnsList[j] then
            StringGrid1.Cells[intCols,j+1] := cmbRendo.Text
          else
            StringGrid1.Cells[intCols,j+1] := '0';
        end;
      end else begin
        ShowMessage('PythonDelphiVar1 が未定義です');
        Exit;
      end;

    finally
      //StringListの解放
      strScrList.Free;
      strAnsList.Free;
    end;

    // ・・・ 略 ・・・
end;
エンエンと続く strScrList.Add( ) そう! ここに Python のスクリプトの1行1行をコピペして行くのです。20 行目くらいから、だんだん、まぶたが重くなり・・・、50 行目まで到達する頃には、意識が朦朧としてきて・・・、残り数行という段階で、ほぼ涅槃の境地に・・・
「涅槃」とは、「一切の煩悩から解脱した、不生不滅の高い境地」であり、「煩悩の火が消え、人間が持っている本能から解放され、心の安らぎを得た状態のこと」をいうのだそうです。
・・・
失礼しました。間違えました。僕のは単に眠くなり、もう何も考えられない状態になっただけです。
何はともあれ、いずれにしてもそのいちばん心が「無」になった状態で、最大の難関が待ち受けています。それは何かというと、Python 側から Delphi 側への判定結果の受け渡しの手続きの記述です。
元々の Python 側でのスクリプトは・・・
        predicted_char = predict_character(canvas, model)
        print(f"{os.path.basename(image_path)} → 認識結果: {predicted_char}")
    else:
        print(f"{os.path.basename(image_path)} → 文字が検出されませんでした。")
ここを、次のように書き換えます。※ results リストは予め空になるよう初期化しておきます。
      strScrList.Add('        predicted_char = predict_character(canvas, model)');
      strScrList.Add('        results.append(str(predicted_char))');
      strScrList.Add('    else:');
      strScrList.Add('        results.append("")');
最後に Delphi 側へ、プレゼント☆
strScrList.Add('var1.Value = ";".join(results)');で、Delphi 側では、results に保存されている認識結果を StringList で受け取って、StringGrid に得点を表示します。
      strAnsList.Clear;

      if Assigned(PythonDelphiVar1) then
      begin
        s := PythonDelphiVar1.ValueAsString;
        if s <> '' then
        begin
          results := SplitString(s, ';');
          for s in results do
            strAnsList.Add(s);
        end else begin
          ShowMessage('sは空欄!');
        end;
      end else begin
        ShowMessage('PythonDelphiVar1 が未定義です');
      end;

      if Assigned(PythonDelphiVar1) then
      begin
        for j := 0 to strAnsList.Count - 1 do
        begin
          if cmbAL.Text = strAnsList[j] then
            StringGrid1.Cells[intCols,j+1] := cmbRendo.Text  //得点を指定
          else
            StringGrid1.Cells[intCols,j+1] := '0';
        end;
      end else begin
        ShowMessage('PythonDelphiVar1 が未定義です');
        Exit;
      end;
もちろん、PATH も、exe のある階層が起点となるように修正して・・・
      //入力・出力フォルダ (cmbAL = ComboBox Answer Label)
      strScrList.Add('input_folder = r".\imgAuto\src"');
      strScrList.Add('output_folder = os.path.join(input_folder, "'+ cmbAL.Text +'")');
      strScrList.Add('os.makedirs(output_folder, exist_ok=True)');
こうして、なんとか、エラーを出さずに、プログラムが「動く」状態にまで仕上げました。
追記_20250421
ふと思ったのですが、Form に非表示の TMemo を1つおいて、そこに Python のスクリプトをコピペして、必要な部分のみ上記のように変更すれば、
もっとラクできたかな・・・
みたいな気が。
でも、「修行」には「修行」で、また、
別の意味と価値がある
ような・・・ 気も。
ただ、このプログラムの・・・ 究極の目的は、採点者が単に「ラクする」ためだけの・・・ 採点環境を実現することにある・・・ という事実。
いや、それは「ヒトと機械との美しき協働」の穿った見方。
こんな相反する「矛盾」を、感じるのは作者である僕だけ?
まぁ、全部をまとめて言えば・・・
人生は必ず ± 0になる
ということでしょうか?
なお、Python4Delphi の設定と使い方の詳細は、次の過去記事をご参照ください。
早速、冒頭に紹介したのと同じデータを読んで、動作確認。
あまりドキドキせずに「自動」ボタンをクリックすることができました!
ボタンの Caption は「自動」より、「実行」の方がよかったかな・・・?
気になっていた切り出し画像の縦横比も・・・
縦横比が変化しないようにスクリプトを修正できました!
前回は、正しく読めなかった「ウ」も、この通り読めています。
長かった・・・ けれど、ここまで来ることができました☆
あきらめなくて、よかった・・・
イイ感じというか、エエ感じというか・・・
そして、Flattening 特徴量抽出で作成した学習モデルでは読めなかった「オ」・・・ ですが、
HOG特徴量抽出で作成した学習モデルは、しっかり読んでくれました!
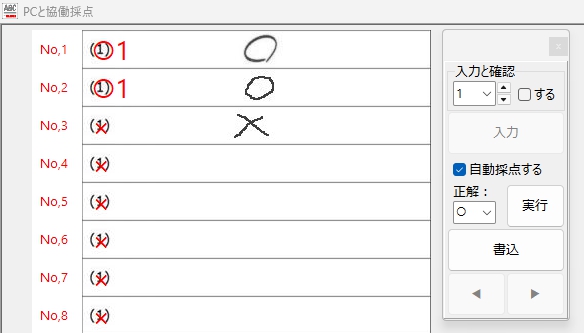
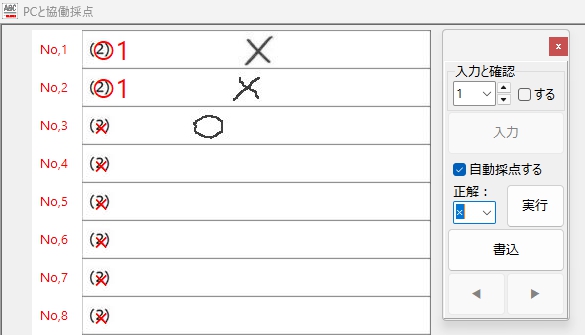
もちろん、「○・×」判定も・・・ 余裕でOK!
(何が余裕なのかは、僕自身、わかってないですが)
最初に正解ラベル「○」の場合、
次に、正解ラベル「×」の場合、
これなら販売できそうです。
まぁ買ってくれる人は、
いないと思いますが・・・ *(^_^)*♪
4.今後の抱負
テストとは、とても言えないような、ほんとうに取り急ぎの採点試行結果ですので、これだけを持って公開してOK!とは、とても思えません。実際の採点現場で性能を確認できたら、自作のデジタル採点ソフト AC_Reader のバージョンアップ版として、この blog の未来記事で公開したいと思います。
5.まとめ
手書き文字認識に scikit-learn を使って成功するためには・・・
(1)特徴量抽出前の学習データ作成を丁寧に行い、機械学習しやすい環境を整える。
(2)学習データが同じである場合、Flattening より HOG 特徴量抽出の方が良い結果を出せた。
(3)誤りがあれば必ず修正し、成功するまで、絶対にあきらめないこと。
6.お願いとお断り
このサイトの内容を利用される場合は、自己責任でお願いします。記載した内容(プログラムコードを含む)を利用した結果、利用者および第三者に損害が発生したとしても、このサイトの管理者は一切責任を負えません。予め、ご了承ください。