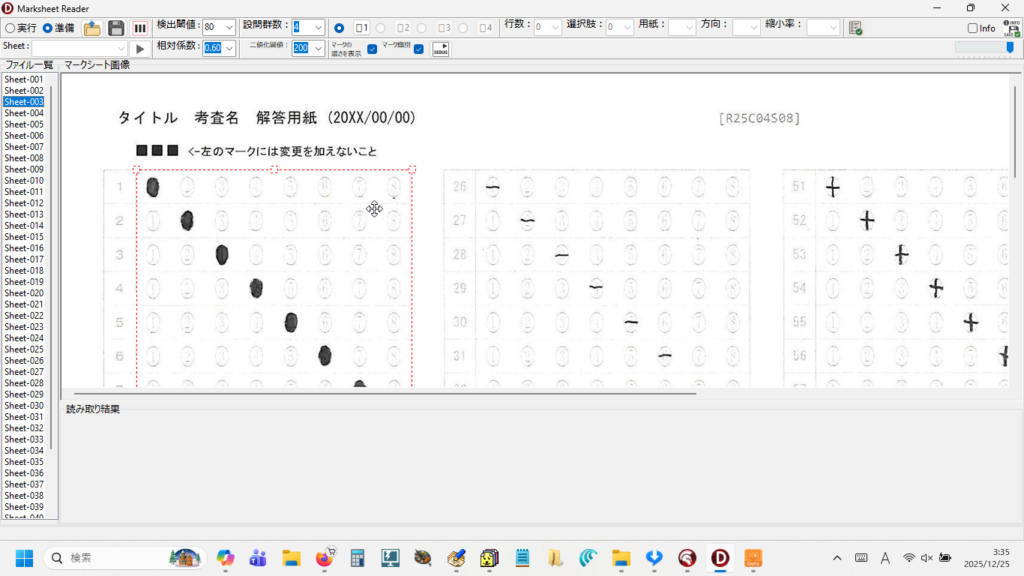
( 50 設問のマークシート 40 枚を1秒程度で読んでくれます!)
僕にはずっと以前から、どうしてもやりたかったことが1つあって、それは Delphi 用の OpenCV ラッパー(OpenCV の C/C++ API を Delphi から呼び出すための橋渡しするプログラム)を使って、軽量かつ超高速なマークシートリーダーを作ること。
初めてマークシートリーダーのプログラムを書いた時は、もうそれが動いただけで本当にうれしかった。マークシート 40 枚を読み取るのにたとえ数分!かかっても大満足だった。
でも、だんだん、もう少し、早くできないかな・・・って思うようになって、PythonForDelphi を使ってバックグラウンドで Python 用の OpenCV を動かして、最初に作ったものよりは・・・かなり高速に動作するバージョンアップ版(?)をなんとか完成させた。
あの頃はもちろん AI なんてなかったし、Google 先生だけが頼りで、わからないことを解決して前へ進むのに今の何倍も時間が必要だったけれど、読み取り速度がどうあろうと、期待した通りにちゃんと動くマークシートリーダーが出来たことが、むちゃくちゃうれしかった。ただ、OpenCV をはじめとして、どうしても必要なライブラリをインストールした Embeddable Python は 158 MB くらいになっちゃって(泣)。
Zip ファイルを展開するにも時間がかかるし、それより何より、初回起動時に Windows による DLL のチェックが走って、マシンによっては数分間フリーズ状態が発生して・・・
いちばんイイのは、Delphi 用の OpenCV ラッパーを使ってプログラムを書けばいいんだって、頭ではわかっていたんだけれど、どうしてもそれが出来なかった。なぜかって言うと、答えは簡単。僕には Delphi 用の OpenCV ラッパーを PC に導入して動かすことが、どうしても出来なかったんだ。
エラーが、たくさん、出て。そして、それを自力で解決することができなかった・・・。
先日、ふと思い立って、マークシートリーダーを作るために必要な必要最低限の OpenCV ラッパーの構成を AI に訊いてみた。少し苦労したけど、なんとか、最小構成の OpenCV ラッパーを僕の PC に導入することに成功。夢の実現にやっと一歩、近づけた。
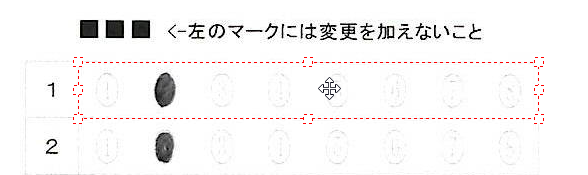
そこで、新しいマークシートリーダーを作り始める前に準備しておこうと思ったのが、今回紹介する PaintBox で作ったラバーバンド。マークシートのマーク欄のブロックの座標を取得する際に、これがどうしても必要なんだけれど、夢に描いたような・・・1ピクセル単位で大きさの微調整が可能で、その内部をドラッグすれば、なめらかに移動も出来るラバーバンドは自分史的にはまだ未実装・・・。ずっと、ずっと、長い間、微調整が可能な、思った通りに動いてくれるラバーバンドが作りたかった。
今回、あくまでも自分的には・・・ですが、かなり満足できるものができたので、どなた様かの参考になればと思い、自分自身の備忘録も兼ねて、ここに書いておくことにしました。
【もくじ】
1.機能
ラバーバンドに持たせたい機能は次の通り。
・マウスで TImage 上をドラッグして、ラバーバンド描画(赤の細い点線を使用)
・四隅+縦横中央の 8 ハンドル(グラブハンドル)でサイズ変更可能
・ラバーバンド内をクリックで「そのままの大きさ」でドラッグ移動
・ドラッグ中に自動スクロール(ドラッグ中にスクロール領域の端に来たらスクロール)
・描画終了(MouseUp)でラバーバンドの画像座標を出力
・ラバーバンド内クリックでフォーカスを取得
・矢印キーで、その向きに 1px 移動、Shift+矢印で辺ごとに 1px 拡大/縮小
・ラバーバンド外クリックで消去
2.実装
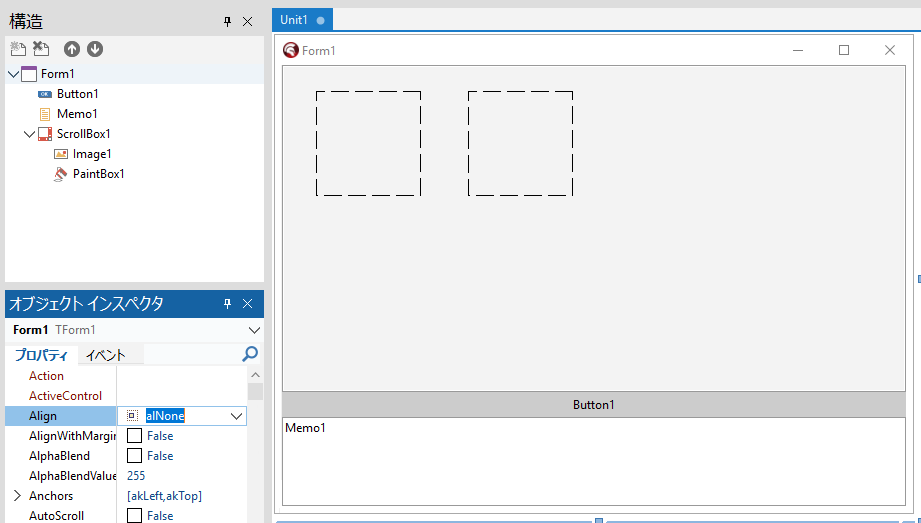
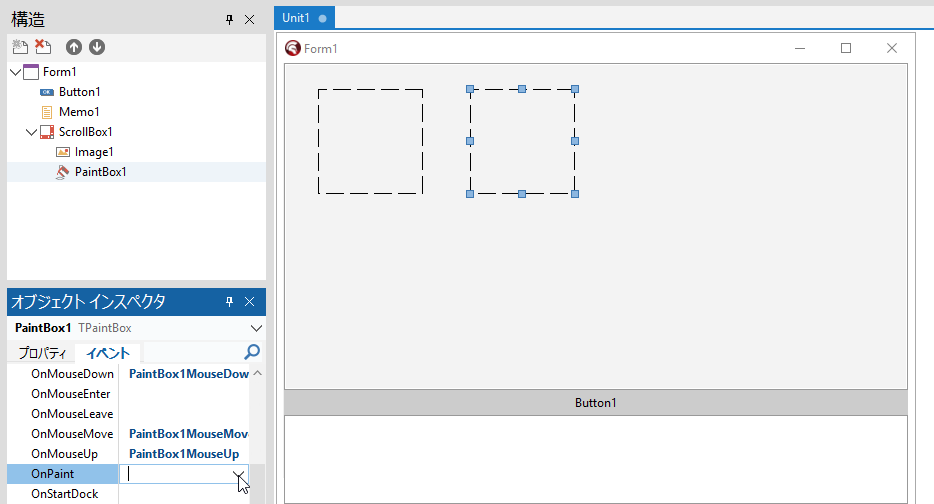
構造ペインで親子関係も確認
Delphi を起動して、「ファイル」→「新規作成」→「Windows VCL アプリケーション」
Form1 上に、ScrollBox1 を置いて、その上に Image1 と PaintBox1 を置く。
あと Button1 と Memo1 も用意(見た目にこだわるなら、Memo1の lines プロパティを開いて、Memo1 というデフォルトで入っている文字列を消去しておいた方がいいかも?)。
Align の設定は、特にこだわりがなければ、Memo1 は alBottom に、続けて Button1 も alBottom に設定、ScrollBox1 は alClient に設定する。
Form を常に最大化して表示したければ、Form1 の WindowState プロパティを wsMaximized にする。
ここで1回実行(F9)して exe を作り、exe と同じ場所に任意のBMP(ビットマップ)画像を置いておく。
interface 部のコードは次の通り。
unit Unit1;

interface

uses
  Winapi.Windows, Winapi.Messages, System.SysUtils, System.Variants, System.Classes, Vcl.Graphics,
  Vcl.Controls, Vcl.Forms, Vcl.Dialogs, Vcl.ExtCtrls, Vcl.StdCtrls;

//ラバーバンド用に宣言
type
  THandlePos = (hpNone, hpLeftTop, hpTop, hpRightTop, hpRight,
                hpRightBottom, hpBottom, hpLeftBottom, hpLeft);

type
  TForm1 = class(TForm)
変数は次のように準備する。
  private
    { Private 宣言 }
    FBitmap: TBitmap;

    //Rubber band
    FRubberBandActive: Boolean;
    FHasRubber: Boolean;
    FRubberRect: TRect;

    FDragging: Boolean;
    FModeMoveSize: Boolean;
    FDragHandle: THandlePos;

    FStartPointImg: TPoint;

    //Zoom
    FZoom: Double;  //将来の拡張に備えて準備したもの

    //Scroll
    FAutoScrollMargin: Integer;
    FAutoScrollStep: Integer;
まずは、FormCreate 手続きを作成。
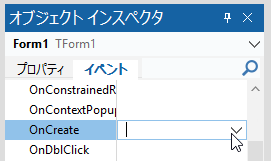
次の内容を記述する。
procedure TForm1.FormCreate(Sender: TObject);
begin
  //フォームがキーを受け取る
  Form1.KeyPreview := True;

  FBitmap := TBitmap.Create;
  Image1.Stretch := False;
  Image1.AutoSize := False;
  Image1.Center := False;

  //初期設定
  Image1.Align := AlNone;
  Image1.Stretch := False;
  Image1.AutoSize := False;
  Image1.Center := False;

  FRubberBandActive := False;
  FHasRubber := False;
  FDragging := False;
  FDragHandle := hpNone;
  FModeMoveSize := False;

  FZoom := 1.0;  //拡大表示が将来必要になった時への備え

  FAutoScrollMargin := 16;  //適宜変更してください
  FAutoScrollStep := 10;

  //PaintBox を Image1 上に重ねる
  PaintBox1.Parent := ScrollBox1;
  PaintBox1.Left := Image1.Left;
  PaintBox1.Top := Image1.Top;
  PaintBox1.Width := Image1.Width;
  PaintBox1.Height := Image1.Height;
  PaintBox1.BringToFront;
  //透明に見せる設定
  PaintBox1.ControlStyle := PaintBox1.ControlStyle - [csOpaque];

  //PaintBox を Image1 上に重ねる
  PaintBox1.Parent := ScrollBox1;
  PaintBox1.Left := Image1.Left;
  PaintBox1.Top := Image1.Top;
  PaintBox1.Width := Image1.Width;
  PaintBox1.Height := Image1.Height;
end;
続いて、Create と同様にして FormDestroy 手続きを準備。ビットマップを解放し忘れたらたいへんだ。
procedure TForm1.FormDestroy(Sender: TObject);
begin
  if assigned(FBitmap) then
  begin
    FBitmap.Free;
  end;
end;
次に、Button1 をダブルクリックして、Button1Click 手続きを作成。
procedure TForm1.Button1Click(Sender: TObject);
begin

  //読み込み(ビットマップ)
  FBitmap.LoadFromFile('Sheet-001.bmp');

  //ScrollBox のスクロール位置をリセット
  ScrollBox1.HorzScrollBar.Position := 0;
  ScrollBox1.VertScrollBar.Position := 0;

  Image1.Align := AlNone;
  //画像をクリア
  Image1.Picture.Graphic := nil;
  Image1.Stretch := False;
  Image1.AutoSize := False;  //UpdateImageDisplaySize に任せる
  Image1.Center := False;
  Image1.Left := 0;  //ScrollBox 左上に合わせる
  Image1.Top := 0;

  //画像を表示
  Image1.Picture.Bitmap.Assign(FBitmap);

  UpdateImageDisplaySize;

  Image1.Invalidate;
  Memo1.Lines.Add('Loaded: ' + 'Sheet-001.bmp');

  FRubberBandActive := not FRubberBandActive;
  if not FRubberBandActive then
  begin
    FHasRubber := False;
    PaintBox1.Invalidate;
  end;

  PaintBox1.BringToFront;

end;
UpdateImageDisplaySize が「未定義の識別子エラー」になるので、private 宣言部に UpdateImageDisplaySize 手続きを宣言。
  private
    { Private 宣言 }
    ・・・(省略)・・・
    procedure UpdateImageDisplaySize;
Shift+Ctrl+C して、次のように記述する。
procedure TForm1.UpdateImageDisplaySize;
var
  W, H: Integer;
begin

  if not Assigned(FBitmap) then Exit;

  //拡大後サイズ
  W := Round(FBitmap.Width  * FZoom);
  H := Round(FBitmap.Height * FZoom);

  //Image
  Image1.Align    := alNone;
  Image1.AutoSize := False;
  Image1.Stretch  := False;
  Image1.SetBounds(0, 0, W, H);

  //PaintBox(完全同期)
  PaintBox1.Align := alNone;
  PaintBox1.SetBounds(0, 0, W, H);

  PaintBox1.Invalidate;
end;
実行(F9)して、動作確認。フォームが表示されたら、Button1 をクリックして、exe と同じ場所に置いたビットマップ画像が表示されることを確認。右上の閉じるボタンをクリックして、終了。

いよいよラバーバンド作成本番へ。
Form1 上の PaintBox をクリックして選択し、OnMouseDown 手続きを作成。
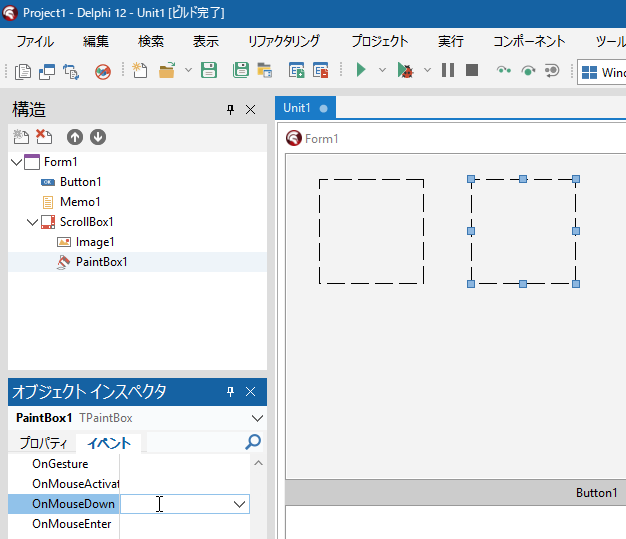
コードは、次の通り。「未定義の識別子エラー」が複数出るが、未作成の手続きや関数があるためなので、その手続きや関数を続けて作成する。
procedure TForm1.PaintBox1MouseDown(Sender: TObject; Button: TMouseButton;
  Shift: TShiftState; X, Y: Integer);
var
  imgP: TPoint;
begin
  if not FRubberBandActive then Exit;

  imgP := ScreenToImagePoint(X, Y);

  if FHasRubber then
  begin
    //ラバーバンド内クリック
    if PointInRectInclusive(FRubberRect, imgP) then
    begin
      FDragHandle := GetHandleAtPosImg(imgP);
      FModeMoveSize := (FDragHandle = hpNone);
      FDragging := True;
      FStartPointImg := imgP;

      //追加:掴んだハンドルに応じてカーソルを確定
      if FDragHandle <> hpNone then
        PaintBox1.Cursor := CursorFromHandle(FDragHandle)
      else
        PaintBox1.Cursor := crSizeAll;  //内部クリック=移動

      ScrollBox1.SetFocus;
      Exit;
    end
    else
    begin
      //外クリック → 削除
      FHasRubber := False;
      PaintBox1.Invalidate;
      UpdateRubberCursor;  //カーソルを戻す
      Exit;
    end;
  end;

  //新規作成
  FDragging := True;
  FModeMoveSize := False;
  FDragHandle := hpNone;
  FStartPointImg := imgP;
  FRubberRect := Rect(imgP.X, imgP.Y, imgP.X, imgP.Y);

  //新規作成中は十字カーソル固定
  PaintBox1.Cursor := crCross;

  PaintBox1.Invalidate;
end;
エラーをひとつずつ潰す。最初に、private 宣言部に ScreenToImagePoint 関数を宣言して、Shift+Ctrl+C を押し下げ。
この後、何度も private 宣言部に戻る必要があるので、変数宣言の最後の方(手続き・関数宣言の最初)あたりをクリックして、Shift+Ctrl+1 を実行しておけば、Ctrl+1 ですぐに private 宣言部に戻ってこれるのでとても便利。
  private
    { Private 宣言 }
    FBitmap: TBitmap;

    // Rubber band
    FRubberBandActive: Boolean;
    ・・・(省略)・・・

    function ScreenToImagePoint(X, Y: Integer): TPoint;
で、次のように記述。
function TForm1.ScreenToImagePoint(X, Y: Integer): TPoint;
begin
  Result.X := Round(X / FZoom);
  Result.Y := Round(Y / FZoom);
end;
次は、PointInRectInclusive 関数を作成。まず宣言して、
  private
    { Private 宣言 }
    ・・・(省略)・・・
    function ScreenToImagePoint(X, Y: Integer): TPoint;
    function PointInRectInclusive(const R: TRect; const P: TPoint): Boolean;
Shift+Ctrl+C して、次のように記述する。
function TForm1.PointInRectInclusive(const R: TRect; const P: TPoint): Boolean;
begin
  Result :=
    (P.X >= R.Left) and (P.X <= R.Right) and
    (P.Y >= R.Top)  and (P.Y <= R.Bottom);
end;
次は、GetHandleAtPosImg 関数を宣言。
  private
    { Private 宣言 }
    ・・・(省略)・・・
    function GetHandleAtPosImg(const P: TPoint): THandlePos;
こちらも Shift+Ctrl+C して、次のように記述する。
function TForm1.GetHandleAtPosImg(const P: TPoint): THandlePos;
const
  HSIZE = 8;
var
  cx: Integer;
begin

  Result := hpNone;

  // Top
  cx := (FRubberRect.Left + FRubberRect.Right) div 2;
  if Abs(P.Y - FRubberRect.Top) <= HSIZE then
  begin
    if Abs(P.X - FRubberRect.Left) <= HSIZE then Exit(hpLeftTop);
    if Abs(P.X - FRubberRect.Right) <= HSIZE then Exit(hpRightTop);
    if Abs(P.X - cx) <= HSIZE then Exit(hpTop);
  end;

  // Bottom
  if Abs(P.Y - FRubberRect.Bottom) <= HSIZE then
  begin
    if Abs(P.X - FRubberRect.Left) <= HSIZE then Exit(hpLeftBottom);
    if Abs(P.X - FRubberRect.Right) <= HSIZE then Exit(hpRightBottom);
    if Abs(P.X - cx) <= HSIZE then Exit(hpBottom);
  end;

  //Left /Right
  if Abs(P.X - FRubberRect.Left) <= HSIZE then Exit(hpLeft);
  if Abs(P.X - FRubberRect.Right) <= HSIZE then Exit(hpRight);

end;
次は、CursorFromHandle 関数を宣言。
  private
    { Private 宣言 }
    ・・・(省略)・・・
    function CursorFromHandle(H: THandlePos): TCursor;
こちらも Shift+Ctrl+C して、次のように記述する。
function TForm1.CursorFromHandle(H: THandlePos): TCursor;
begin
  case H of
    hpLeft, hpRight:
      Result := crSizeWE;

    hpTop, hpBottom:
      Result := crSizeNS;

    hpLeftTop, hpRightBottom:
      Result := crSizeNWSE;

    hpRightTop, hpLeftBottom:
      Result := crSizeNESW;

    else
      Result := crDefault;
  end;
end;
残りのエラーはあとひとつ。UpdateRubberCursor;
  private
    { Private 宣言 }
    ・・・(省略)・・・
    procedure UpdateRubberCursor;
Shift+Ctrl+C して、次のように記述する。
procedure TForm1.UpdateRubberCursor;
begin
  if FRubberBandActive then
    PaintBox1.Cursor := crCross
  else
    PaintBox1.Cursor := crDefault;
end;
次は、PaintBox の OnMouseMove 手続きを作成。
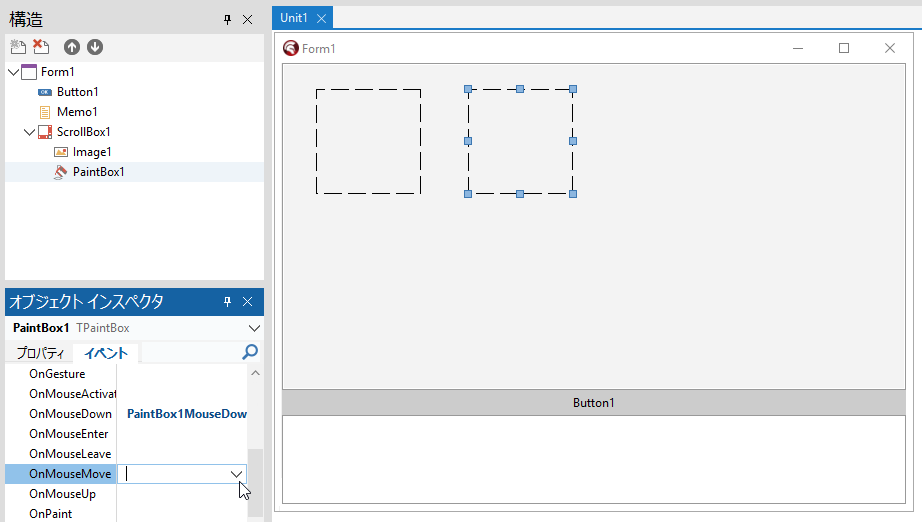
こちらは、次のように記述する。
procedure TForm1.PaintBox1MouseMove(Sender: TObject; Shift: TShiftState; X,
  Y: Integer);
var
  curImg: TPoint;
  screenPt: TPoint;
  dx, dy: Integer;
  H: THandlePos;
begin
  if not FRubberBandActive then Exit;

  curImg := ScreenToImagePoint(X, Y);

  //ドラッグ中のみ自動スクロール
  if FDragging then
  begin
    screenPt := PaintBox1.ClientToScreen(Point(X, Y));
    AutoScrollIfNeededFromScreen(screenPt);
  end;

  //矢印キーの形状をより適切に
  if not FDragging then
  begin
    if FHasRubber and PointInRectInclusive(FRubberRect, curImg) then
    begin
      H := GetHandleAtPosImg(curImg);
      if H <> hpNone then
        PaintBox1.Cursor := CursorFromHandle(H)
      else
        PaintBox1.Cursor := crSizeAll;  //内部=移動
    end
    else
      PaintBox1.Cursor := crCross; //ラバーバンド描画モード
    Exit;
  end;

  dx := curImg.X - FStartPointImg.X;
  dy := curImg.Y - FStartPointImg.Y;

  if FModeMoveSize then
  begin
    FRubberRect.Offset(dx, dy);
  end
  else
  begin
    case FDragHandle of
      hpLeftTop:
      begin
        FRubberRect.Left := curImg.X;
        FRubberRect.Top  := curImg.Y;
      end;

      hpTop:
        FRubberRect.Top := curImg.Y;

      hpRightTop:
      begin
        FRubberRect.Right := curImg.X;
        FRubberRect.Top   := curImg.Y;
      end;

      hpRight:
        FRubberRect.Right := curImg.X;

      hpRightBottom:
      begin
        FRubberRect.Right  := curImg.X;
        FRubberRect.Bottom := curImg.Y;
      end;

      hpBottom:
        FRubberRect.Bottom := curImg.Y;

      hpLeftBottom:
      begin
        FRubberRect.Left   := curImg.X;
        FRubberRect.Bottom := curImg.Y;
      end;

      hpLeft:
        FRubberRect.Left := curImg.X;

      hpNone:
      begin
        FRubberRect.Right  := curImg.X;
        FRubberRect.Bottom := curImg.Y;
      end;
    end;
  end;

  FStartPointImg := curImg;

  NormalizeRect(FRubberRect);

  //画像エリアを超えないよう制限
  if FRubberRect.Left < 0 then FRubberRect.Left := 0;
  if FRubberRect.Top < 0 then FRubberRect.Top := 0;
  if FRubberRect.Right > FBitmap.Width then FRubberRect.Right := FBitmap.Width;
  if FRubberRect.Bottom > FBitmap.Height then FRubberRect.Bottom := FBitmap.Height;

  PaintBox1.Invalidate;

end;
AutoScrollIfNeededFromScreen と、NormalizeRect が「未定義の識別子エラー」になるので、こちらもprivate 宣言部に手続きを宣言して、
  private
    { Private 宣言 }
    ・・・(省略)・・・
    procedure AutoScrollIfNeededFromScreen(const ScreenPt: TPoint);
    procedure NormalizeRect(var R: TRect);
Shift+Ctrl+C して、それぞれ次のように記述する。
procedure TForm1.AutoScrollIfNeededFromScreen(const ScreenPt: TPoint);
var
  pt: TPoint;
begin
  pt := ScreenToClient(ScreenPt);

  if pt.X < FAutoScrollMargin then
    ScrollBox1.HorzScrollBar.Position :=
      ScrollBox1.HorzScrollBar.Position - FAutoScrollStep
  else if pt.X > ScrollBox1.ClientWidth - FAutoScrollMargin then
    ScrollBox1.HorzScrollBar.Position :=
      ScrollBox1.HorzScrollBar.Position + FAutoScrollStep;

  if pt.Y < FAutoScrollMargin then
    ScrollBox1.VertScrollBar.Position :=
      ScrollBox1.VertScrollBar.Position - FAutoScrollStep
  else if pt.Y > ScrollBox1.ClientHeight - FAutoScrollMargin then
    ScrollBox1.VertScrollBar.Position :=
      ScrollBox1.VertScrollBar.Position + FAutoScrollStep;
end;
procedure TForm1.NormalizeRect(var R: TRect);
var
Ll, Lt, Lr, Lb: Integer;
begin
Ll := R.Left; Lt := R.Top;
Lr := R.Right; Lb := R.Bottom;
R.Left := Min(Ll, Lr);
R.Top := Min(Lt, Lb);
R.Right := Max(Ll, Lr);
R.Bottom := Max(Lt, Lb);
end;ここで、今度は Min と Max が「未定義の識別子エラー」になるので、uses に System.Math を追加する。
unit Unit1;

interface

uses
  Winapi.Windows, Winapi.Messages, System.SysUtils, System.Variants,
  System.Classes, Vcl.Graphics, Vcl.Controls, Vcl.Forms, Vcl.Dialogs,
  Vcl.ExtCtrls, Vcl.StdCtrls,  System.Math;
次は、PaintBox の OnMouseUp 手続きを作成。
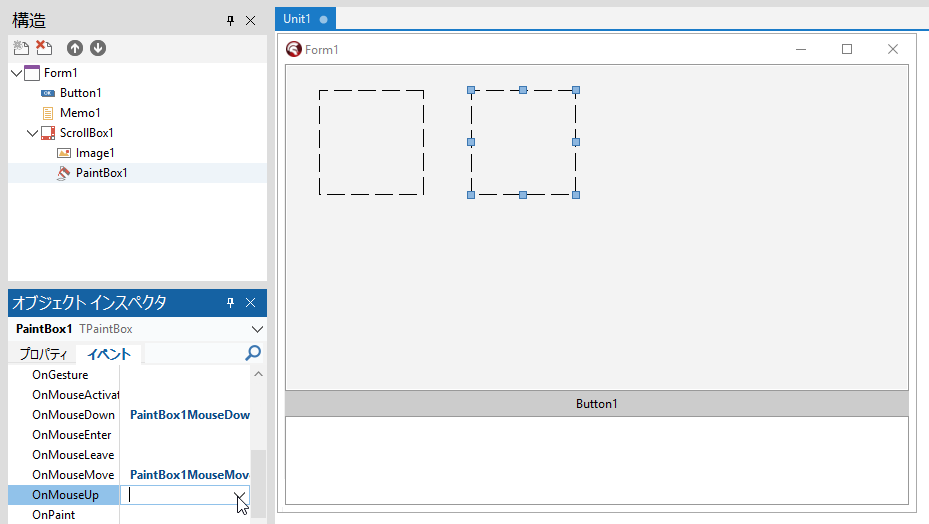
次の内容を記述。
procedure TForm1.PaintBox1MouseUp(Sender: TObject; Button: TMouseButton;
  Shift: TShiftState; X, Y: Integer);
begin
  if not FRubberBandActive then Exit;
  if not FDragging then Exit;

  FDragging := False;
  NormalizeRect(FRubberRect);
  FHasRubber := True;

  //ドラッグ終了後は状態に応じてカーソルを戻す
  UpdateRubberCursor;

  //矢印キー操作を有効にする
  ActiveControl := nil;

  EnsureRubberVisible;
  PaintBox1.Invalidate;

  //ラバーバンドの座標を取得
  UpdateRubberInfo('Mouse ');
end;
ここでは、EnsureRubberVisible と、 UpdateRubberInfo が「未定義の識別子エラー」になるので、private 宣言部で、EnsureRubberVisible 手続きと UpdateRubberInfo 手続きを宣言。
  private
    { Private 宣言 }
    ・・・(省略)・・・
    procedure EnsureRubberVisible;
    procedure UpdateRubberInfo(const Prefix: string = '');
次のように、それぞれの手続きを記述する。
procedure TForm1.EnsureRubberVisible;
var
  R: TRect;
  p: TPoint;
begin
  R := ImageToScreenRect(FRubberRect);
  p := PaintBox1.ClientToScreen(Point(R.Left, R.Top));
  AutoScrollIfNeededFromScreen(p);
end;
procedure TForm1.UpdateRubberInfo(const Prefix: string);
var
R: TRect;
begin
if not FHasRubber then Exit;
R := FRubberRect;
if Memo1.Lines.Count = 0 then
Memo1.Lines.Add('')
else
Memo1.Lines[Memo1.Lines.Count - 1] := ''; //最終行を書き換える
Memo1.Lines[Memo1.Lines.Count - 1] :=
Format('%sL:%d T:%d W:%d H:%d',
[Prefix, R.Left, R.Top, R.Right - R.Left, R.Bottom - R.Top]);
end;
すると、EnsureRubberVisible 手続きの ImageToScreenRect が「未定義の識別子エラー」になるので、これも潰す。
  private
    { Private 宣言 }
    ・・・(省略)・・・
    function ImageToScreenRect(const R: TRect): TRect;
Shift+Ctrl+C して、次のように記述する。
function TForm1.ImageToScreenRect(const R: TRect): TRect;
begin
  Result.Left   := Round(R.Left   * FZoom);
  Result.Top    := Round(R.Top    * FZoom);
  Result.Right  := Round(R.Right  * FZoom);
  Result.Bottom := Round(R.Bottom * FZoom);
end;
次は、Form1 の OnKeyDown 手続きを作成。まず、Form1 のタイトルバー付近をクリックして、Form1 をアクティブにしておき、
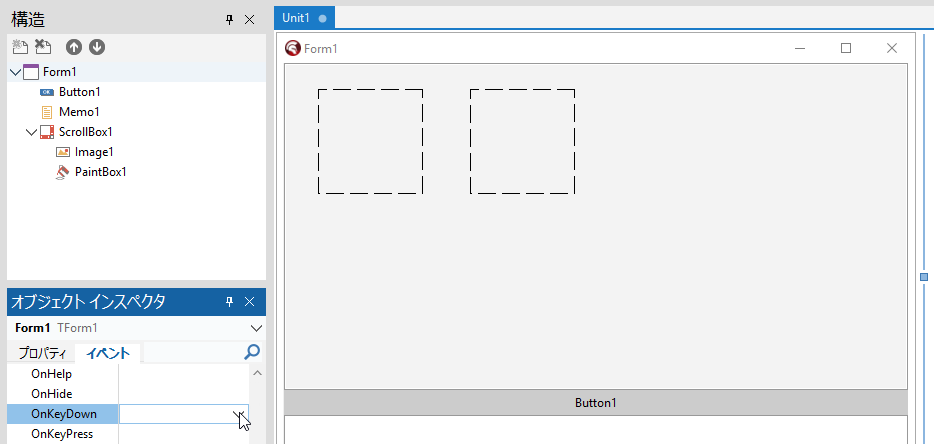
次のように記述する。
procedure TForm1.FormKeyDown(Sender: TObject; var Key: Word;
  Shift: TShiftState);
begin

  if not (FRubberBandActive and FHasRubber) then Exit;

  case Key of
    VK_LEFT:
      if ssShift in Shift then Dec(FRubberRect.Right)
      else FRubberRect.Offset(-1, 0);

    VK_RIGHT:
      if ssShift in Shift then Inc(FRubberRect.Right)
      else FRubberRect.Offset(1, 0);

    VK_UP:
      if ssShift in Shift then Dec(FRubberRect.Bottom)
      else FRubberRect.Offset(0, -1);

    VK_DOWN:
      if ssShift in Shift then Inc(FRubberRect.Bottom)
      else FRubberRect.Offset(0, 1);
  end;

  NormalizeRect(FRubberRect);
  PaintBox1.Invalidate;

  //ラバーバンドの座標を取得
  UpdateRubberInfo('Key ');

end;
次は、PaintBox1Paint 手続きを作成。こちらは PaintBox1 をクリックしてアクティブにしておいて、
次の内容を記述。
procedure TForm1.PaintBox1Paint(Sender: TObject);
var
  C: TCanvas;
  rS: TRect;
  pLT, pRT, pRB, pLB, pT, pB, pL, pR: TPoint;

  procedure DrawHandle(const P: TPoint);
  var
    R: TRect;
    S: Integer;
  begin
    S := 5;
    R := Rect(P.X - S, P.Y - S, P.X + S, P.Y + S);
    C.Brush.Color := clWhite;
    C.Pen.Color := clRed;
    C.Rectangle(R);
  end;

begin

  C := PaintBox1.Canvas;
  C.Brush.Style := bsClear;

  //初回ドラッグ中、ラバーバンドが描画されない
  //if not (FRubberBandActive and FHasRubber) then Exit;

  //初回ドラッグ中でもラバーバンドが描画される
  if not FRubberBandActive then Exit;
  if not (FDragging or FHasRubber) then Exit;

  rS := ImageToScreenRect(FRubberRect);

  //枠
  C.Pen.Style := psDot;
  C.Pen.Color := clRed;
  C.Rectangle(rS);

  //ハンドル位置
  pLT := ImageToScreenPoint(FRubberRect.Left,  FRubberRect.Top);
  pRT := ImageToScreenPoint(FRubberRect.Right, FRubberRect.Top);
  pRB := ImageToScreenPoint(FRubberRect.Right, FRubberRect.Bottom);
  pLB := ImageToScreenPoint(FRubberRect.Left,  FRubberRect.Bottom);

  pT := Point((pLT.X + pRT.X) div 2, pLT.Y);
  pB := Point((pLB.X + pRB.X) div 2, pLB.Y);
  pL := Point(pLT.X, (pLT.Y + pLB.Y) div 2);
  pR := Point(pRT.X, (pRT.Y + pRB.Y) div 2);

  DrawHandle(pLT);
  DrawHandle(pRT);
  DrawHandle(pRB);
  DrawHandle(pLB);
  DrawHandle(pT);
  DrawHandle(pB);
  DrawHandle(pL);
  DrawHandle(pR);

end;
ImageToScreenPoint が「未定義の識別子エラー」になるので、これを潰す。private 宣言部に戻って、ImageToScreenPoint 関数を宣言し、
  private
    { Private 宣言 }
    ・・・(省略)・・・
    function ImageToScreenPoint(Ix, Iy: Integer): TPoint;
Shift+Ctrl+C して、次のように記述する。
function TForm1.ImageToScreenPoint(Ix, Iy: Integer): TPoint;
begin
  Result.X := Round(Ix * FZoom);
  Result.Y := Round(Iy * FZoom);
end;
実行(F9)すると、「[dcc32 ヒント] Unit1.pas(529): H2443 インライン関数 ‘Point’ はユニット ‘System.Types’ が USES リストで指定されていないため展開されません」というヒントが表示されるので、uses に System.Types を追加する。
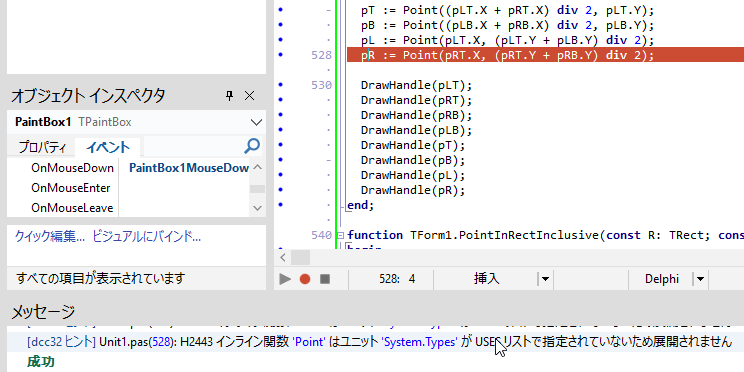
uses
  Winapi.Windows, Winapi.Messages, System.SysUtils, System.Variants,
  System.Classes, Vcl.Graphics, Vcl.Controls, Vcl.Forms, Vcl.Dialogs,
  Vcl.ExtCtrls, Vcl.StdCtrls,  System.Math, System.Types;
【マウスホイールでスクロールさせるには?】
ちなみに、マウスのホイールを回転させて画像をスクロールさせたい場合は、
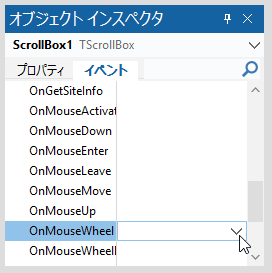
次のコードを記述する。Shift キーを押したまま、ホイールを回転させると、ホイールを手前に回転させた場合は右へ(逆なら左へ)画像はスクロールする。
procedure TForm1.ScrollBox1MouseWheel(Sender: TObject; Shift: TShiftState;
  WheelDelta: Integer; MousePos: TPoint; var Handled: Boolean);
const
  ScrollStep = 40; //ホイール1回の移動量
begin
  if ssShift in Shift then
  begin
    //横スクロール(Shift + ホイール)
    ScrollBox1.HorzScrollBar.Position :=
      ScrollBox1.HorzScrollBar.Position - (WheelDelta div 120) * ScrollStep;
  end
  else
  begin
    //縦スクロール(通常)
    ScrollBox1.VertScrollBar.Position :=
      ScrollBox1.VertScrollBar.Position - (WheelDelta div 120) * ScrollStep;
  end;
  //処理済み
  Handled := True;
end;
3.まとめ
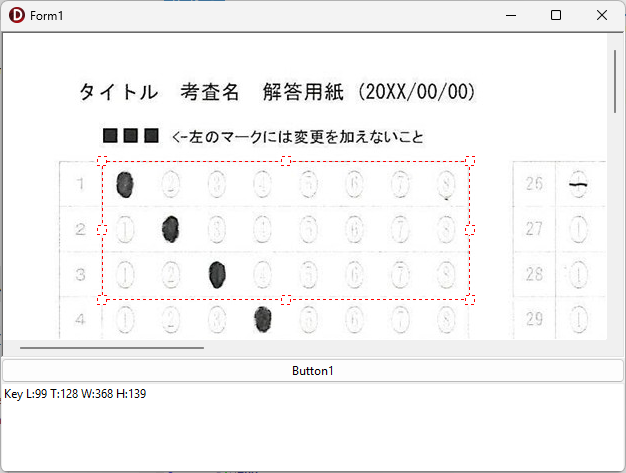
Button1 をクリックして、Image1 に画像を表示し、その上をマウスでドラッグすると伸縮・移動が自由自在なラバーバンドが表示される。
以下の内容を追記しました(20260209)
【ラバーバンドの新規作成】
ボタンクリックで新しくラバーバンドを描画するコードです。
procedure TForm1.btnNewRectClick(Sender: TObject);
begin

  //新規にラバーバンドを描画

  //1. ラバーバンド描画モードをON
  FRubberBandActive := True;

  //2. 現在表示されているラバーバンドを非表示に
  FHasRubber := False;

  //3. ドラッグ中の状態もリセット
  FDragging := False;

  //4. PaintBoxを最前面にする(マウス操作を確実に受け取る)
  PaintBox1.BringToFront;

  //5. カーソルを「新規作成」用の十字型(crCross)に変更
  UpdateRubberCursor;

  //6. PaintBoxを再描画して、古い枠を画面から消す
  PaintBox1.Invalidate;

  //7. ユーザーへ通知
  StatusBar1.SimpleText := '新規ラバーバンド作成準備完了:ドラッグしてください';

end;
【ラバーバンドの座標を取得】
現在、Image1上に描画されているラバーバンドの座標を取得するコードです。
ごく一般的な記述では 3-a の座標形式だと思いますが、実際の運用では解答欄の矩形座標を取得し、これを保存する際、印刷やスキャン時のズレの問題を解消するため、画像上の特徴点からの距離で座標を記録するようにしていますので、3-b はその例となっています。
procedure TForm1.btnGetRectClick(Sender: TObject);
var
  R: TRect;
  CoordStr: string;
begin

  //座標を取得

  //1. ラバーバンドが存在するかチェック
  if not FHasRubber then
  begin
    ShowMessage('ラバーバンドが描画されていません。');
    Exit;
  end;

  //2. 現在の座標を取得
  R := FRubberRect;

  //3-a. 表示用の文字列を作成 (例: [L:10, T:20, W:100, H:50])
  //CoordStr := Format('L:%d, T:%d, W:%d, H:%d',
  //                   [R.Left, R.Top, R.Width, R.Height]);

  //3-b. 表示用の文字列を作成 (例: [LX, TY, RX, BY])
  //LeftX, TopYは矩形切り出しの原点とする特徴点左上の座標
  //(矩形印刷位置・スキャン時のズレに強くする独自の工夫)
  CoordStr := Format('%d, %d, %d, %d',
                     [R.Left - LeftX, R.Top - TopY,
                      R.Left + R.Width - LeftX, R.Top + R.Height - TopY]);

  //4. Memo1の現在のキャレット位置に文字列を挿入
  //SelTextに代入すると、選択範囲がある場合は上書き、ない場合はキャレット位置に挿入される
  Memo2.SetFocus; // メモにフォーカスを当てる
  Memo2.SelText := CoordStr;

  //5. ラバーバンドを消去
  ClearRubberBand;
  StatusBar1.SimpleText := '';

end;
【ラバーバンドの消去】
現在、Image1上に描画されているラバーバンドを消去するコードです。
上の「ラバーバンドの座標を取得」の最後に ClearRubberBand; として呼び出しています。消去手続きとして作成しておけば、何度も同じコードを書かなくて済むので便利ですね。
procedure TForm1.ClearRubberBand;
begin
  //1. 枠が存在するというフラグを降ろす
  FHasRubber := False;

  //2. ラバーバンド操作モード自体をOFFに
  FRubberBandActive := False;

  //3. ドラッグ中の状態もリセット
  FDragging := False;

  //4. 座標データをゼロで初期化
  FRubberRect := Rect(0, 0, 0, 0);

  //5. カーソルをデフォルトに戻す
  UpdateRubberCursor;

  //6. PaintBoxを再描画(画面から消去)
  PaintBox1.Invalidate;
end;
※ UpdateRubberCursor 手続きは、本記事内で作成済みの手続きです。
4.お願いとお断り
このサイトの内容を利用される場合は、自己責任でお願いします。記載した内容(プログラムを含む)を利用した結果、利用者および第三者に損害が発生したとしても、このサイトの管理者は一切責任を負えません。予め、ご了承ください。