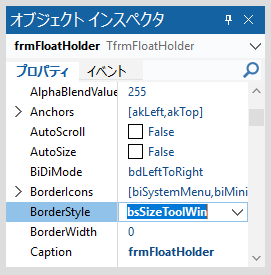
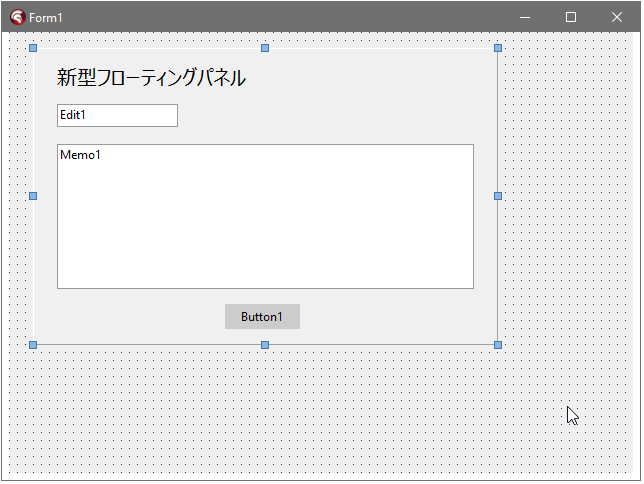
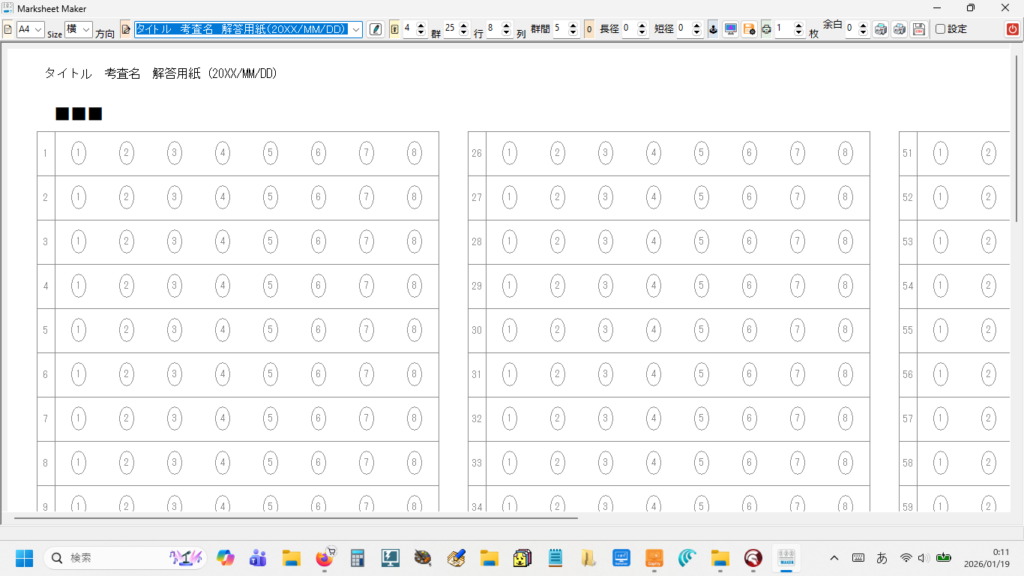
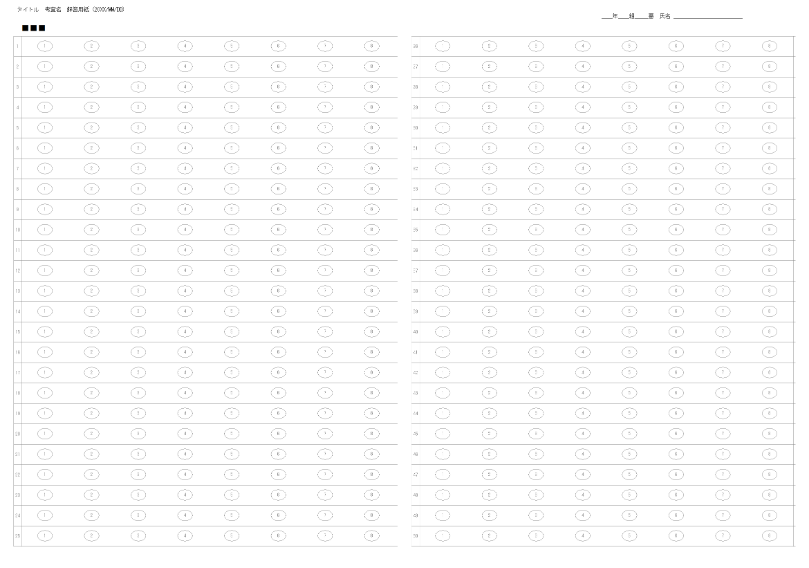
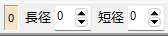
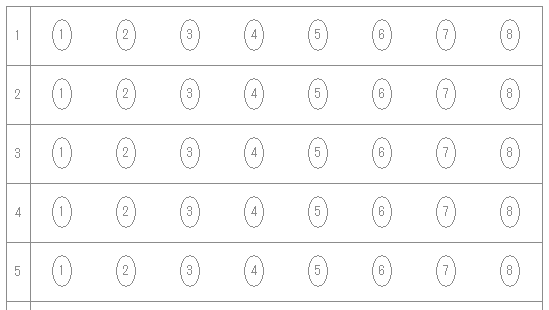
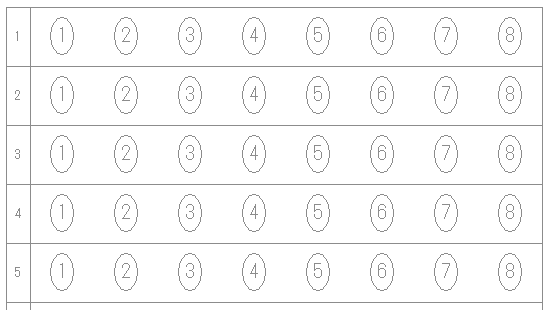
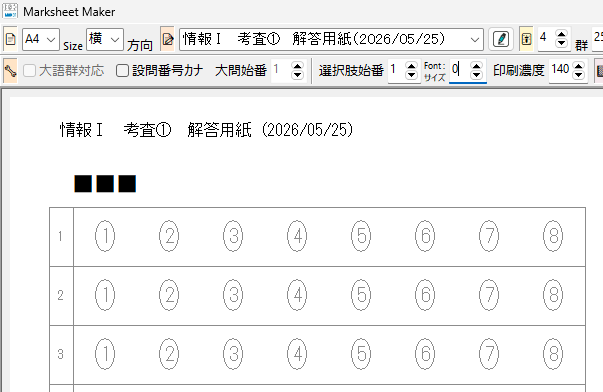
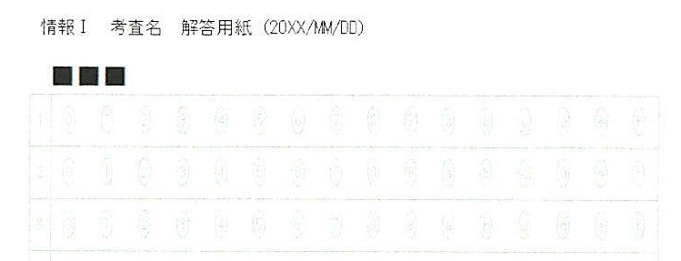
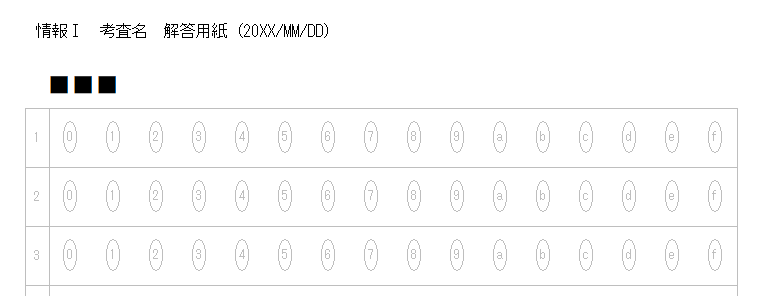
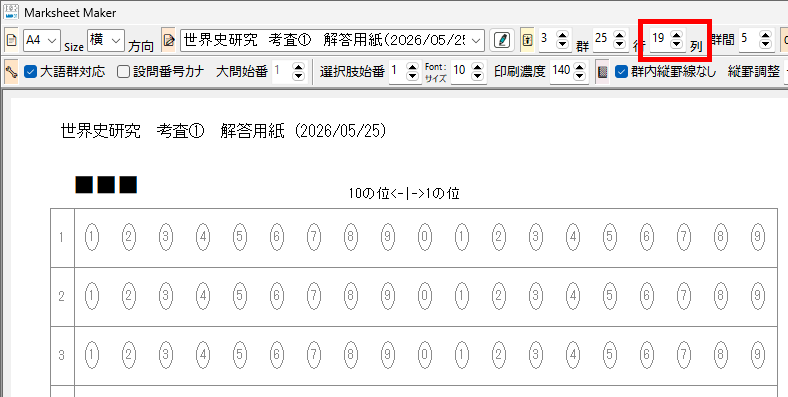
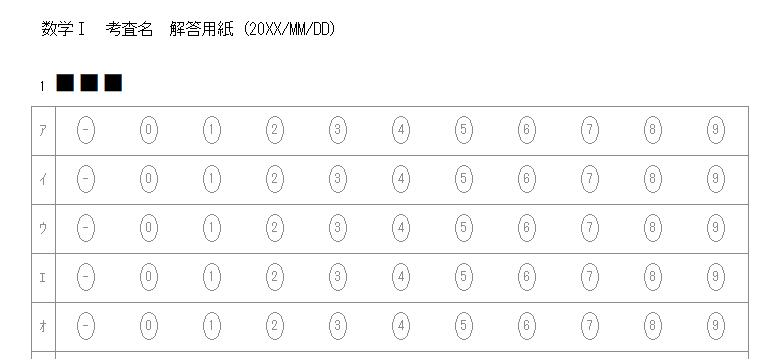
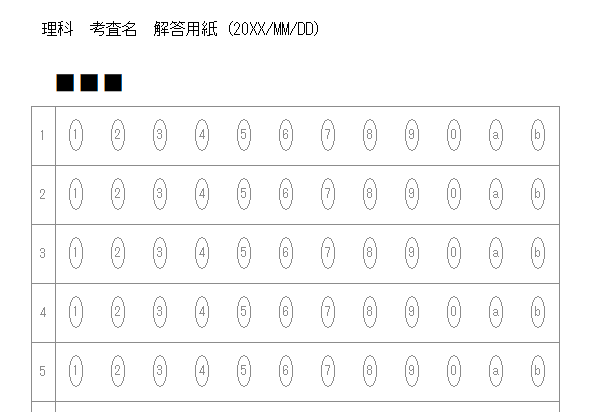
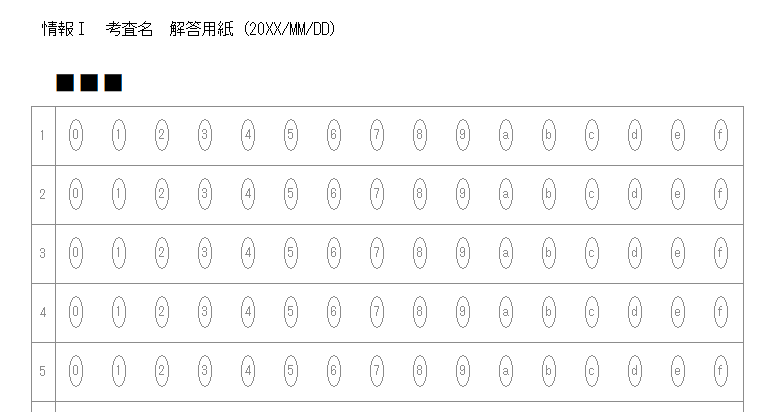
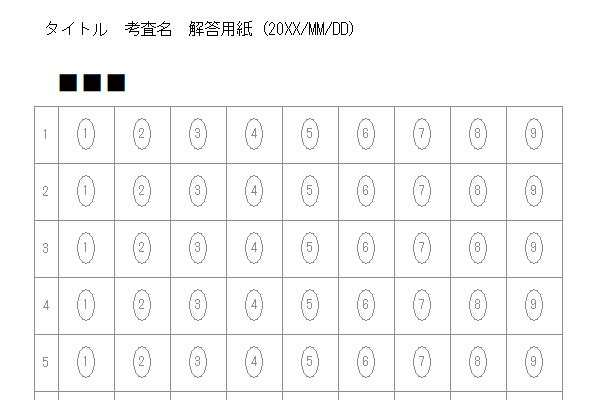
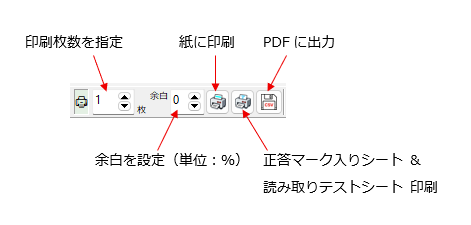
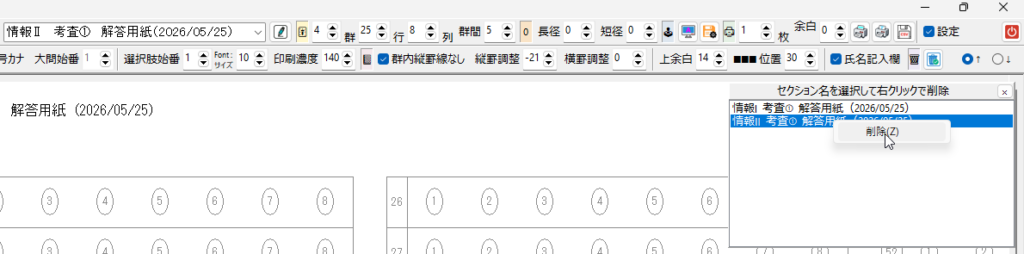
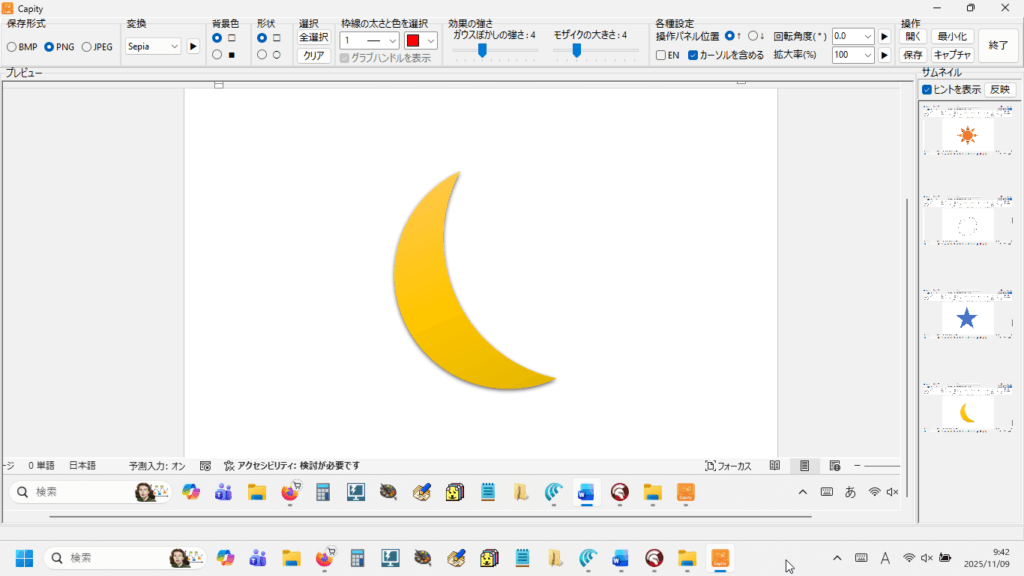
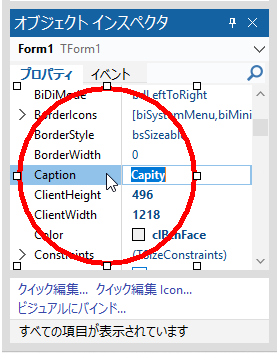
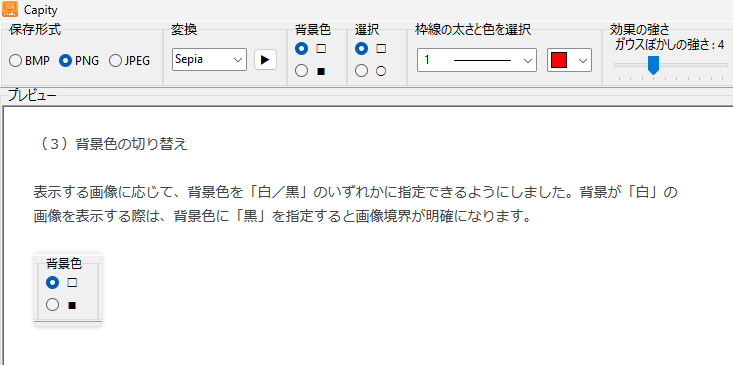
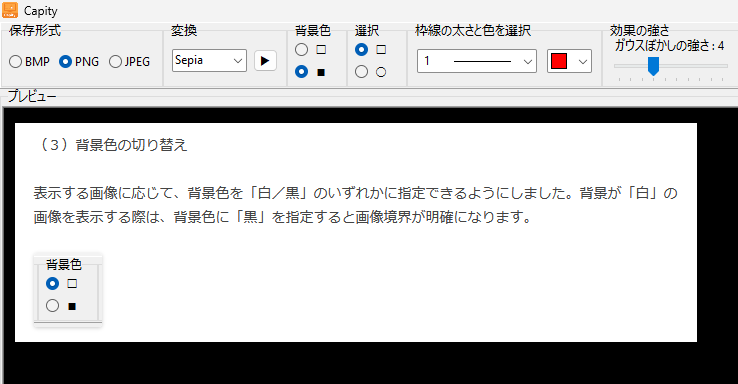
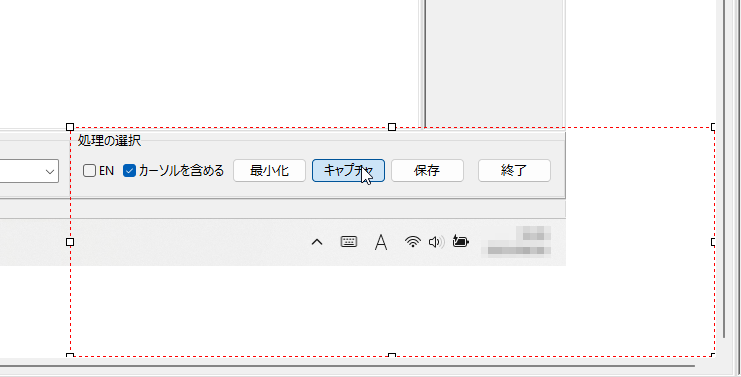
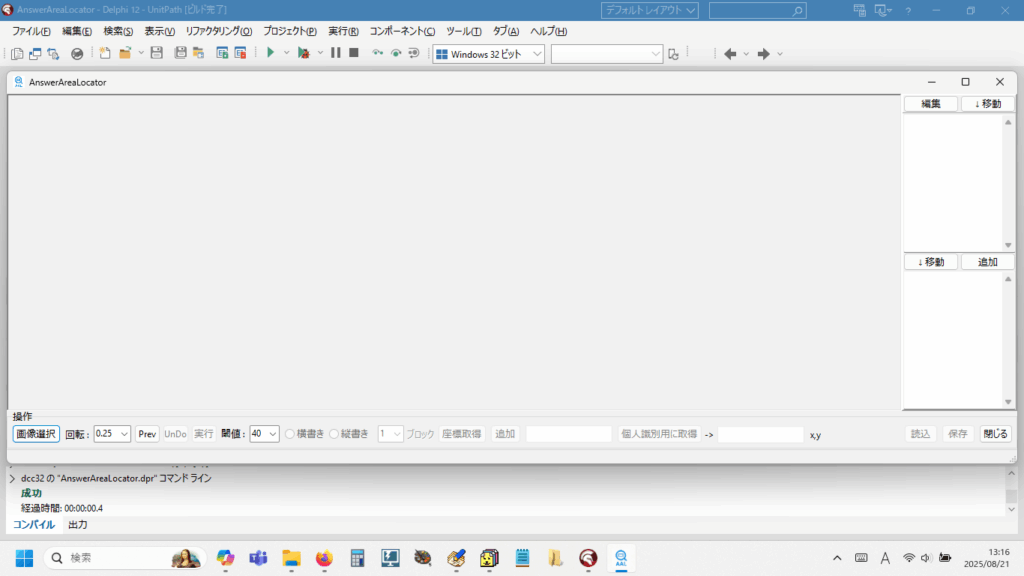
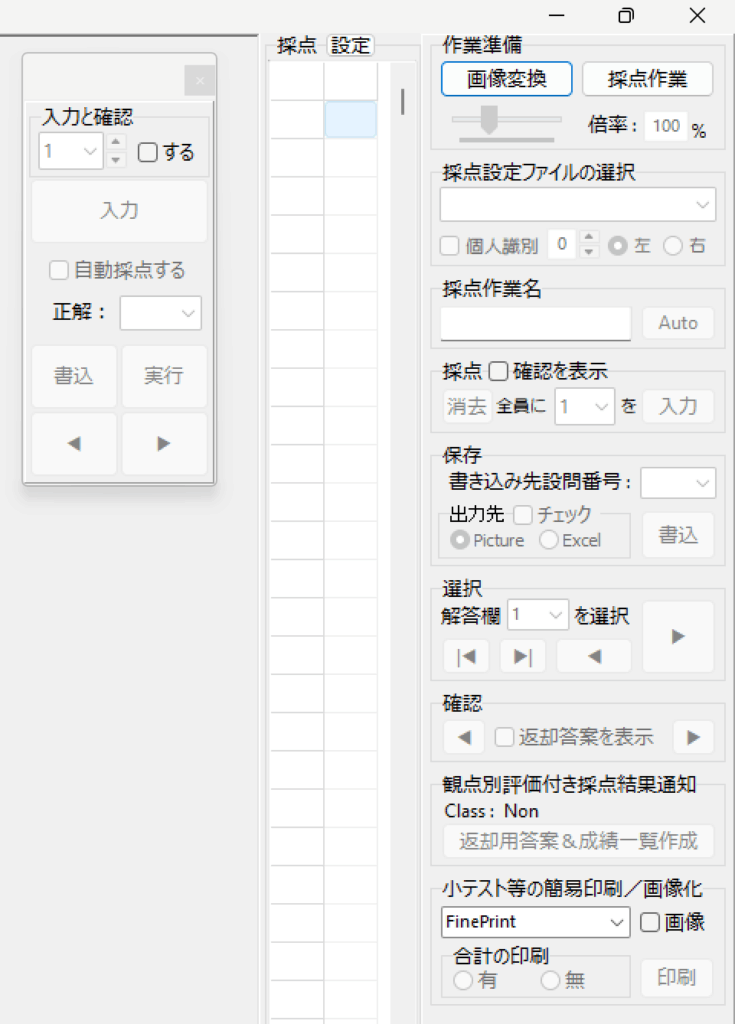
タイトル名でマークシート設定を管理( INI ファイルに保存&呼び出し)しますので、教科 or 科目の名称、考査の時期、日付等を入れておくと管理しやすいのではないかと思います。Edit コントロールへ入力すると同時にマークシートの描画も更新されます。入力確定後、再度 Enter キー押し下げで、次のコントロールへフォーカスが移動します。
新しく作成中のマークシートリーダーでも、もちろん、この大語群対応マークシートが読めるようにしてありますが、まだ実際の試験で使用して問題がないかどうかの確認を行っていませんので、現時点での公開はできませんが、この Blog で過去に公開してきたマークシートリーダーより、読み取り速度は比較にならないくらい高速化することに成功しています。設定によりますが、輪郭検出を最初の1枚のみに限定した場合で、私の PC では、1秒間に約47,500マークを読み取り可能です。
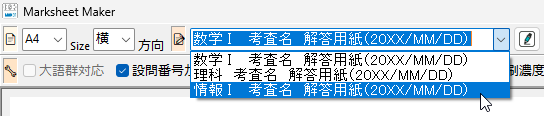
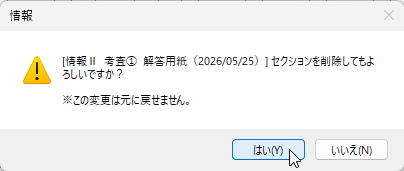
設定の保存ボタンをクリックすると、現在表示されているマークシートの設定が exe と同じ場所に自動的に作成される INI ファイル内に「タイトル名をセクション名として」保存されます。次回、プログラムを起動する際、プログラムは自動的に INI ファイル内のセクション名を取得して、タイトルを表示する ComboBox の選択肢に設定します。
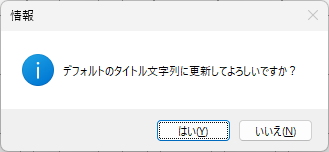
セクションの削除と、画面の表示は、『連動しない仕様』としてある点にご注意願います。
例えば、「情報Ⅰ」と「情報Ⅱ」の2種類のマークシート設定があり、「情報Ⅱ」を表示している状態で「情報Ⅱ」のセクションを INI ファイルから削除したとします。
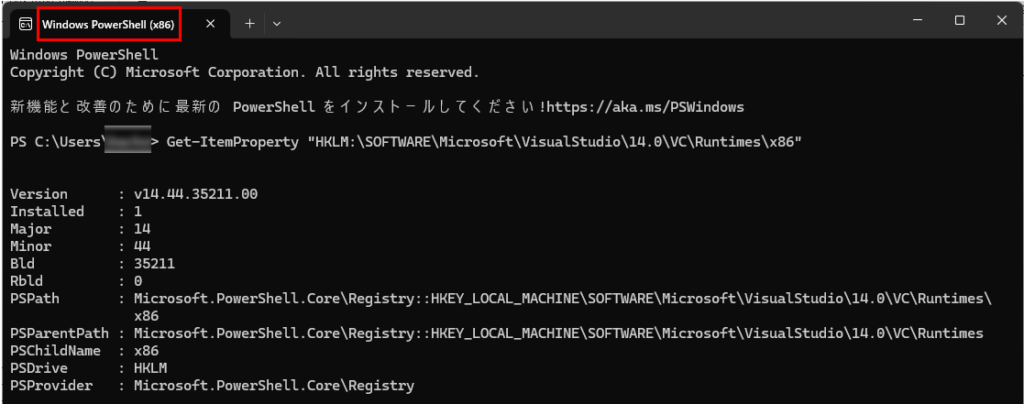
上のリンク先『ダウンロードとプロダクト キー』へ行き、表示される画面の左側の『Developer Tools』に『Visual Studio 2022』(リンク)をクリック。
表示されたページの中ほどに「Visual C++ Redistributable for Visual Studio 2022」があるので、その右側の ComboBox みたいな部分で x64 を x86 に変更して『ダウンロード』ボタンをクリック。
「Visual C++ Redistributable for Visual Studio 2022」は「VC_redist.x86.exe」で保存されました。これをインストールすると、2015 以降のランタイム(2015, 2017, 2019, 2022)は統合されているため、「Visual C++ 2015 Redistributable」も含まれてインストールされるようです。
  private
    { Private 宣言 }
    FBitmap: TBitmap;

    // Rubber band
    FRubberBandActive: Boolean;
    ・・・(省略)・・・

    function ScreenToImagePoint(X, Y: Integer): TPoint;
で、次のように記述。
function TForm1.ScreenToImagePoint(X, Y: Integer): TPoint;
begin
  Result.X := Round(X / FZoom);
  Result.Y := Round(Y / FZoom);
end;
次は、PointInRectInclusive 関数を作成。まず宣言して、
  private
    { Private 宣言 }
    ・・・(省略)・・・
    function ScreenToImagePoint(X, Y: Integer): TPoint;
    function PointInRectInclusive(const R: TRect; const P: TPoint): Boolean;
Shift+Ctrl+C して、次のように記述する。
function TForm1.PointInRectInclusive(const R: TRect; const P: TPoint): Boolean;
begin
  Result :=
    (P.X >= R.Left) and (P.X <= R.Right) and
    (P.Y >= R.Top)  and (P.Y <= R.Bottom);
end;
function TForm1.GetHandleAtPosImg(const P: TPoint): THandlePos;
const
  HSIZE = 8;
var
  cx: Integer;
begin

  Result := hpNone;

  // Top
  cx := (FRubberRect.Left + FRubberRect.Right) div 2;
  if Abs(P.Y - FRubberRect.Top) <= HSIZE then
  begin
    if Abs(P.X - FRubberRect.Left) <= HSIZE then Exit(hpLeftTop);
    if Abs(P.X - FRubberRect.Right) <= HSIZE then Exit(hpRightTop);
    if Abs(P.X - cx) <= HSIZE then Exit(hpTop);
  end;

  // Bottom
  if Abs(P.Y - FRubberRect.Bottom) <= HSIZE then
  begin
    if Abs(P.X - FRubberRect.Left) <= HSIZE then Exit(hpLeftBottom);
    if Abs(P.X - FRubberRect.Right) <= HSIZE then Exit(hpRightBottom);
    if Abs(P.X - cx) <= HSIZE then Exit(hpBottom);
  end;

  //Left /Right
  if Abs(P.X - FRubberRect.Left) <= HSIZE then Exit(hpLeft);
  if Abs(P.X - FRubberRect.Right) <= HSIZE then Exit(hpRight);

end;
次は、CursorFromHandle 関数を宣言。
  private
    { Private 宣言 }
    ・・・(省略)・・・
    function CursorFromHandle(H: THandlePos): TCursor;
こちらも Shift+Ctrl+C して、次のように記述する。
function TForm1.CursorFromHandle(H: THandlePos): TCursor;
begin
  case H of
    hpLeft, hpRight:
      Result := crSizeWE;

    hpTop, hpBottom:
      Result := crSizeNS;

    hpLeftTop, hpRightBottom:
      Result := crSizeNWSE;

    hpRightTop, hpLeftBottom:
      Result := crSizeNESW;

    else
      Result := crDefault;
  end;
end;
procedure TForm1.UpdateRubberCursor;
begin
  if FRubberBandActive then
    PaintBox1.Cursor := crCross
  else
    PaintBox1.Cursor := crDefault;
end;
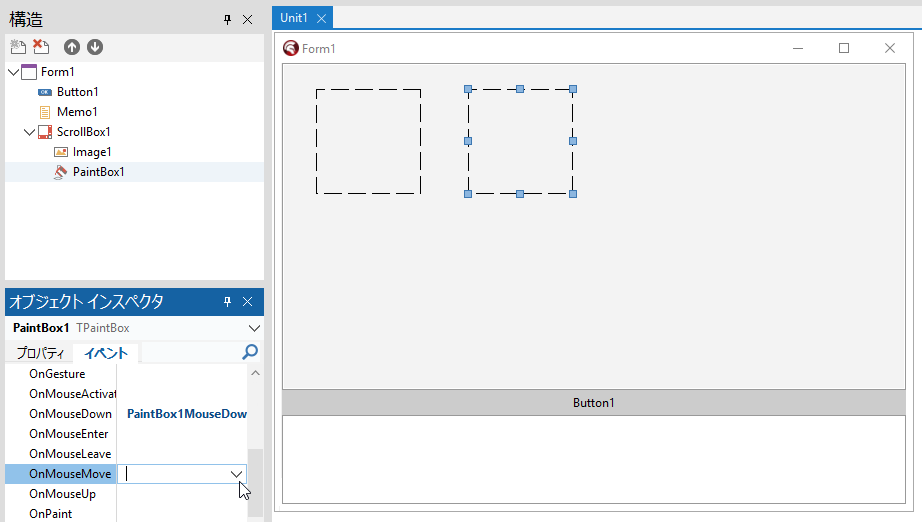
次は、PaintBox の OnMouseMove 手続きを作成。
オブジェクトインスペクタの OnMouseMove をダブルクリックする。
こちらは、次のように記述する。
procedure TForm1.PaintBox1MouseMove(Sender: TObject; Shift: TShiftState; X,
  Y: Integer);
var
  curImg: TPoint;
  screenPt: TPoint;
  dx, dy: Integer;
  H: THandlePos;
begin
  if not FRubberBandActive then Exit;

  curImg := ScreenToImagePoint(X, Y);

  //ドラッグ中のみ自動スクロール
  if FDragging then
  begin
    screenPt := PaintBox1.ClientToScreen(Point(X, Y));
    AutoScrollIfNeededFromScreen(screenPt);
  end;

  //矢印キーの形状をより適切に
  if not FDragging then
  begin
    if FHasRubber and PointInRectInclusive(FRubberRect, curImg) then
    begin
      H := GetHandleAtPosImg(curImg);
      if H <> hpNone then
        PaintBox1.Cursor := CursorFromHandle(H)
      else
        PaintBox1.Cursor := crSizeAll;  //内部=移動
    end
    else
      PaintBox1.Cursor := crCross; //ラバーバンド描画モード
    Exit;
  end;

  dx := curImg.X - FStartPointImg.X;
  dy := curImg.Y - FStartPointImg.Y;

  if FModeMoveSize then
  begin
    FRubberRect.Offset(dx, dy);
  end
  else
  begin
    case FDragHandle of
      hpLeftTop:
      begin
        FRubberRect.Left := curImg.X;
        FRubberRect.Top  := curImg.Y;
      end;

      hpTop:
        FRubberRect.Top := curImg.Y;

      hpRightTop:
      begin
        FRubberRect.Right := curImg.X;
        FRubberRect.Top   := curImg.Y;
      end;

      hpRight:
        FRubberRect.Right := curImg.X;

      hpRightBottom:
      begin
        FRubberRect.Right  := curImg.X;
        FRubberRect.Bottom := curImg.Y;
      end;

      hpBottom:
        FRubberRect.Bottom := curImg.Y;

      hpLeftBottom:
      begin
        FRubberRect.Left   := curImg.X;
        FRubberRect.Bottom := curImg.Y;
      end;

      hpLeft:
        FRubberRect.Left := curImg.X;

      hpNone:
      begin
        FRubberRect.Right  := curImg.X;
        FRubberRect.Bottom := curImg.Y;
      end;
    end;
  end;

  FStartPointImg := curImg;

  NormalizeRect(FRubberRect);

  //画像エリアを超えないよう制限
  if FRubberRect.Left < 0 then FRubberRect.Left := 0;
  if FRubberRect.Top < 0 then FRubberRect.Top := 0;
  if FRubberRect.Right > FBitmap.Width then FRubberRect.Right := FBitmap.Width;
  if FRubberRect.Bottom > FBitmap.Height then FRubberRect.Bottom := FBitmap.Height;

  PaintBox1.Invalidate;

end;
procedure TForm1.EnsureRubberVisible;
var
  R: TRect;
  p: TPoint;
begin
  R := ImageToScreenRect(FRubberRect);
  p := PaintBox1.ClientToScreen(Point(R.Left, R.Top));
  AutoScrollIfNeededFromScreen(p);
end;
procedure TForm1.UpdateRubberInfo(const Prefix: string);
var
  R: TRect;
begin
  if not FHasRubber then Exit;

  R := FRubberRect;

  if Memo1.Lines.Count = 0 then
    Memo1.Lines.Add('')
  else
    Memo1.Lines[Memo1.Lines.Count - 1] := '';  //最終行を書き換える

  Memo1.Lines[Memo1.Lines.Count - 1] :=
    Format('%sL:%d T:%d W:%d H:%d',
      [Prefix, R.Left, R.Top, R.Right - R.Left, R.Bottom - R.Top]);
end;
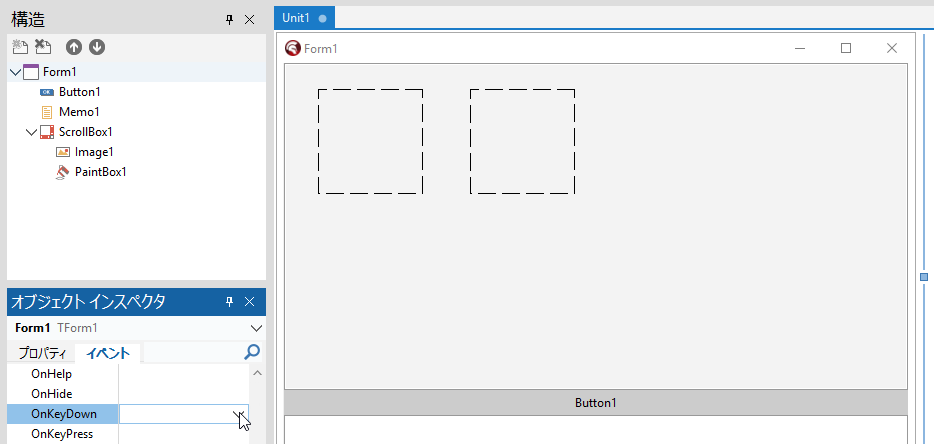
procedure TForm1.FormKeyDown(Sender: TObject; var Key: Word;
  Shift: TShiftState);
begin

  if not (FRubberBandActive and FHasRubber) then Exit;

  case Key of
    VK_LEFT:
      if ssShift in Shift then Dec(FRubberRect.Right)
      else FRubberRect.Offset(-1, 0);

    VK_RIGHT:
      if ssShift in Shift then Inc(FRubberRect.Right)
      else FRubberRect.Offset(1, 0);

    VK_UP:
      if ssShift in Shift then Dec(FRubberRect.Bottom)
      else FRubberRect.Offset(0, -1);

    VK_DOWN:
      if ssShift in Shift then Inc(FRubberRect.Bottom)
      else FRubberRect.Offset(0, 1);
  end;

  NormalizeRect(FRubberRect);
  PaintBox1.Invalidate;

  //ラバーバンドの座標を取得
  UpdateRubberInfo('Key ');

end;
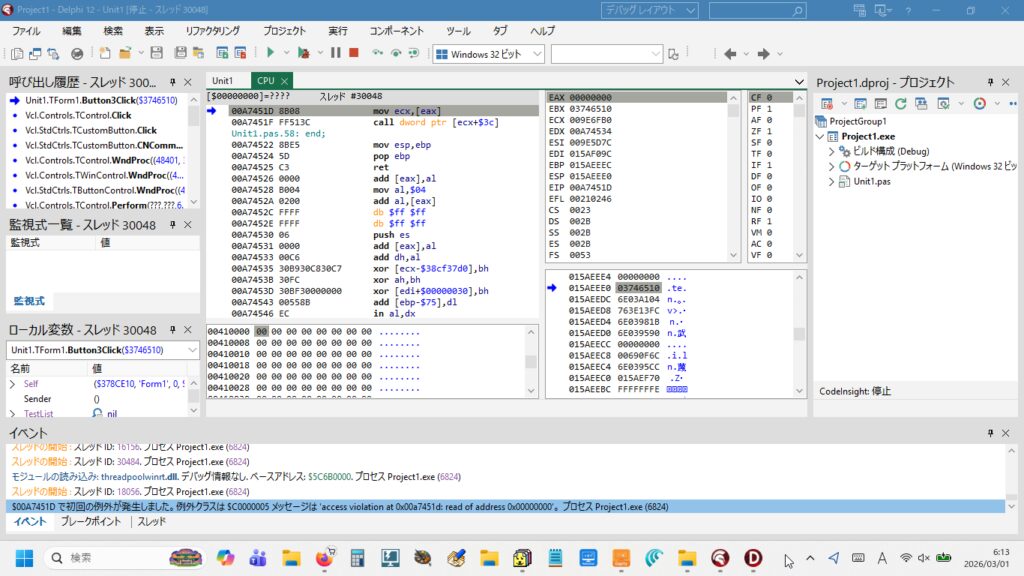
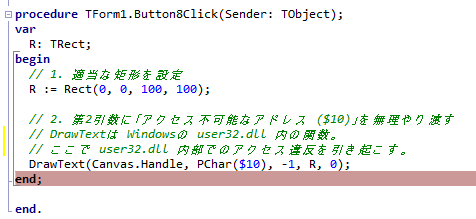
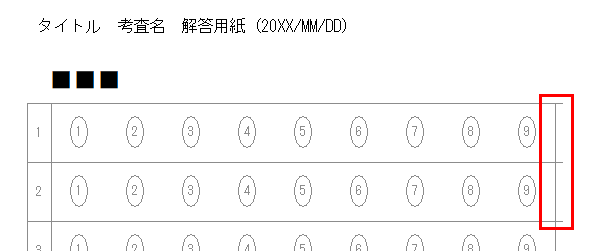
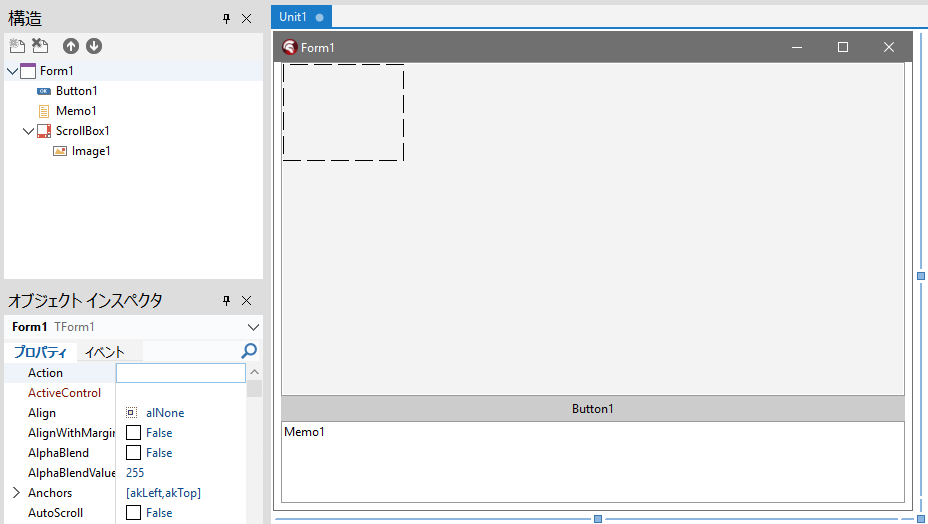
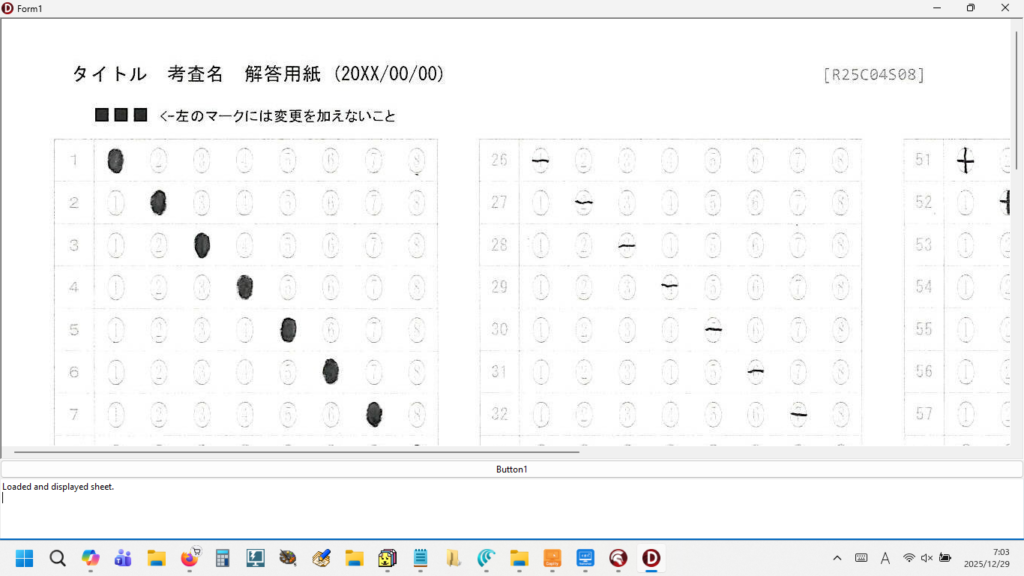
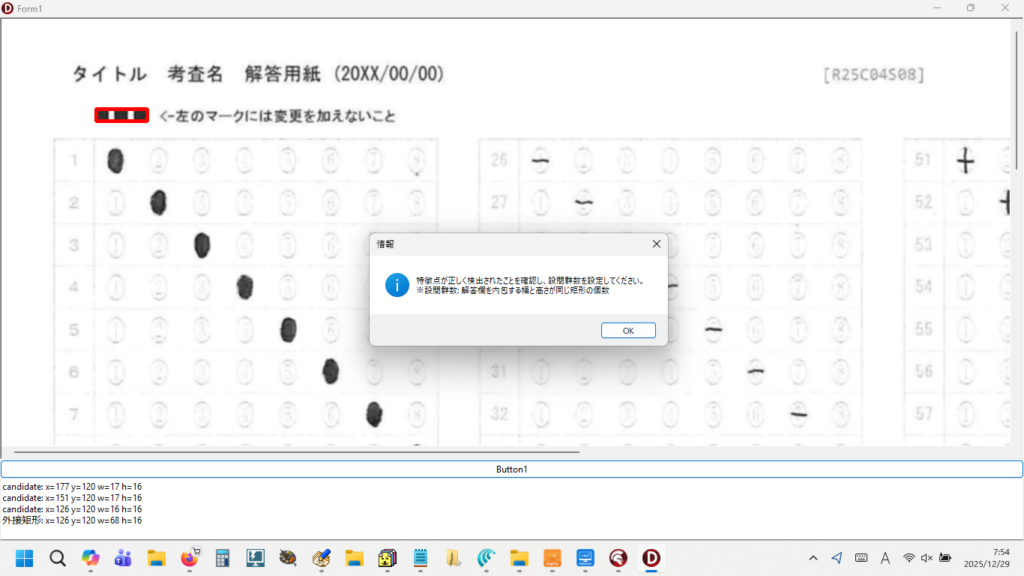
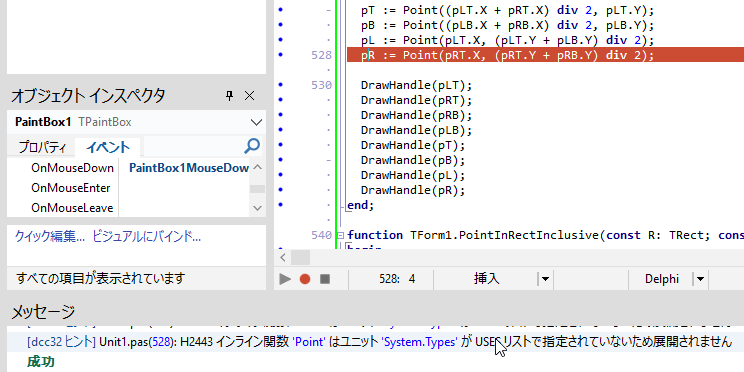
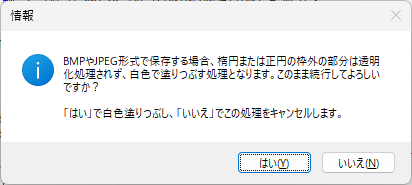
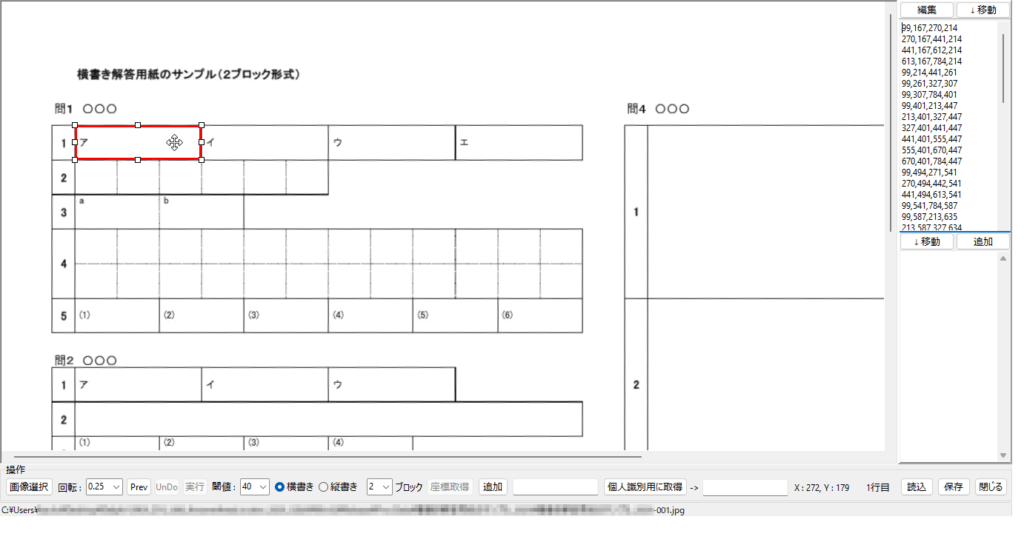
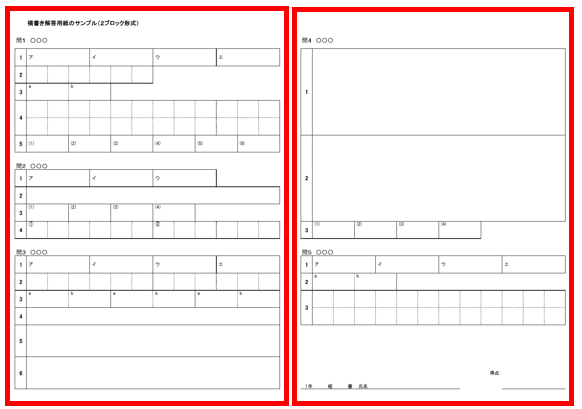
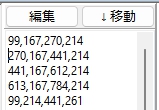
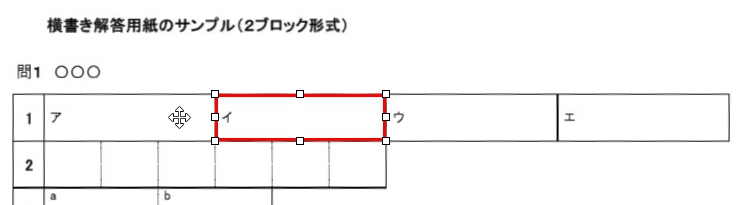
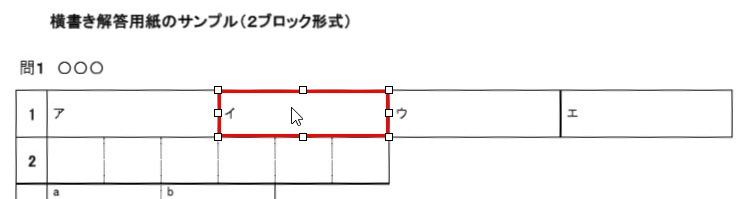
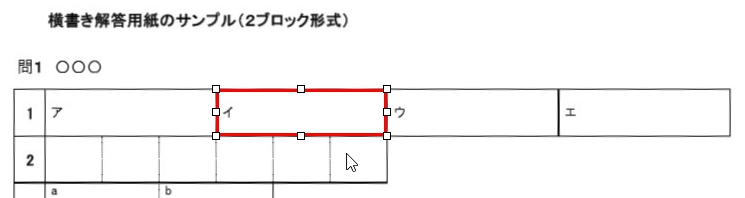
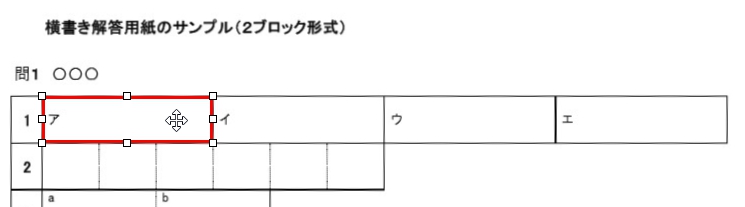
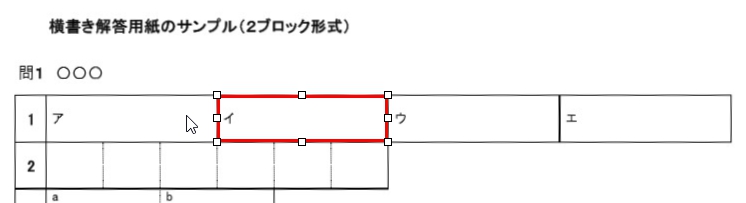
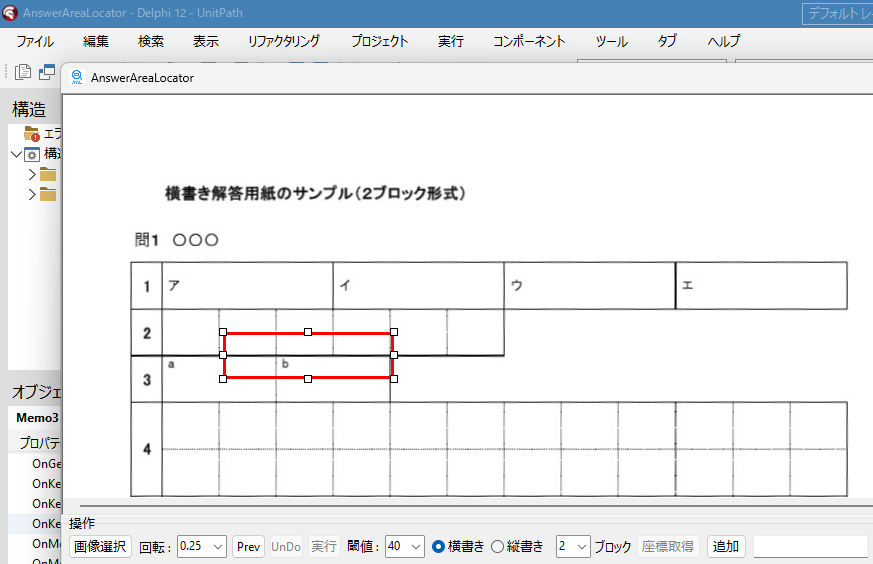
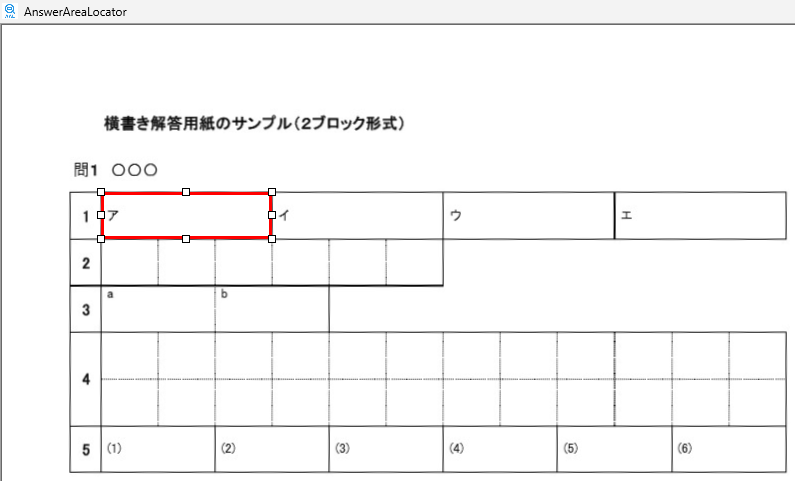
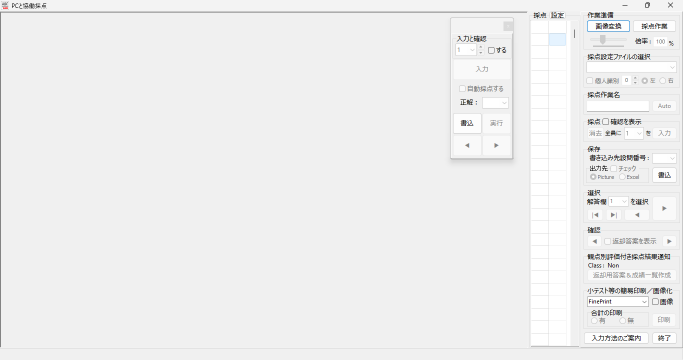
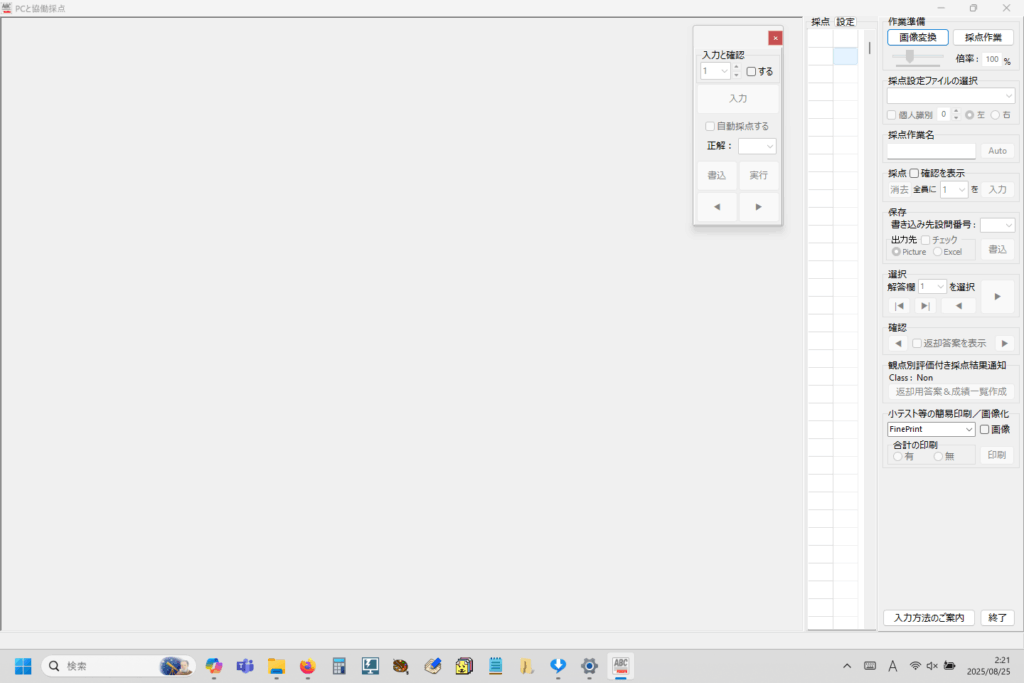
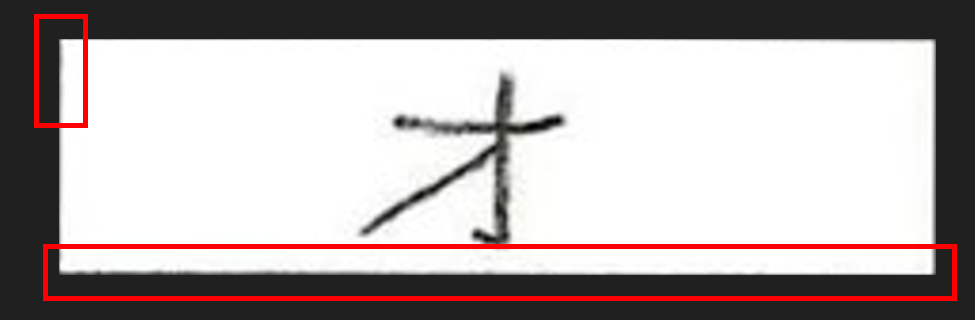
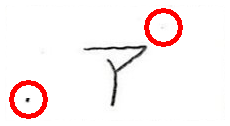
現在、Image1上に描画されているラバーバンドの座標を取得するコードです。 ごく一般的な記述では 3-a の座標形式だと思いますが、実際の運用では解答欄の矩形座標を取得し、これを保存する際、印刷やスキャン時のズレの問題を解消するため、画像上の特徴点からの距離で座標を記録するようにしていますので、3-b はその例となっています。
AI と会話しない日がなくなって久しいです。彼(彼女?)は時々間違えることもあるけれど、その間違いを見抜く力さえあれば、Google 先生とあわせて活用することで、調べものにかかる時間と手間を大いに軽減できて、すーぱー Goooooooooooooooooooooood!!← アボガドロ数的感情表現のつもり。
動作テストを重ねるうちに、削除対象文字としてこの TRichEdit に指定した絵文字の数が激増し、それでも(おかしいなー!)と思いつつ都度『新発見絵文字』を気持ち半分喜びながら毎日追加しておりましたが、日々増え行く絵文字列が2行目の折り返しを間近に控えた頃、ようやく『 AI が使用する絵文字の種類は限定されてるに違いない』という自身の強い思い込みが『完全な誤り』であることに気づき(かつ、TRichEdit は絵文字に完全対応ではないみたいな話を AI から聞いたこともあり)、個別にいちいち指定する方式から一括削除する方式に仕様を変更したという、微笑ましくもどこか悲しい、ごく私らしい個人的なエピソードもあります。
「マークダウン表記を平文にする」をチェックした場合は、Form のキャプション(タイトル)が『MarkdownRemover』と表示されますが、チェックを外すと Form のキャプション(タイトル)が『CharSweeper』と変化するのは、用途に応じた必要な機能の提供という部分へのこだわりをタイトル的に表現したものです。名前が変わるプログラムなんて私は見たことがありませんが・・・
AI とチャットした際、その会話内容は AI の方で勝手に保存してくれますが(ただ、過去のチャットの「特定部分」を探すのがエライ面倒なことも多々あり、やはり、自分にとって『走召!』重要な情報は別に保存しておきたいなー!みたいな気が・・・私はしますし)、会話の特定部分を資料的に印刷等して活用したい場合は、どうしてもプレーンテキストでないと困る場合が・・・自分的には・・・ほとんどですと言うか、はっきり言って全部です。
それより何より、Pandoc はライセンスが GPLv2 or later ですので、法的な問題をきちんとクリアしないと Pandoc を利用したアプリケーションはもちろん公開できません。これが最大の理由で、Pandoc の利用を今回はあきらめることにしました。(個人的にはもちろん!試用してみました。デフォルト設定のまま動かしてみたのですが、コードブロックの変換部分で、インデントの処理に独自ルールが適用されるようで、変換結果のプログラミングコードをコピペする際にちょっと困るかもと思いましたが、その他は期待通りに動作しました)
    //削除対象として検索する絵文字の範囲
    if not (
      (code >= $1F600) and (code <= $1F64F) or // 顔文字
      (code >= $1F300) and (code <= $1F5FF) or // 天気・場所・物
      (code >= $1F680) and (code <= $1F6FF) or // 乗り物・地図
      (code >= $2600)  and (code <= $26FF)  or // 記号
      (code >= $2700)  and (code <= $27BF)  or // その他記号
      (code >= $FE00)  and (code <= $FE0F)  or // 表示スタイル
      (code >= $1F900) and (code <= $1F9FF) or // 拡張絵文字
      (code >= $1FA70) and (code <= $1FAFF)    // Emoji 13以降
    ) then
このプログラムでは、開始時に音量設定が0でなければ自動消音し、終了時に開始時の音量設定を復元しています。なぜ、そのようにしたかというと、周囲に人がいるような環境では Beep 音が鳴らない方がよいと思ったからです。「入力ミス」などがあった際にユーザーに対して注意喚起するような目的で使われるこの音ですが、一人で PC を使用していてもメッセージが表示された際などに鳴ると結構(私は)気になります。
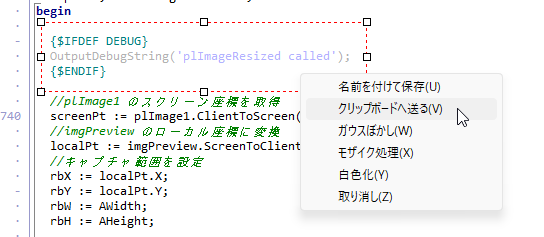
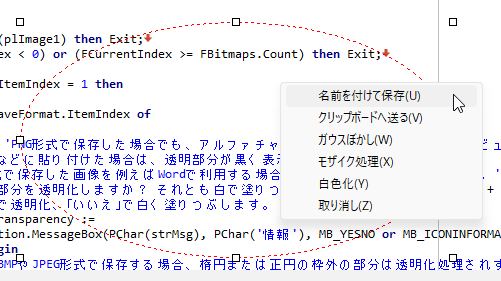
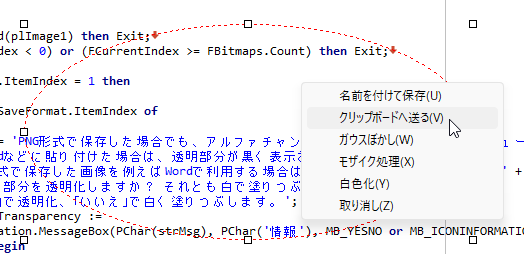
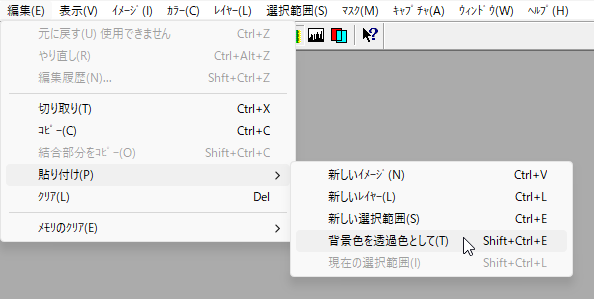
  //Ctrl+Cで選択範囲をクリップボードへ送る
  if plImage1.Visible then
  begin
    //Ctrl + C(Shiftを含まない)のみ許可
    if (Key = Ord('C')) and (ssCtrl in Shift) and not (ssShift in Shift) then
    begin
      //plResizeImage の「クリップボードへ送る」を実行
      if Assigned(plImage1.MenuClipboardRef) then
      begin
        plImage1.MenuClipboardRef.Click;
      end;
      //ショートカットキーを他に伝播させない
      Key := 0;
    end;
  end;
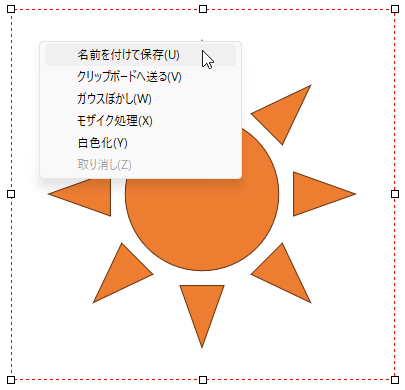
これで Ctrl + C で、ラバーバンドで囲んだ範囲を、クリップボードへ画像データとして送信できるようになりました。
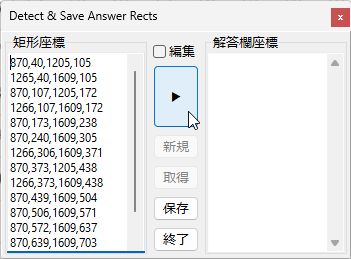
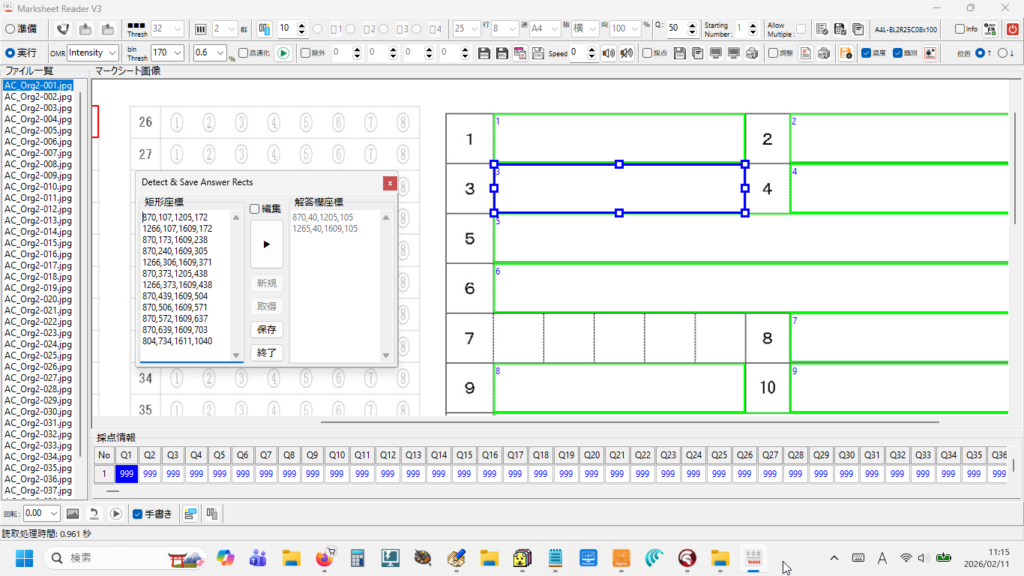
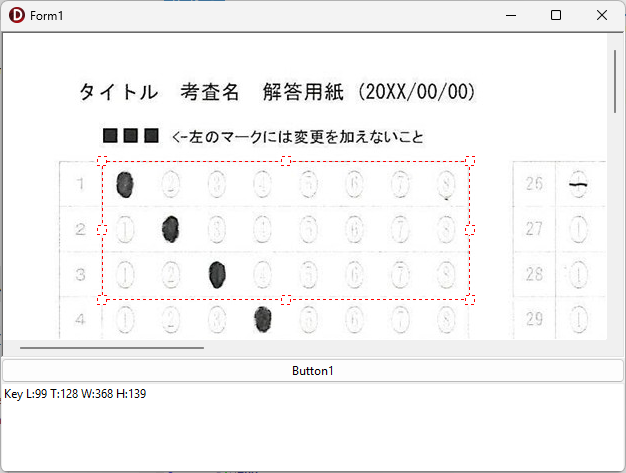
とにかく、これまでの矩形検出プログラムで解答欄矩形の座標を検出して、採点する順番になるように並び替える際、横書き答案であれば「 Y 座標の値が小さいものから順に、左から右へ並べ替える」アルゴリズムを採用しているため、解答用紙の画像が左へ傾いていると、座標原点 0,0 が左上であるため、右側の解答欄ほど Y 座標の値が小さくなり、検出した座標を並び替える際に「上から下へ」の順番はなんとか守れても、「左から右へ」が「右から左へ」と、「一部の解答欄座標の並びが逆転」してしまうわけです。
以下は、Delphi に埋め込んで使用している「横書き答案の解答欄座標を検出して、採点順に並べ替える」 Python Script です(ダウンロードしていただいた Zip ファイルのサイズが大きいのも、展開に時間がかかるのも、Python 用の OpenCV をバックグラウンドで動作させているためです)。
  import cv2
  import numpy as np

  def imread_unicode(path):
      with open(path, "rb") as f:
          data = f.read()
      img_array = np.frombuffer(data, np.uint8)
      return cv2.imdecode(img_array, cv2.IMREAD_COLOR)

  def deskew_image(gray):
      edges = cv2.Canny(gray, 50, 150, apertureSize=3)
      lines = cv2.HoughLines(edges, 1, np.pi / 180, 150)
      if lines is None:
          return gray
      horizontal_angles = []
      for rho, theta in lines[:, 0]:
          angle_deg = (theta * 180 / np.pi)
          if (angle_deg < 10) or (angle_deg > 170):
              adjusted_angle = angle_deg if angle_deg < 90 else angle_deg - 180
              horizontal_angles.append(adjusted_angle)
      if len(horizontal_angles) < 5:
          return gray
      mean_angle = np.mean(horizontal_angles)
      if abs(mean_angle) < 0.3:
          return gray
      (h, w) = gray.shape
      center = (w // 2, h // 2)
      M = cv2.getRotationMatrix2D(center, mean_angle, 1.0)
      rotated = cv2.warpAffine(gray, M, (w, h), flags=cv2.INTER_LINEAR, borderValue=255)
      return rotated

  def detect_inner_boxes(image_path):
      img_color = imread_unicode(image_path)
      if img_color is None:
          raise FileNotFoundError(f"画像が見つかりません: {image_path}")
      img_gray = cv2.cvtColor(img_color, cv2.COLOR_BGR2GRAY)
      thresh = cv2.adaptiveThreshold(
          img_gray, 255,
          cv2.ADAPTIVE_THRESH_GAUSSIAN_C,
          cv2.THRESH_BINARY_INV,
          15, 10
      )
      contours, _ = cv2.findContours(thresh, cv2.RETR_TREE, cv2.CHAIN_APPROX_SIMPLE)
      boxes = []
      for cnt in contours:
          x, y, w, h = cv2.boundingRect(cnt)
          if w > ' + cmbThreshold.Text + ' and h > ' + cmbThreshold.Text + ':
              boxes.append((x, y, w, h))
      inner_boxes = []
      for i, box in enumerate(boxes):
          x1, y1, w1, h1 = box
          rect1 = (x1, y1, x1 + w1, y1 + h1)
          contains_other = False
          for j, other in enumerate(boxes):
              if i == j:
                  continue
              x2, y2, w2, h2 = other
              rect2 = (x2, y2, x2 + w2, y2 + h2)
              if rect1[0] <= rect2[0] and rect1[1] <= rect2[1] and rect1[2] >= rect2[2] and rect1[3] >= rect2[3]:
                  contains_other = True
                  break
          if not contains_other:
              inner_boxes.append(box)

      if not inner_boxes:
          return []
      y_tolerance = max(5, int(np.median([h for (_,_,_,h) in inner_boxes]) * 0.5))
      inner_boxes.sort(key=lambda b: b[1])
      sorted_boxes = []
      current_row = []
      current_y = None
      for b in inner_boxes:
          x, y, w, h = b
          if current_y is None:
              current_y = y
              current_row.append(b)
          elif abs(y - current_y) <= y_tolerance:
              current_row.append(b)
          else:
              current_row.sort(key=lambda b: b[0])
              sorted_boxes.extend(current_row)
              current_row = [b]
              current_y = y
      if current_row:
          current_row.sort(key=lambda b: b[0])
          sorted_boxes.extend(current_row)
      inner_boxes = sorted_boxes

      for idx, (x, y, w, h) in enumerate(inner_boxes, start=1):
          var1.Value = str(x) + "," + str(y) + "," + str(x + w) + "," + str(y + h)
      return inner_boxes

  if __name__ == "__main__":
      image_path = r"' + 'CutImage0' + IntToStr(i) + '.jpg' + '"
      boxes = detect_inner_boxes(image_path)
横書き答案で、ブロックの指定が2以上である場合がありますので、この処理を for ループの中に埋め込んでいます。また、この横書きでブロックの指定が2以上である答案の場合には、2ブロック目に検出した座標の値のx座標を一律補正するような処理も Delphi 側で必要ですが、核心部分はなんと言っても、上のスクリプトです。思えば、ここに至るまで、はや幾年月・・・
  TplResizeImage = class(TImage)
  private
    FSelected        : Boolean;

  ・・・

      if FSelected then begin
        Screen.Cursor := crSizeAll;
      end else begin
        Screen.Cursor := crDefault;
      end;
procedure TForm1.FormKeyDown(Sender: TObject; var Key: Word;
  Shift: TShiftState);
begin
  if Key in [VK_LEFT, VK_RIGHT, VK_UP, VK_DOWN] then
    Screen.Cursor := crDefault;
end;
さらに、より確実に動作するよう OnKeyUp イベントにも同じ処理を記述します。
procedure TForm1.FormKeyUp(Sender: TObject; var Key: Word; Shift: TShiftState);
begin
  if Key in [VK_LEFT, VK_RIGHT, VK_UP, VK_DOWN] then
    Screen.Cursor := crDefault;
end;
procedure TForm1.FormCreate(Sender: TObject);
begin
  KeyPreview:=True;
end;
これで完璧かと思いましたが、Application.OnMessage を使ってグローバルに押されたキーを監視し、矢印キーが押された場合にはマウスのカーソルをデフォルトに戻す処理も追加しておくことにしました。こちらは構造的な意味でも、保守性を高める意味でも Form のメンバーとして記述します。こうしておけば、何年か経って今日の作業内容を完全に忘れてしまった場合でも、Private 宣言部分を参照すれば、何を設定したのかがわかり、メンテナンスしやすいコードにすることができます。
私は、そのような意味から、手続きだけでなく関数も Form のメンバーとして記述するようにしています。むかしは何でもかんでも Form のメンバーにしていたのですが、この Blog を書くようになってから、他から呼び出す必要のない手続きや関数は、「ネストされた手続き(Nested Procedure)」 または 「ネストされた関数(Nested Function)」 として記述することも多くなりました。コードを読むのと、( Blog の記事用に)コピペするのが楽だからというのが、その主な理由です。
type
  TForm1 = class(TForm)
    ...
  private
    //Application.OnMessage を使ったグローバルキー監視
    procedure AppMessageHandler(var Msg: TMsg; var Handled: Boolean);
  end;
で、Shift + Ctrl + C で手続きを作成し、実装します。
procedure TForm1.AppMessageHandler(var Msg: TMsg; var Handled: Boolean);
begin
  case Msg.message of
    WM_KEYDOWN, WM_KEYUP:
      case Msg.wParam of
        VK_LEFT, VK_RIGHT, VK_UP, VK_DOWN:
          Screen.Cursor := crDefault;
      end;
  end;
end;
最後に、FormCreate で登録しました。
procedure TForm1.FormCreate(Sender: TObject);
begin
  Application.OnMessage := AppMessageHandler;
end;
これで Form がアクティブ(フォーカスがある)な時も、非アクティブ(フォーカスがない)な時も、常にマウスのカーソルをリセットできるようになったはずです。
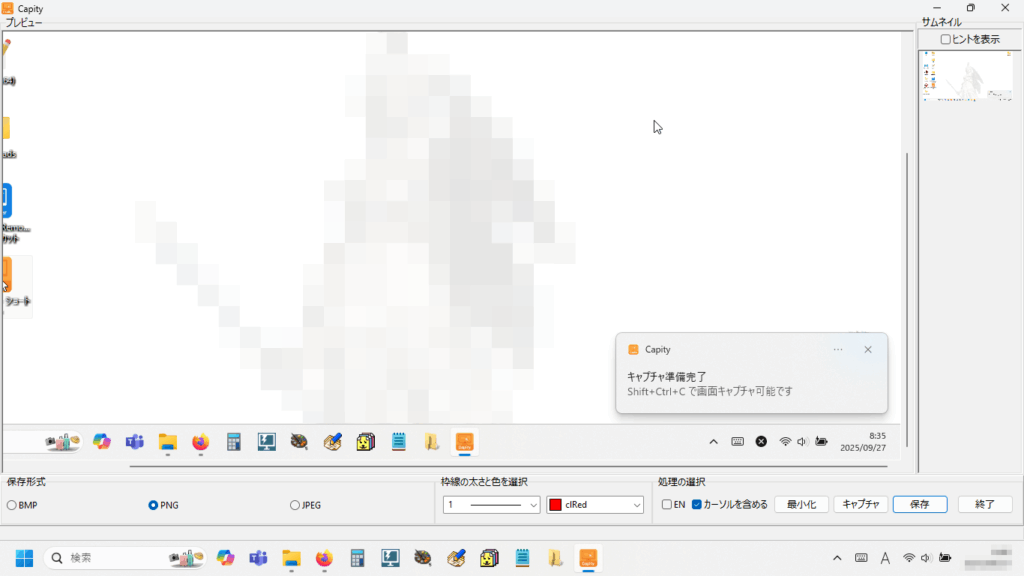
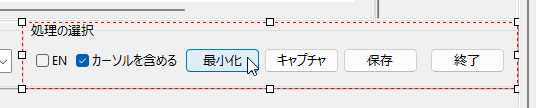
余談ですが、このマウスカーソルの形状も含めて画面のハードコピーを取るのはどうしたらいいものかと、今回、少し悩んでしまいました。Windows11の機能のみで行うなら、拡大鏡を固定(?)にして PrintScreen を実行すれば出来るみたいなことを AI が言ってましたが、せっかく Delphi があるんだし、ヒマもあったので、マウスカーソルの形状も含めて画面のハードコピーを取るプログラムを自分で書いてしまいました。後日、機会がありましたら、この Blog でご紹介したいと思います。
こちらの問題も修正しようかとも思いましたが、このプログラムを実行する場合、画面は最大化して作業するのが最も効率がよく、何か他の画面と並べて作業する必要性もないので、Form は常に最大化して表示する設定とし、通常 Form の右上にある最大化及び最小化ボタンは表示しないようにプログラムを変更しました。
また、通常の場合、最大化状態で Form のタイトルバーをクリックしてアクティブにし、そのままタイトルバーをドラッグ&ドロップすると Window 内の任意の位置へ、設計時の大きさになった Form を移動できますが、上記の理由から、この時やはりラバーバンド位置が解答欄矩形からズレます。これを防止するため、Form のタイトルバーをクリックしてドラッグ&ドロップする機能は無効化しました。
この Form の設定に使用したコードは、以下の通りです。
  private
    //最初に1回だけ設定を実行するための確認フラグ
    F_FormActivated: Boolean;

    //タイトルバーは残したまま「最大化解除できない」ように設定
    procedure WMSysCommand(var Msg: TWMSysCommand); message WM_SYSCOMMAND;
    procedure WMNCLButtonDown(var Msg: TWMNCLButtonDown); message WM_NCLBUTTONDOWN;

procedure TForm1.FormCreate(Sender: TObject);
begin

  //Formの最大化ボタン及びドラッグ&ドロップを制御(禁止)する
  F_FormActivated := False;
  //最大化して表示する
  Form1.WindowState := wsMaximized;
  //ここで実行するとFormがタスクバーを覆い隠してしまう -> FormActiveで実行する
  //BorderIcons := [biSystemMenu, biMinimize];

end;

procedure TForm1.FormActivate(Sender: TObject);
begin
  if not F_FormActivated then
  begin
    BorderIcons := [biSystemMenu];
    F_FormActivated := True;
  end;
end;

procedure TForm1.WMNCLButtonDown(var Msg: TWMNCLButtonDown);
begin
  if Msg.HitTest = HTCAPTION then
    Exit; // タイトルバーをドラッグしても動かせない
  inherited;
end;

procedure TForm1.WMSysCommand(var Msg: TWMSysCommand);
begin
  // 「元に戻す」「サイズ変更」を禁止
  if (Msg.CmdType = SC_RESTORE) or (Msg.CmdType = SC_SIZE) then
  begin
    Exit;
  end;
  inherited;
end;
procedure TForm1.Memo2Click(Sender: TObject);
var
  i:integer;
  p1,p2:TPoint;

  function RemoveToken(var s:string;delimiter:string):string;
  var
    p:Integer;
  begin
    p:=Pos(delimiter,s);
    if p=0 then Result:=s
    else Result:=Copy(s,1,p-1);
    s:=Copy(s,Length(Result)+Length(delimiter)+1,Length(s));
  end;

  function GetTokenIndex(s:string;delimiter:string;index:Integer):string;
  var
    i:Integer;
  begin
    Result:='';
    for i:=0 to index do
      Result:=RemoveToken(s,delimiter);
  end;

begin

  if not EditTF then
  begin

    //座標を取得
    i:=Memo2.Perform(EM_LINEFROMCHAR, Memo2.SelStart, 0);

    //エラー対策
    if Memo2.Lines[i]='' then Exit;

    x1:=StrToInt(GetTokenIndex(Memo2.Lines[i],',',0));
    y1:=StrToInt(GetTokenIndex(Memo2.Lines[i],',',1));
    x2:=StrToInt(GetTokenIndex(Memo2.Lines[i],',',2));
    y2:=StrToInt(GetTokenIndex(Memo2.Lines[i],',',3));

    if Assigned(plImage1) then begin
      FreeAndNil(plImage1);
    end;

    //コンポーネントを生成し,イベントを定義し,位置を指定して画像を表示
    plImage1:= TplResizeImage.Create(Self);
    plImage1.Parent:= ScrollBox1;
    plImage1.TransEvent:= True;

    //画像内座標
    p1 := Point(x1, y1);
    p2 := Point(x2, y2);
    //クライアント座標 -> スクリーン座標(Image1基準)
    p1 := Image1.ClientToScreen(p1);
    p2 := Image1.ClientToScreen(p2);
    //スクリーン座標 -> フォームのクライアント座標(Form基準)
    p1 := Form1.ScreenToClient(p1);
    p2 := Form1.ScreenToClient(p2);
    //ラバーバンドの座標を設定(フォームのクライアント座標で配置)
    plImage1.SetBounds(p1.X, p1.Y, p2.X - p1.X, p2.Y - p1.Y);

    //SelectedプロパティをTrueにするとラバーバンドとグラブハンドルが表示される
    plImage1.Selected := True;
    plImage1.BringToFront;

  end;

end;
詳しいことはわかりませんが、この表示位置は私の方で何かした覚えがありませんので、おそらく OS 側で決めているのではないか・・・と思うのですが、やはり、これは何とかしたいところです。
私は普段は「1366×768」サイズに設定したモニターを使ってプログラムを書いています。職場ではもっと高解像度のモニターを与えられていますが、もともと大きさ的に限界のあるノート PC のモニターに必要以上の解像度設定は不要だと思います。若い方ならいざ知らず、年寄りには小さな画面&高解像度のモニター環境は厳しすぎる気がします。
で、通常状態に戻ったときに Form を中央に表示する AdjustFormPosition 手続きは・・・
procedure TForm1.AdjustFormPosition;
var
  WorkArea: TRect;
begin
  //フォームが属しているモニタのワークエリアを取得(マルチモニタ対応)
  WorkArea := Monitor.WorkareaRect;

  //横方向の調整
  if Width < (WorkArea.Right - WorkArea.Left) then
    Left := WorkArea.Left + ((WorkArea.Right - WorkArea.Left) - Width) div 2
  else
    //はみ出す場合は左端に寄せる
    Left := WorkArea.Left;

  //縦方向の調整
  if Height < (WorkArea.Bottom - WorkArea.Top) then
    Top := WorkArea.Top + ((WorkArea.Bottom - WorkArea.Top) - Height) div 2
  else
    //はみ出す場合は上端に寄せる
    Top := WorkArea.Top;

end;
FormCreate 時に、Form の状態を取得しておきます。
procedure TForm1.FormCreate(Sender: TObject);
begin
  //「最大化->元に戻す」で画面の中央に表示
  FPrevWindowState := WindowState;
procedure TForm1.FormResize(Sender: TObject);
var
  //for 高さの調整
  MemoHight, btnHight:integer;
begin
  //VCLの高さを調整
  ・・・ 省略 ・・・

  //「最大化->元に戻す」で画面の中央に表示
  //ユーザーが普通にフォームをドラッグして幅や高さを変えた場合を除外
  if (FPrevWindowState = wsMaximized) and (WindowState = wsNormal) then
    AdjustFormPosition;
  FPrevWindowState := WindowState;  //最新の状態を保存
end;
実行して、非最大化時の動作を確認します。
Form は、画面の中央に表示されました!
できたー☆
予定した(と言うか、気がついた)修正作業は、全部、無事完了しました!
どなた様も、お待ちになってないことと思いますが・・・
8.ダウンロードのご案内
今回、全面的に不具合を修正しました、この「解答欄矩形の座標を検出するプログラム」と、先日この Blog でご紹介した「自動採点機能みたいなモノを搭載した手書き答案の採点補助プログラム(こちらも様々に内在していた不具合を修正し、Version 3.1.0 としました)」及び「マークシートリーダー」、「採点結果通知表並びに成績一覧表作成プログラム」他を1つにまとめた zip ファイルを下記リンク先からダウンロードすることができます。
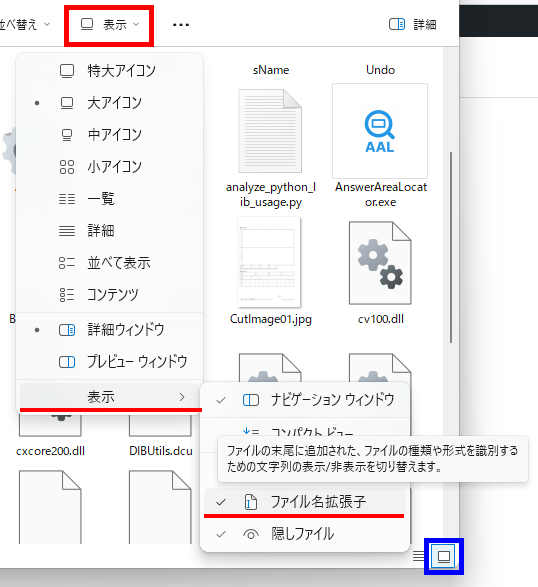
お使いの PC の設定によっては、ファイルの拡張子が表示されない場合もあると思います。その場合は、エクスプローラーの画面上部にある「表示」をクリックすると表示されるサブメニューのいちばん下にある「表示」をクリック( or ポイント)し、横に表示されるサブメニューの「ファイル名拡張子」をクリックしてチェックマークを付けると拡張子が表示されます。
この PDF ファイルを「そのまま印刷して利用する」のであれば、もちろん何も問題など生じませんが、紙媒体でなく、そのまま電子データとして、例えば、重い障害のある方が iPad の Goodnotes で読み込んで利用するような場合、正しい方向に戻す(=回転させる)ひと手間が(その方から見れば余計に)必要です。
たかが「ひと手間」ですが、この「ひと手間」が「ある」と「ない」とでは、当該 PDF ファイルを受け取った方の「気持ち」は大きく違ってくるのではないでしょうか?
しかも、それが毎回のことになると・・・
そのような観点から、手軽に PDF ファイルの向きを変換して、その状態を保存できるプログラムがないかと探してみたのですが、Web 上にデータをアップロードする必要があったり、例えその問題はクリアできても通信環境によっては、変換に「ちょっと我慢できないくらいの時間」を要したり、はたまたローカル環境 Only で作業できたとしても「単に向きを変換」するだけの工程の手順が、正直、とても使いにくいと感じてしまったり・・・、
「ただ向きを変える」それだけのことで、探し当てたどの方法を使っても、こんなにイライラするのであれば、(自分の知識と技術だけで PDF ファイルの向きを変更するプログラムなど、間違っても書けるわけがありませんので)サードパーティー製(?)ソフトウェアを使わせていただいて PDF ファイルを好きな向きに変更して保存できるプログラムを、自分で書けばいいのではないか? と思った次第です。
自分の技術では PDF ファイルの内容をどうこうすることは到底できません。中身がどうなっているのかも、以前、ちょっとだけ勉強したことはあるのですが、今は全部忘れました。でも、他人様のお作りになられたとても良い Tool がたくさん公開されています。PDF ファイル操作のユーティリティは多数ありますが、あれこれダウンロードして実際に試用させていただき、今回は PDFtk Server を使わせていただくことにしました。
この PDFtk Server ですが、プラットフォームは、Windows、macOS、Linux に対応しており、PDF ファイルのマージ・分割・回転・その他、幅広い PDF 操作をコマンドラインで実行できる ユーティリティであるとのこと。
PDFtk Server のライセンスは、GNU GPL バージョン2 なので、非商用の個人利用であれば無償で使用可能です。ただし、GPLの下では自分のソフトウェアに PDFtk Server を同梱して、そのソフトウェアを配布する場合には、ソースコードの公開義務などが適用されますので、今回作成するソフトウェアでは PDFtk Server が動作に必要なことを明示して、利用者の責任で PDFtk Server のダウンロードをしていただき、プログラムの動作に必要な環境の整備を行ってもらう形をとりたいと思います。
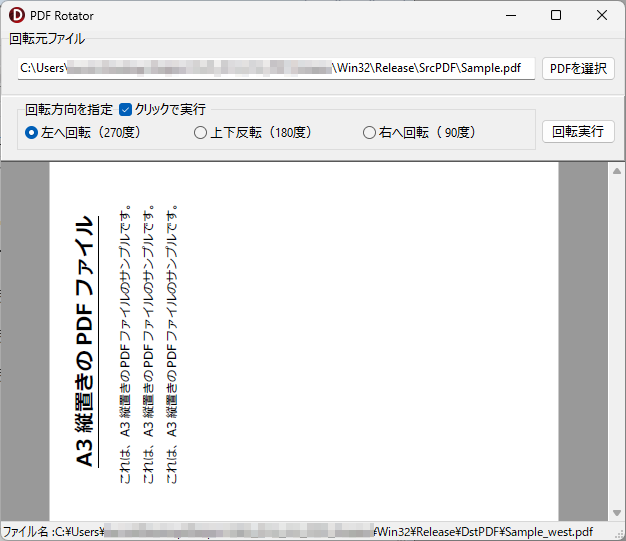
操作方法は、回転させたい PDF ファイルを選択して、回転方向を選ぶ(オプションボタンをクリックする)だけです。回転を実行するボタンをクリックしなくても、回転方向を選んだだけで即回転が実行される機能を実現するチェックボックスも用意しました。
【注意】このプログラムは、ページを指定しての回転は実行することができません。
当初、回転した状態のプレビューを表示するような方向性も考えたのですが、たった3パターンの回転しかありませんし、ファイルの保存にもそれほど時間はかからない(何百ページもあるような PDF 文書はそもそも想定外で動作確認しておりませんので、それが必要な場合は利用者様各自の責任で検証作業を行っていただき、その結果に応じました運用をお願い申し上げます)ので、やや乱暴かもしれませんが、プログラムはオプションボタンをクリックするごとに回転を実行し、ファイルを固有の名称で(上書き)保存してしまう仕様としました。
コントロールが異なると、パスの区切り文字の表記が¥マークと \(バックスラッシュ)になるのは、それぞれのコントールの Font の違いによるものと思われます・・・。
5.CreateProcess で回転を実行
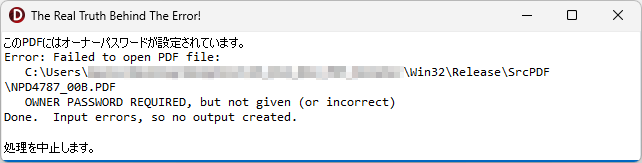
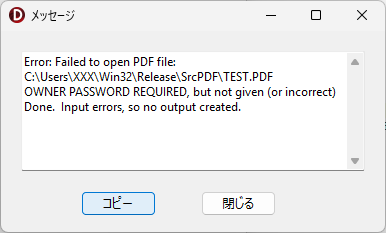
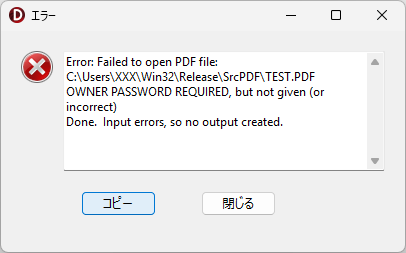
プログラムの設計当初、PDF ファイルの回転処理は先に記載した通り ShellExecute で実行していたのですが、プログラムの動作検証を行った際、200ページ以上ある PDF ファイルを回転元ファイルに指定したら、回転に失敗してしまいました。
ShellExecute では、何が起きて回転に失敗してしまったのかが皆目わかりませんので、原因を究明すべく、回転処理の実行( PDFtk Server の呼び出しと実行部分)を CreateProcess に変更し、エラーが発生した場合はメッセージを PDFtk Server から取得して表示できるよう、次のようにプログラムを修正しました。
private
{ Private 宣言 }
//PDFtkでコマンドを実行
function RunPdftk(const ExePath, Params: string; out OutputStr: string): Boolean;
procedure TForm1.Button2Click(Sender: TObject);
var
InputFile, OutputFile, RotateArg: string;
Params, Msg:string;
strMsg: string;
begin
//カーソルを待機状態に変更
Screen.Cursor:=crHourGlass;
//CreateProcessで実行
try
PDFTK_PATH := ExtractFilePath(Application.ExeName) + 'pdftk.exe';
if not FileExists(PDFTK_PATH) then
begin
StatusBar1.SimpleText := 'pdftk.exe が見つかりません';
Exit;
end;
InputFile := strSrcPDFName;
if not FileExists(InputFile) then
begin
StatusBar1.SimpleText := 'PDFファイルが存在しません';
Exit;
end;
case RadioGroup1.ItemIndex of
0: RotateArg := 'west'; // 270°
1: RotateArg := 'south'; // 180°
2: RotateArg := 'east'; // 90°
else
StatusBar1.SimpleText := '回転方向を選択してください';
Exit;
end;
OutputFile := ChangeFileExt(strDstPDFName, '') + '_' + RotateArg + '.pdf';
strDstPDFName := OutputFile;
//end%sが正しい(end %sとしないこと:半角スペースは不要)
Params := Format('"%s" cat 1-end%s output "%s"', [
InputFile, RotateArg, OutputFile
]);
if RunPdftk(PDFTK_PATH, Params, Msg) then
begin
StatusBar1.SimpleText := FitPathWithMiddleEllipsis(
OutputFile, StatusBar1.Font, StatusBar1.ClientWidth);
if Msg.Trim <> '' then
begin
//ShowMessage('pdftk 出力: ' + Msg);
//コピーできるメッセージを表示する
strMsg:= 'pdftk 出力: ' + Msg + #13#10 + #13#10 +
'"Copied to clipboard"';
//Clipboard.AsText := strMsg; // クリップボードにコピー
Clipboard.AsText := Msg;
//ShowMonospaceMessage(strMsg);
//ShowMessage(strMsg);
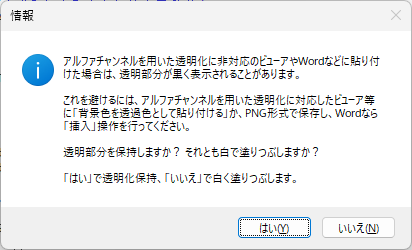
Application.MessageBox(PChar(strMsg), PChar('エラー'), MB_ICONERROR);
end;
Sleep(500);
WebBrowser1.Navigate('file:///' + StringReplace(OutputFile, '\', '/', [rfReplaceAll]));
end
else
begin
StatusBar1.SimpleText := 'pdftk の実行に失敗しました';
if Msg.Trim <> '' then
ShowMessage('エラー詳細: ' + Msg);
end;
finally
//名前を元に戻しておく!
strSrcPDFName := OpenDialog1.FileName;
strDstPDFName := StringReplace(strSrcPDFName, 'SrcPDF', 'DstPDF', [rfReplaceAll, rfIgnoreCase]);
Screen.Cursor := crDefault;
end;
end;
function TForm1.RunPdftk(const ExePath, Params: string;
out OutputStr: string): Boolean;
var
SI: TStartupInfo;
PI: TProcessInformation;
SA: TSecurityAttributes;
StdOutRead, StdOutWrite: THandle;
Buffer: array[0..1023] of Byte;
BytesRead: DWORD;
OutputBytes: TBytes;
CmdLine: string;
begin
//Result := False;
OutputStr := '';
if not FileExists(ExePath) then
raise Exception.CreateFmt('実行ファイルが見つかりません: %s', [ExePath]);
ZeroMemory(@SA, SizeOf(SA));
SA.nLength := SizeOf(SA);
SA.bInheritHandle := True;
if not CreatePipe(StdOutRead, StdOutWrite, @SA, 0) then
RaiseLastOSError;
try
try
SetHandleInformation(StdOutRead, HANDLE_FLAG_INHERIT, 0);
ZeroMemory(@SI, SizeOf(SI));
SI.cb := SizeOf(SI);
SI.dwFlags := STARTF_USESHOWWINDOW or STARTF_USESTDHANDLES;
SI.wShowWindow := SW_HIDE;
SI.hStdOutput := StdOutWrite;
SI.hStdError := StdOutWrite;
ZeroMemory(@PI, SizeOf(PI));
CmdLine := Format('"%s" %s', [ExePath, Params]);
if not CreateProcess(
nil, PChar(CmdLine), nil, nil, True,
CREATE_NO_WINDOW, nil, nil, SI, PI) then
RaiseLastOSError;
CloseHandle(StdOutWrite);
SetLength(OutputBytes, 0);
repeat
if not ReadFile(StdOutRead, Buffer, SizeOf(Buffer), BytesRead, nil) then
Break;
if BytesRead > 0 then
begin
//W1024 符号付型と符号無し型の演算による、オペランドの拡張」と警告される
//SetLength(OutputBytes, Length(OutputBytes) + BytesRead);
//対策1:BytesRead を明示的に Integer にキャストする
SetLength(OutputBytes, Length(OutputBytes) + Integer(BytesRead));
//対策2:Length を NativeInt にキャストする(より安全か?)
//SetLength(OutputBytes, NativeInt(Length(OutputBytes)) + NativeInt(BytesRead));
//W1024 符号付型と符号無し型の演算による、オペランドの拡張」と警告される
//Move(Buffer[0], OutputBytes[Length(OutputBytes) - BytesRead], BytesRead);
//対策1:BytesRead を明示的に Integer にキャストする
Move(Buffer[0], OutputBytes[Length(OutputBytes) - Integer(BytesRead)], BytesRead);
end;
until BytesRead = 0;
WaitForSingleObject(PI.hProcess, INFINITE);
CloseHandle(PI.hProcess);
CloseHandle(PI.hThread);
if Length(OutputBytes) > 0 then
OutputStr := TEncoding.UTF8.GetString(OutputBytes);
Result := True;
except
on E: Exception do
begin
OutputStr := E.Message;
Result := False;
end;
end;
finally
CloseHandle(StdOutRead);
end;
end;
PDFtk Server の実行は、RunPdftk 関数側で行っています。
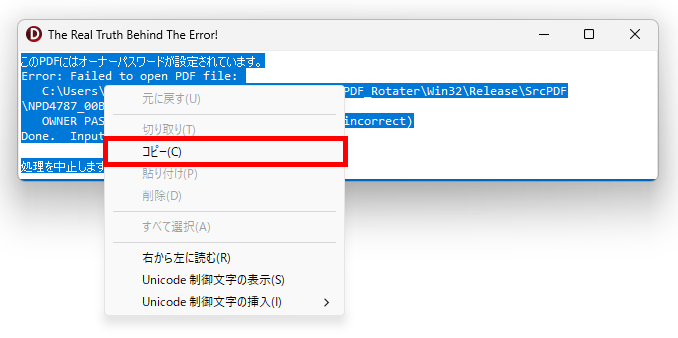
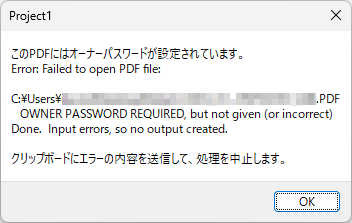
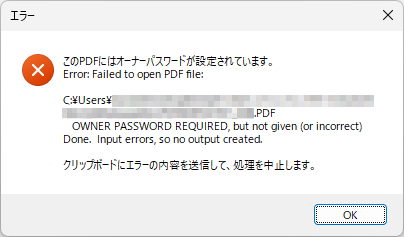
こうして CreateProcess での PDFtk Server の呼び出しに実行方法を変更し、何か問題が発生した場合には PDFtk Server 側からのエラーメッセージを取得して表示するようにできました。早速、先ほど回転に失敗した巨大な PDF ファイルを再度指定して、回転を実行してみました。
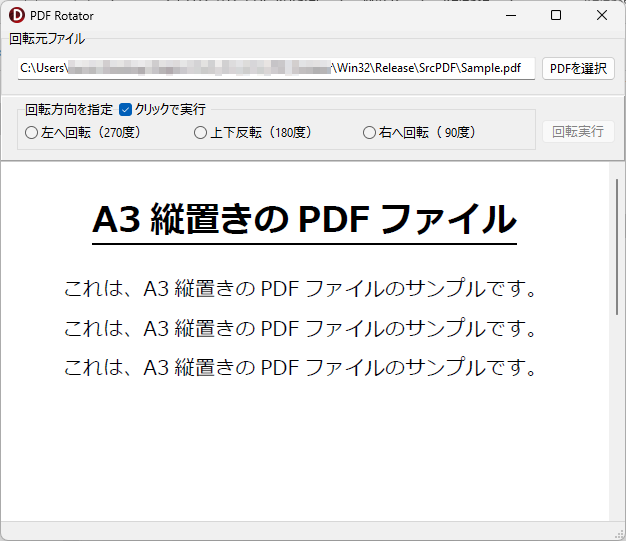
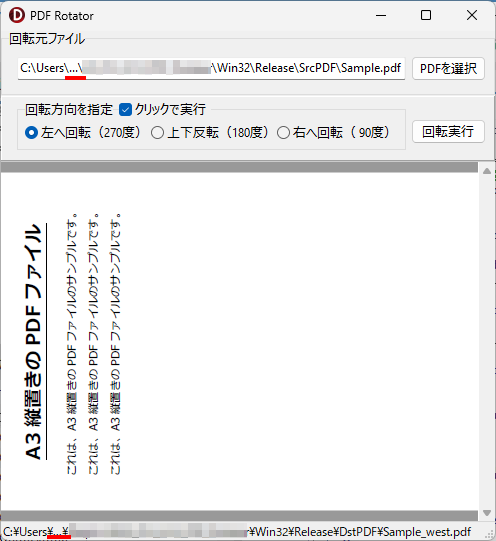
PDF_Rotator.exe をダブルクリックして起動後、回転させたい PDF ファイルを選択し、回転方向を指定してください。デフォルト設定では、回転方向の指定と同時に PDF ファイルの回転と保存が行われます。回転後の PDF ファイルは、左へ回転した場合は「元のファイル名_west.pdf」、上下反転した場合は「元のファイル名_south.pdf」、右へ回転した場合は「元のファイル名_east.pdf」のように北を上とした場合の方角が付加されて DstPDF フォルダ内に保存されます。
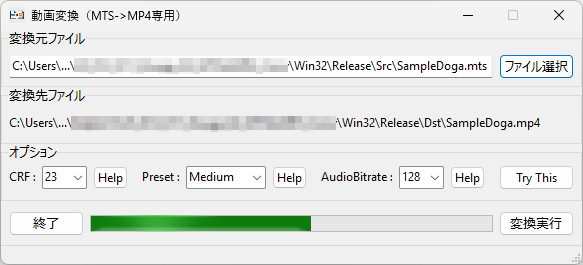
PC に詳しい方なら次のような画面が表示され、より詳細な変換処理の進捗状況が見えた方が安心かもしれませんが、この背景が真っ黒な画面にあまり馴染みのない方にとっては、この画面よりもプログレスバーに進捗状況が表示されるという、より単純な GUI による表示の方が安心できるのではないでしょうか?(私は、本質的に難しいことが苦手なので、そのように感じてしまいます)
  function TimeStringToSeconds(const TimeStr: string): Double;
  var
    h, m, s: Integer;
    secFrac: Double;
    Parts: TArray<string>;
  begin
    Result := 0;
    Parts := TimeStr.Split([':']);
    if Length(Parts) < 3 then Exit;

    h := StrToIntDef(Parts[0], 0);
    m := StrToIntDef(Parts[1], 0);
    s := Trunc(StrToFloatDef(Parts[2], 0));
    secFrac := Frac(StrToFloatDef(Parts[2], 0));

    Result := h * 3600 + m * 60 + s + secFrac;
  end;
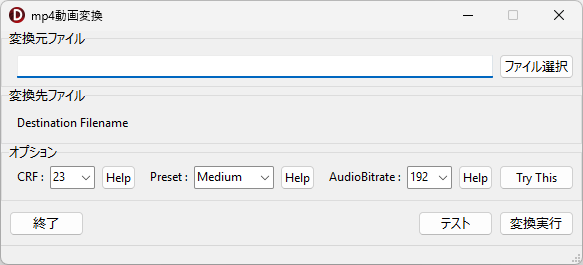
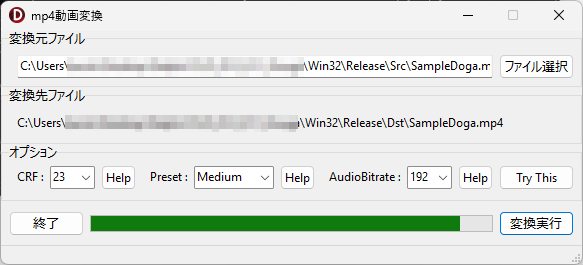
「変換実行」ボタンをクリックした際の手続き全体のコードです。
procedure TForm1.ButtonXClick(Sender: TObject);
function TimeStringToSeconds(const TimeStr: string): Double;
var
h, m, s: Integer;
secFrac: Double;
Parts: TArray<string>;
begin
Result := 0;
Parts := TimeStr.Split([':']);
if Length(Parts) < 3 then Exit;
h := StrToIntDef(Parts[0], 0);
m := StrToIntDef(Parts[1], 0);
s := Trunc(StrToFloatDef(Parts[2], 0));
secFrac := Frac(StrToFloatDef(Parts[2], 0));
Result := h * 3600 + m * 60 + s + secFrac;
end;
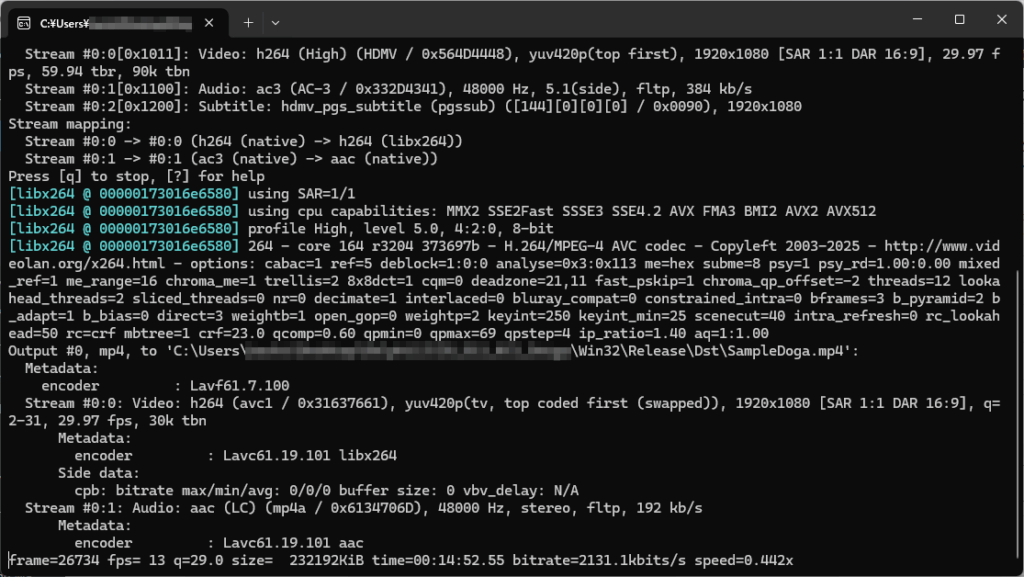
procedure RunFFmpegWithProgressBar(const InputFile, OutputFile: string; ProgressBar: TProgressBar);
var
SecurityAttr: TSecurityAttributes;
StdOutRead, StdOutWrite: THandle;
StartupInfo: TStartupInfo;
ProcessInfo: TProcessInformation;
Buffer: array[0..1023] of AnsiChar;
LogBuffer: string;
Lines: TArray<string>;
Line: string;
BytesRead: DWORD;
DurationInSec, CurrentTimeInSec: Double;
CmdLine: string;
TotalDurationStr, TimeStr: string;
FFmpegPath: string;
AudioBitrate, VideoCRF: Integer;
strPreset: string;
i: Integer;
begin
//初期化
ProgressBar.Min := 0;
ProgressBar.Max := 100;
ProgressBar.Position := 0;
//パイプの準備
SecurityAttr.nLength := SizeOf(SecurityAttr);
SecurityAttr.bInheritHandle := True;
SecurityAttr.lpSecurityDescriptor := nil;
if not CreatePipe(StdOutRead, StdOutWrite, @SecurityAttr, 0) then
RaiseLastOSError;
ZeroMemory(@StartupInfo, SizeOf(StartupInfo));
StartupInfo.cb := SizeOf(StartupInfo);
StartupInfo.hStdError := StdOutWrite;
StartupInfo.hStdOutput := StdOutWrite;
StartupInfo.dwFlags := STARTF_USESTDHANDLES or STARTF_USESHOWWINDOW;
StartupInfo.wShowWindow := SW_HIDE;
//Pathを設定
FFmpegPath:=IncludeTrailingPathDelimiter(ExtractFilePath(Application.ExeName)) + 'ffmpeg\\bin\\ffmpeg.exe';
//各パラメータの設定(値は参考)
//VideoCRF:= 23;
VideoCRF:=StrToInt(ComboBox1.Text);
//プリセット(例: ultrafast, superfast, medium, slow, veryslow など)
//strPreset:= 'slow';
strPreset:= ComboBox2.Text;
//AudioBitrate:= 192;
AudioBitrate:= StrToInt(ComboBox3.Text);
//-ac 2 を追加して、5.1ch → 2ch ステレオ に変換して出力(My環境ではこうしないと無音になる!)
CmdLine:= Format(
'"%s" -i "%s" -map 0:v -map 0:a -vcodec libx264 -acodec aac -ac 2 -b:a %dk -crf %d -preset %s -y -progress pipe:1 "%s"',
[FFmpegPath, InputFile, AudioBitrate, VideoCRF, strPreset, OutputFile]
);
if not CreateProcess(nil, PChar(CmdLine), nil, nil, True,
CREATE_NO_WINDOW, nil, nil, StartupInfo, ProcessInfo) then
begin
CloseHandle(StdOutRead);
CloseHandle(StdOutWrite);
RaiseLastOSError;
end;
CloseHandle(StdOutWrite);
LogBuffer := '';
DurationInSec := 0;
repeat
FillChar(Buffer, SizeOf(Buffer), 0);
if ReadFile(StdOutRead, Buffer, SizeOf(Buffer) - 1, BytesRead, nil) and (BytesRead > 0) then
begin
LogBuffer := LogBuffer + string(Copy(Buffer, 0, BytesRead));
//改行で分割して処理
Lines := LogBuffer.Split([#10, #13], TStringSplitOptions.ExcludeEmpty);
if Length(Lines) > 0 then
begin
for i := 0 to High(Lines) - 1 do
begin
Line := Trim(Lines[i]);
//ログ出力内容を確認
//Memo1.Lines.Add(Line);
if (DurationInSec = 0) and (Pos('Duration:', Line) > 0) then
begin
TotalDurationStr := Copy(Line, Pos('Duration:', Line) + 9, 12);
DurationInSec := TimeStringToSeconds(Trim(TotalDurationStr));
end;
if Pos('out_time=', Line) > 0 then
begin
TimeStr := Copy(Line, Pos('out_time=', Line) + 9, 11);
CurrentTimeInSec := TimeStringToSeconds(Trim(TimeStr));
if DurationInSec > 0 then
begin
ProgressBar.Position := Min(100, Round((CurrentTimeInSec / DurationInSec) * 100));
Application.ProcessMessages;
end;
end;
end;
LogBuffer := Lines[High(Lines)];
end;
end;
until WaitForSingleObject(ProcessInfo.hProcess, 10) = WAIT_OBJECT_0;
CloseHandle(StdOutRead);
CloseHandle(ProcessInfo.hProcess);
CloseHandle(ProcessInfo.hThread);
end;
begin
//変換元ファイルの指定がない場合は、処理しない
if Edit1.Text='' then
begin
Edit1.SetFocus;
Exit;
end;
//プログレスバーを表示
ProgressBar1.Visible:=True;
try
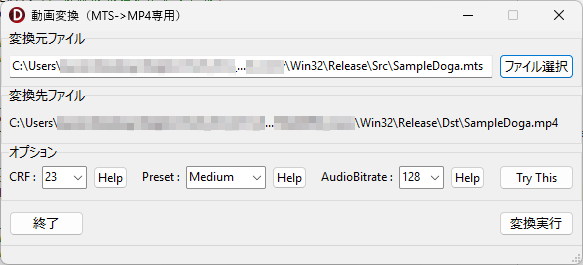
//MTS -> MP4変換
RunFFmpegWithProgressBar(Edit1.Text, Label1.Caption, ProgressBar1);
finally
//非表示にする
ProgressBar1.Visible:=False;
end;
end;
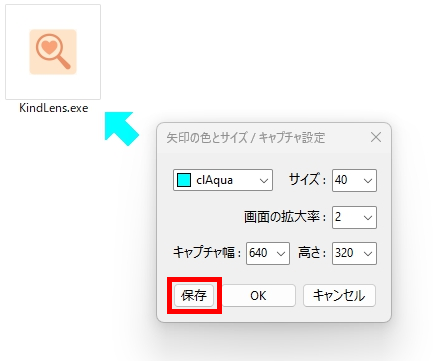
矢印型 Form をこの位置に置いてクリックすると・・・予め設定した範囲を、指定した倍率で、図のように枠のない別窓に拡大表示します。 別窓を指定時間後に自動で閉じる設定も可能です。 (デフォルト設定では、幅640×高さ320ピクセル、倍率2倍で、2.5秒間表示後、自動で閉じます)
追記(20250715)
初期バージョンにあった不具合を解消しました。主な改善点は以下の通りです。
(1)矢印型 Form の画面上の位置に応じて、矢印の向きとキャプチャ範囲を自動設定します。 (2)矢印形状(方向)のリアルタイム描画で、より直感的なキャプチャ範囲設定を可能としました。 (3)キャプチャ画面を指定時間後に自動で閉じる機能を追加しました(0.5秒刻みで設定可)※。
※ 指定時間経過後に拡大表示画面が自動で閉じる機能はデフォルト ON になっています。
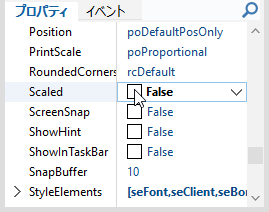
また、上記改善を行った後、マルチモニター環境で行ったテストにおいて、プログラムの設計時、設定 Form の Scaled プロパティの確認を怠り、これを「 True のまま」としたため(なぜ、そうなっているのか、わかりませんが、 Delphi では Form の Scaled プロパティはデフォルト True なのです)、設定 Form に配置した VCL コントロールの配置がモニタの解像度によっては乱れてしまうことを確認し、一旦公開を中止して当該箇所の不具合を修正し、再度公開しました。
プログラムにはバージョン番号の表記等は一切ありませんので、矢印型 Form を右クリックすると表示されるサブメニューから「設定」をクリックして選択し、表示される設定画面が正常でない場合は、当記事のダウンロードリンクより、最新版の KindLens.exe をダウンロードしていただけますよう、伏してお願い申し上げます。
PCの画面を拡大表示できるツールは Windows の拡大鏡をはじめとしてさまざまなものがありますが、各種設定変更の必要性がなく、単一の実行形式ファイルのダブルクリックで起動し、マウス操作(ドラッグ&ドロップと左ボタンクリック)のみで画面の拡大表示を実現できる無料ツールはおそらくないのではないかと思います。
使い方は・・・
【初期バージョン】※ 現在、ダウンロードできません。
(1)矢印型の Form を拡大表示したい領域の右下へドラッグして移動します。 (2)ドロップした矢印型 Form 上をクリック(マウスの左ボタンを押し下げ)します。 (3)ドロップした位置の左上方向の画面が、拡大表示されます。
また、矢印型の Form は、常に最前面に表示されますので、動画等を全画面表示している場合でも問題なく動作します。拡大表示は矢印型の Form 上をクリックすることで実行されますので、動画アプリの操作と干渉することはありません(動画を流したまま、その一部の拡大表示が「静止画」として可能※です)。
※ 私のPC環境では、TEAMSで配信した動画や、YouTube の動画は静止画として拡大表示できましたが、PC環境や通信方法によっては動画を静止画として取得できない場合があるかもしれません。また、このプログラムは Microsoft 社の Windows11 で開発し、同 OS 上で動作確認を行っています。他社製 OS 上での動作は未確認ですので、間接的な方法やエミュレーション技術を利用されて本プログラムを Windows 以外の OS 上で実行される場合は、プログラムそのものが動作しない可能性があることに十分ご注意ください。
【プログラムの開発環境(ご参考まで)】
・デバイスの仕様
デバイス名 XXX
プロセッサ 11th Gen Intel(R) Core(TM) i7-1185G7 @ 3.00GHz (3.00 GHz)
実装 RAM 32.0 GB (31.7 GB 使用可能)
デバイス ID
プロダクト ID
システムの種類 64 ビット オペレーティング システム、x64 ベース プロセッサ
ペンとタッチ 10 タッチ ポイントでのペンとタッチのサポート
・Windowsの仕様
エディション Windows 11 Pro
バージョン 24H2
インストール日 2024/10/05
OS ビルド 26100.4652
エクスペリエンス Windows 機能エクスペリエンス パック 1000.26100.128.0
・開発環境
Embarcadero® Delphi 12.3 (バージョン 29.0.55362.2017)
Professional with Mobile
矢印の色に「白」を設定した場合は、矢印の輪郭を黒で描画して白背景の画面でも矢印 Form の位置がわかるように工夫してあります。ただし、白以外の淡色を指定した場合は、このような黒い輪郭の描画は行われません。くれぐれもご注意ください※。
色を「白」に設定した場合、矢印の輪郭が黒い線で描画されます。
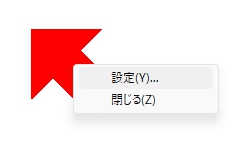
※ もし、矢印 Form の色を白以外のごく薄い淡色に設定して、矢印型 Form の表示位置がわからなくなった場合は、タスクバーに表示されている KindLens のアイコンを右クリックして表示されるメニューから「ウィンドウを閉じる」を選択(クリック:マウスの左ボタン押し下げ)する方法で、プログラムを終了することができます。
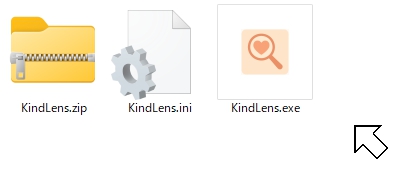
設定状態を保存していない場合は、次回起動時には矢印型 Form の色は以前の状態に戻ると思いますが、ごく薄い淡色の設定状態を保存した場合は、KindLens.exe と同じ場所にある KindLens.ini を削除してから KindLens.exe を起動してください。矢印型 Form は初期設定の赤い状態で表示されます。その後、必要に応じて各種設定を変更してください。設定変更後、「保存」ボタンをクリックすれば、拡張子が ini のイニシャライズファイルが再作成され、新しい設定がこのファイルに保存されます。
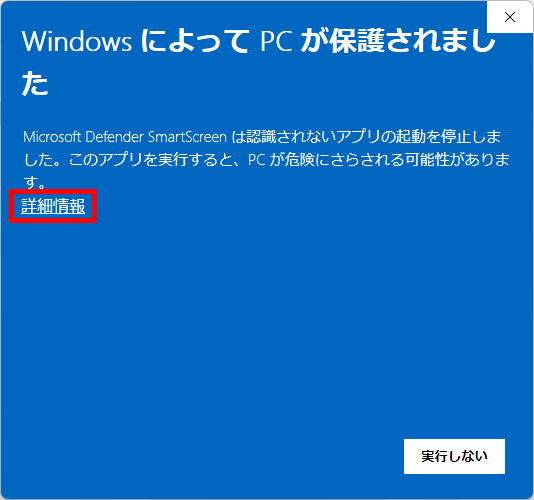
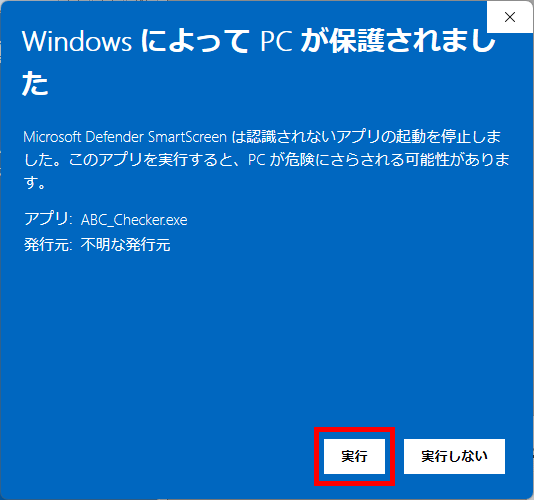
プログラムの起動に成功すると、初期状態では赤い矢印型 Form がお使いの PC の画面中央に表示されますが、ダウンロード&展開直後の最初の実行(プログラム起動)時には Windows の保護機能が働いて、次に示す Windows Defender SmartScreen による警告画面が表示されます。
AV は「初めて見る未知の DLL」をロードしようとした時に、ファイル全体をディスクから読み込み、サンドボックス(外部と隔離された仮想環境:ITやセキュリティの分野では、主に怪しいプログラムを安全に試すための実験室として使われる)や、クラウドサービスに投げて解析(インターネット接続が出来ない環境である場合には、一定時間のタイムアウトを設け、その後ローカル判定にフォールバックする:なのでインターネット接続環境がないPCで実行してもいつまでもフリーズしたような状態が続くわけではない → 待機時間は Windows Defender の場合、既定で数秒~数十秒程度)し、ハッシュをキャッシュに登録という処理を行うため、この「初回スキャン」が終わるまで、DLL ロードは OS レベルでブロックされてしまい、アプリケーション側から見ると フリーズ、すなわち「固まった」ようにしか見えない状態になるわけです。一度、このスキャンを通過すれば「このファイルは安全」とキャッシュされるので、以後は高速にロードできるようになります。
自動採点の初回実行時のみ PC がフリーズしたようになり、2回目以降は何の問題もなかったかのように動作するのは、このスキャンが実行されている証拠だと思われます(このスキャンが実行されていることを直接確認する方法はないようです: AV が検査状態を外部に直接公開すると、逆にマルウェアに悪用される可能性が高まるため)。
さらに「実行形式ファイルを別の場所にコピーすると再びフリーズする」のは、 AV によっては ファイルパスや場所ごとにキャッシュが分かれるためです(同じファイルでもデスクトップに置いたら「未知扱い」になる)。
procedure TFormCollaboration.FormCreate(Sender: TObject);
var
  ・・・ 省略 ・・・
begin
  //embPythonの存在の有無を調査(条件コンパイル)
  {$IFDEF WIN32}
    //32bit環境での処理
    AppDataDir:=ExtractFilePath(Application.ExeName)+'Python39-32';
  {$ELSE}
    //64bit環境での処理
    AppDataDir:=ExtractFilePath(Application.ExeName)+'Python39-64';
  {$ENDIF}

  if DirectoryExists(AppDataDir) then
  begin
    //フォルダが存在したときの処理
    PythonEngine1.AutoLoad:=True;
    PythonEngine1.IO:=PythonGUIInputOutput1;
    PythonEngine1.DllPath:=AppDataDir;
    PythonEngine1.SetPythonHome(PythonEngine1.DllPath);
    PythonEngine1.LoadDll;
    //PythonDelphiVar1のOnSeDataイベントを利用する
    PythonDelphiVar1.Engine:=PythonEngine1;
    PythonDelphiVar1.VarName:=AnsiString('var1');
    //初期化
    PythonEngine1.Py_Initialize;
  end else begin
    PythonEngine1.AutoLoad:=False;
  end;

  //Splashフォームを表示
  theSplashForm:=TSplashForm.Create(Application);
  try
    theSplashForm.Show;
    theSplashForm.Refresh;
    theSplashForm.TimeLabel.Caption :=
      'ライブラリをロード中...(スキャンにより数分かかる場合があります)';
    theSplashForm.Update;
    Sleep(1500);
    LoadAllPythonModules;  //Pythonのモジュールを読み込み
    theSplashForm.TimeLabel.Caption := '準備が整いました!';
    theSplashForm.Update;
    Sleep(500);
    FadeOutForm(theSplashForm);
    theSplashForm.Close;
  finally
    theSplashForm.Free;
  end;
  ・・・ 省略 ・・・
end;
上記コードを実行した結果、初回起動時、私の環境では約2分5秒間 PC が待機状態になりました。また、自動採点機能の初回使用時は、私の環境では 15 秒間待機状態が続きました。2回目のアプリケーション起動時、自動採点実行時は、いずれも待機時間は大幅に短縮され、ほとんど気にならないレベル(個人差はあると思いますが)になりました。
(2)について
(1)ではユーザーへの案内が「’ライブラリをロード中…(スキャンにより数分かかる場合があります)’」のみとなってしまい、処理の経過状況がうまく伝わらない可能性があると考え、当初、別スレッドで AV スキャンを監視し、UI (theSplashForm.TimeLabel.Caption)に進捗状況を表示できないかと考えました。そこで、.pyd ファイル(=Python モジュール)のロードと同時に監視を自動で開始し、スキャンが収束するまで待機するユーティリティ関数を作成してみたのですが、PC の環境によりインストールされている AV は異なっていて当然ですので、この AV プロセスをどうすれば確実に取得できるかという部分が、まず大きな問題となりました。
type
  TAVInfo = record
    Name: string;
    Path: string;
  end;

function DetectAVProcesses: TArray<TAVInfo>;

implementation

const
  AVCandidates: array[0..4] of TAVInfo = (
    (Name: 'MsMpEng'; Path: '') //動的に取得する
  );

function GetProcessPath(const ProcName: string): string;
var
  Snapshot: THandle;
  ProcEntry: TProcessEntry32;
  hProcess: THandle;
  PathBuffer: array[0..MAX_PATH - 1] of Char;
begin
  Result := '';
  Snapshot := CreateToolhelp32Snapshot(TH32CS_SNAPPROCESS, 0);
  if Snapshot = INVALID_HANDLE_VALUE then Exit;

  ProcEntry.dwSize := SizeOf(TProcessEntry32);
  if Process32First(Snapshot, ProcEntry) then
  begin
    repeat
      if SameText(ProcEntry.szExeFile, ProcName + '.exe') then
      begin
        hProcess := OpenProcess(PROCESS_QUERY_INFORMATION or PROCESS_VM_READ, False, ProcEntry.th32ProcessID);
        if hProcess <> 0 then
        begin
          if GetModuleFileNameEx(hProcess, 0, PathBuffer, Length(PathBuffer)) > 0 then
            Result := PathBuffer;
          CloseHandle(hProcess);
        end;
        Break;
      end;
    until not Process32Next(Snapshot, ProcEntry);
  end;
  CloseHandle(Snapshot);
end;

function DetectAVProcesses: TArray<TAVInfo>;
var
  i: Integer;
  L: TList<TAVInfo>;
  Path: string;
  Info: TAVInfo;
begin
  L := TList<TAVInfo>.Create;
  try
    for i := Low(AVCandidates) to High(AVCandidates) do
    begin
      Path := GetProcessPath(AVCandidates[i].Name);
      if Path <> '' then
      begin
        Info := AVCandidates[i];
        Info.Path := Path;
        L.Add(Info);
      end;
    end;
    Result := L.ToArray;
  finally
    L.Free;
  end;
end;
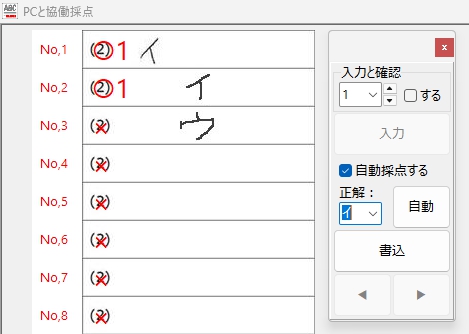
私が動作確認した際には経験しなかった現象なので、具体的に「ナニを・どうすると・それが起きるのか」が当初まったくわからず、はたして不具合を解消できるかどうか、大いに不安でしたが、年齢層で言うとかなり高めの方からの不具合の報告であったことを念頭に置き、得点の「入力」、採点結果の「書込」、採点対象答案の「移動」あたりのボタンクリックに関する問題なのではないかと推測して、不具合の再現を図ったところ、予想が的中し、「書込」ボタンを連打すると PC がフリーズしてプログラムが落ちることを確認しました。
procedure TForm1.DoSaveData;
var
  i:integer;
begin
  if FIsSaving then Exit; // 多重実行防止
  FIsSaving := True;
  ・・・ 省略 ・・・
end;
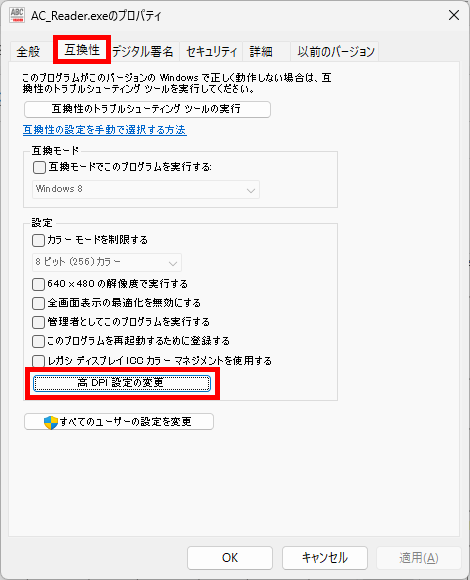
なお、自動採点機能もどきを搭載した Version 3 の修正作業を行っているうちに、私の周囲では、旧版の Version 2 の方が手に馴染むと、そちらを使い続けてくださっている方が複数いることを思い出し、Version 3 に行ったものと同等の修正(今回の修正に加えて、高 DPI 環境下でのスケーリング問題への対応や、メモリーリークを防止するため、設定画面が表示されている際には「閉じる」ボタンを無効化する処理等)を Version 2 にも同様に施して、Version 3 側を「 AC_Reader_AutoGrading.exe 」、Version 2 側を「 AC_Reader_NoneAutoGrading.exe 」として、上記リンクからダウンロードできる「 デジタル採点 All in One.zip 」に同梱しました。
自動採点機能もどきを搭載した Version 3 は、初回起動時に必ず実行される Windows Defender や McAfee などの Anti-Virus Software : AV による『未知バイナリの初回スキャン』の対象ファイルが多いため、実行環境を別ディレクトリに移動した際等、必ずこの処理が走り、長い待機状態が発生します。自動採点機能が不要の場合は、それがなく、『未知バイナリの初回スキャン』の対象ファイルが少ない「 AC_Reader_NoneAutoGrading.exe 」をお試しいただいた方がいいかもしれません。
AI に確認したところ、『多くのAVは、過去にスキャン済みのファイル情報をキャッシュしており、安全と判断したファイルはスキャン対象から外すようにしているが、そのキャッシュには有効期限があるため、検査後一定時間が経過すると「再評価が必要」と判断され、再スキャンが実行される』とのことです(私の環境下では、たとえディレクトリ構成を変えていない場合でも、前回起動時からひと月ほど経過?していたりするとプログラム起動時に待機状態が長く続く現象を確認しました。なので、間違いなくキャッシュには有効期限があるようです)。この他にも『スケジュールされた定期スキャン』や『アイドル時スキャン( ScanOnlyIfIdle )』の実行時、さらに『ウイルス定義ファイル更新後に再評価対象とされた場合』等にも再スキャンされる可能性があるとのことです。安全のためには仕方のないこととは言え、もう少しスキャン時間が短くなるとありがたいのですが・・・。
(追記_20250924 ここまで)
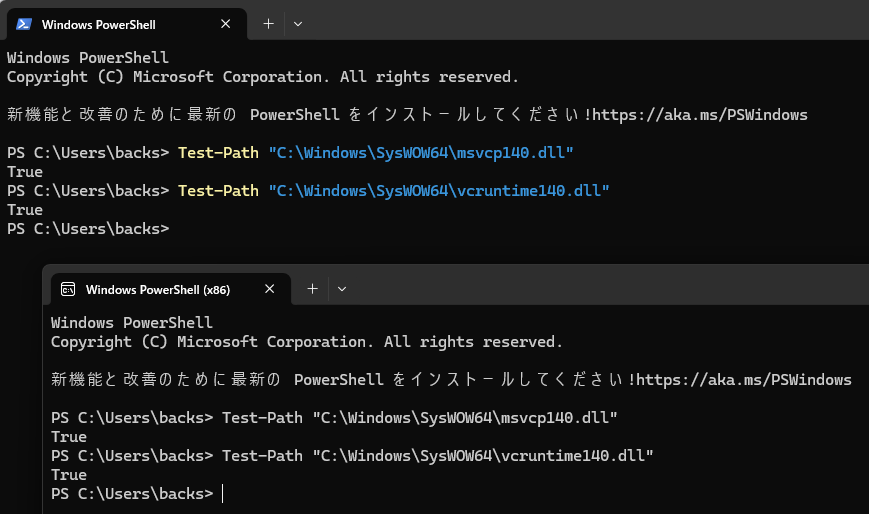
また、このプログラムの動作には「Microsoft Visual C ++ ランタイムライブラリ」のインストールが必要です。お使いのPCに「Microsoft Visual C ++ ランタイムライブラリ」が入っていない場合は、下記 Web サイトから「VisualCppRedist_AIO_x86_x64.exe」をダウンロードし、ダウンロードしたプログラムを管理者権限で実行し、動作に必要なライブラリをPCにインストールしてください。なお、インストール時には Windows のユーザーアカウント制御(UAC) が起動し、管理者用のID とパスワードの入力を求められます。インストールでは、exe の名称からわかるように 32 ビット版と 64 ビット版それぞれの VC++ランタイムライブラリがお使いの PC にセットアップされます。なお、インストール後は(僕のPC環境では)再起動なしで、そのまますぐに AC_Reader.exe を実行できました。
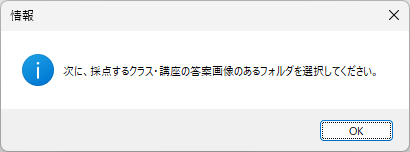
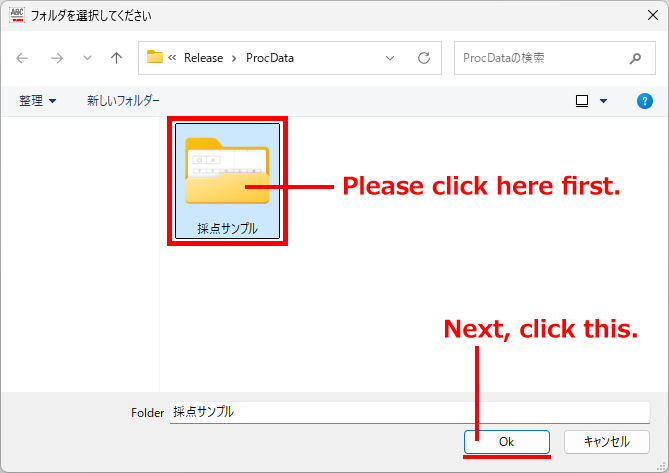
ダウンロードした zip ファイルを展開すれば、すぐにお試しいただけるよう、次に紹介する採点サンプルデータを同梱してあります。記事の説明を参照しながら、操作していただけますよう、お願い申し上げます。
この記事の冒頭にも書きましたが、プログラムの動作には「Microsoft Visual C ++ ランタイムライブラリ」のインストールが必要です。お使いのPCに「Microsoft Visual C ++ ランタイムライブラリ」が入っていない場合は、下記 Web サイトから「VisualCppRedist_AIO_x86_x64.exe」をダウンロードし、ダウンロードしたプログラムを管理者権限で実行し、動作に必要なライブラリをPCにインストールしてください。なお、インストール時には Windows のユーザーアカウント制御(UAC) が起動し、管理者用のID とパスワードの入力を求められます。インストールでは、exe の名称からわかるように 32 ビット版と 64 ビット版それぞれの VC++ランタイムライブラリがお使いの PC にセットアップされます。なお、インストール後は(僕のPC環境では)再起動なしで、そのまますぐに AC_Reader.exe を実行できました。
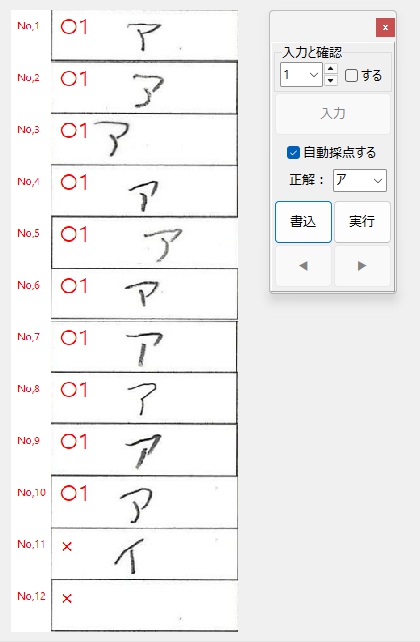
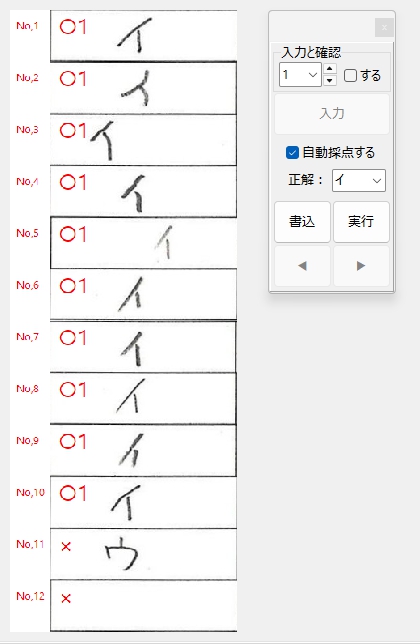
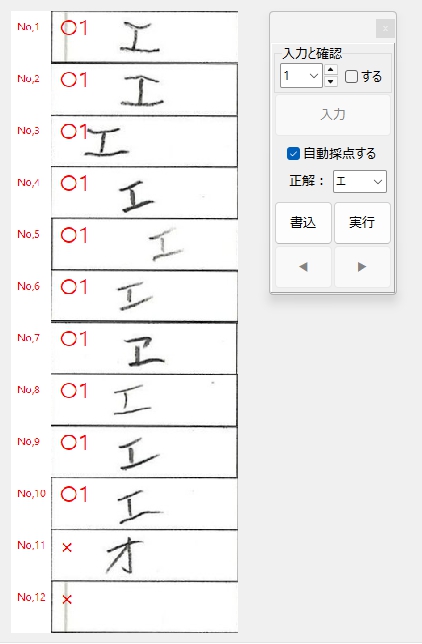
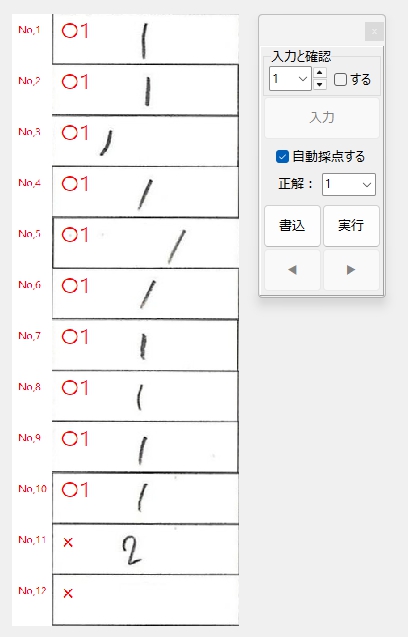
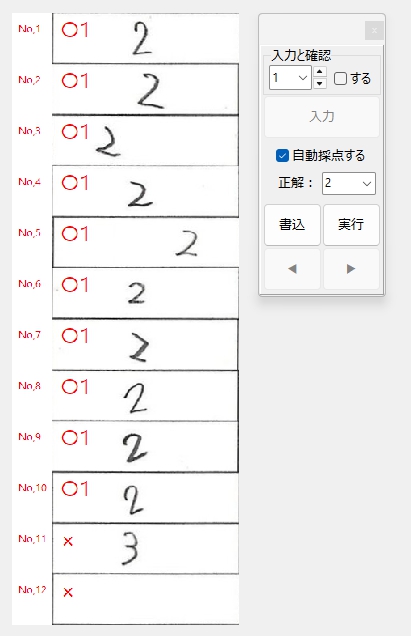
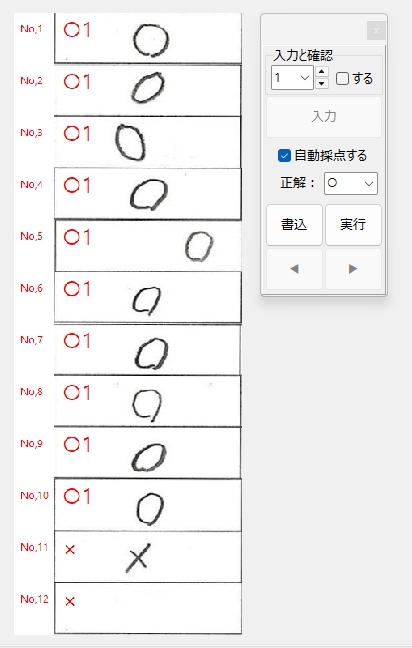
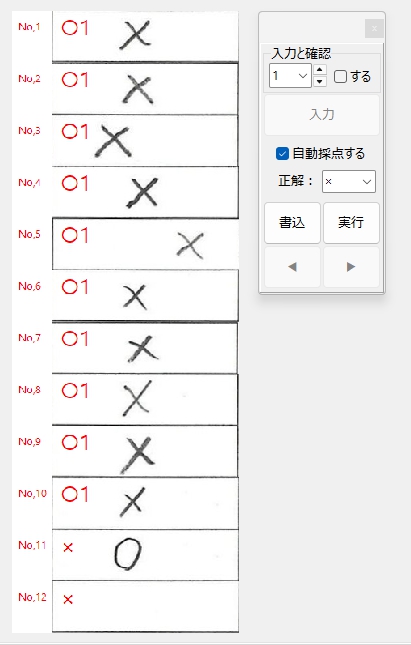
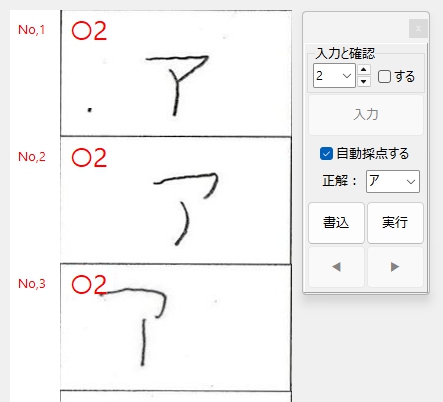
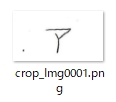
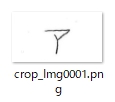
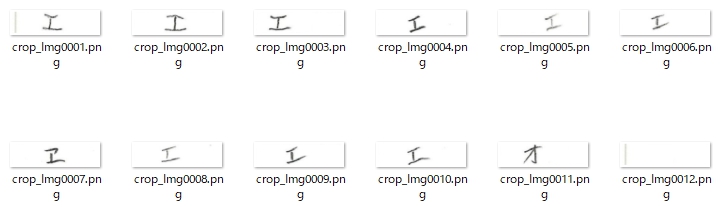
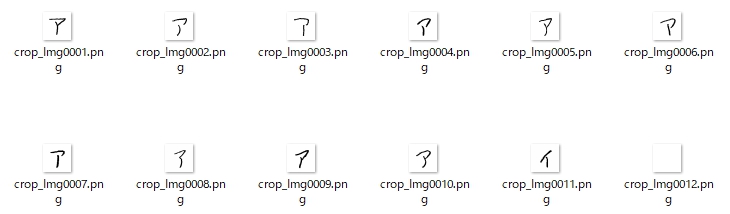
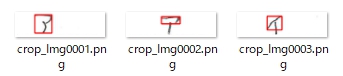
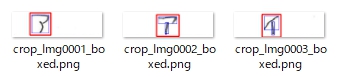
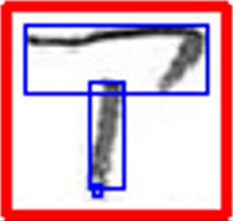
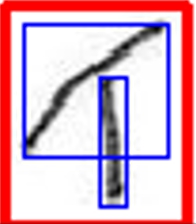
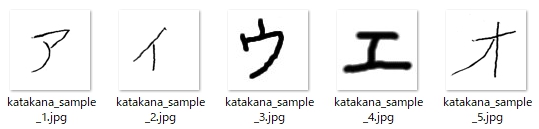
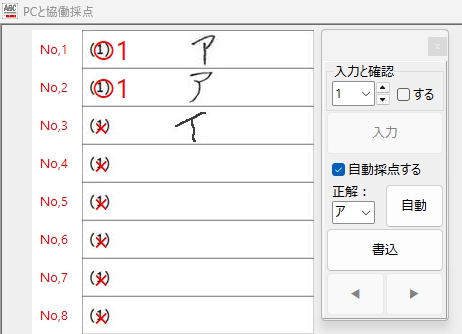
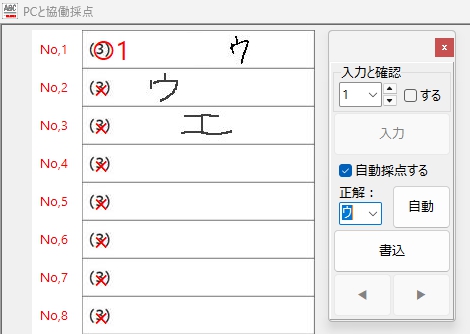
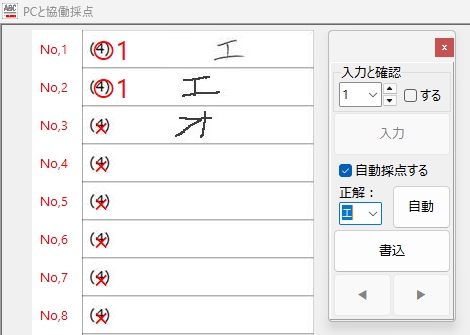
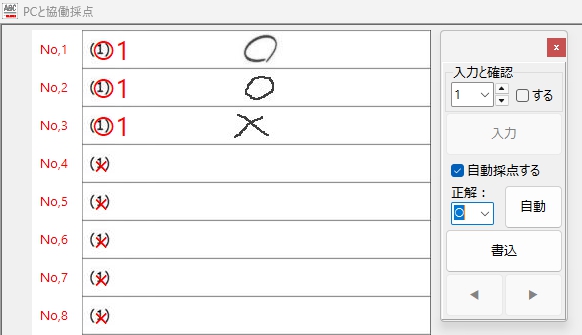
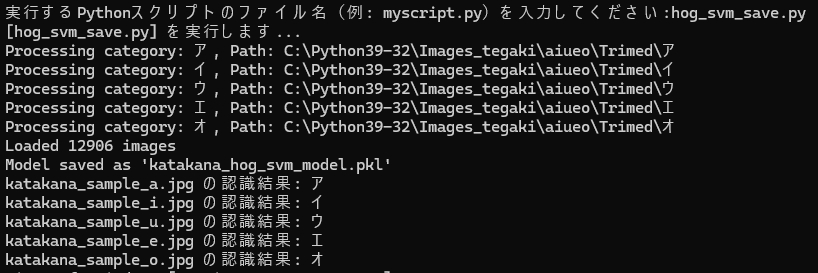
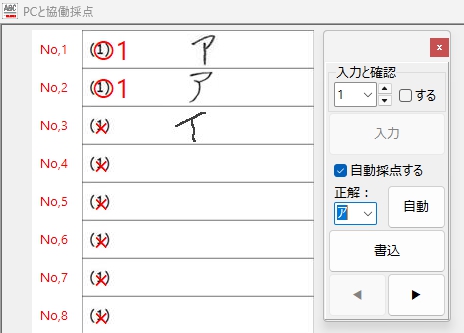
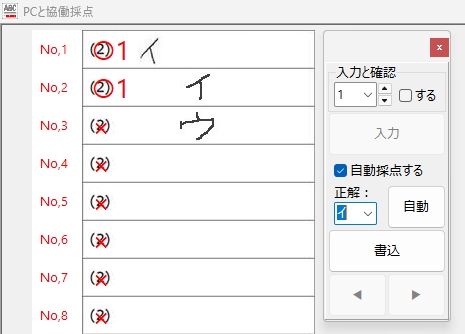
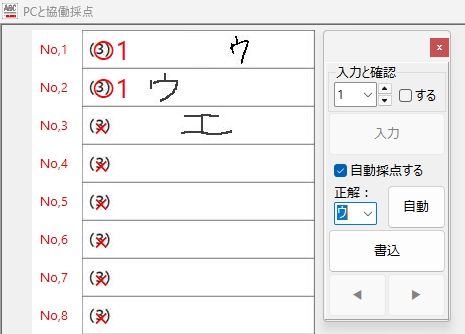
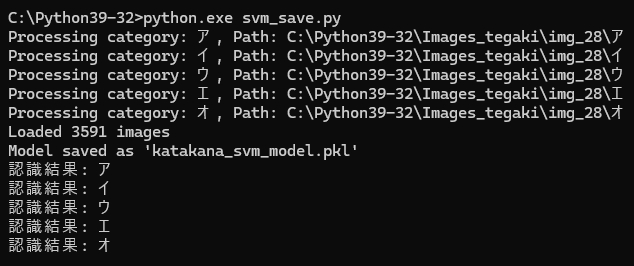
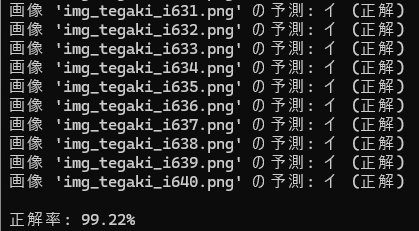
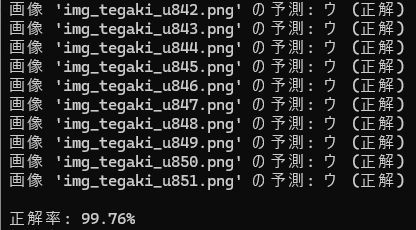
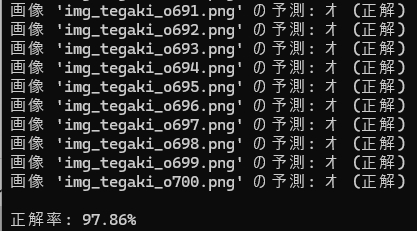
実は、この Blog の過去の記事で「失敗の記録」として掲載した手書き文字認識チャレンジの試行錯誤の記事を書いた当時、文字の認識に失敗した最大の原因は「正しく文字を切り出せなかった」ことにありました。今回、テストしたのは、たった3枚の画像ですが、いずれも問題なく文字が記入されている位置をプログラムは特定し、その正確な切り出しに成功しています。
次は、完成した学習モデルをDelphiから使えるようにすれば OK なのですが、この作業は毎回「写経」を行っているような気持ちを感じる作業です。・・・と、言う僕自身、写経の経験は皆無ですが・・・ この業界で一般的に使用される「写経」的意味合いと、ここでのそれは異なり、感覚的にはむしろ「修行」に近いものです。
次のコードを見ていただければ、なぜ「修行」なのか、ご理解いただけると思います。
procedure TFormCollaboration.btnAutoClick(Sender: TObject);
var
strScrList:TStringList;
strAnsList:TStringList;
j:integer;
intCols:integer;
results: TArray<string>;
s: string;
begin
// ・・・ 略 ・・・
try
//Scriptを入れるStringList
strScrList:=TStringList.Create;
//手書き文字の認識結果
strAnsList:=TStringList.Create;
try
strScrList.Add('import cv2');
strScrList.Add('import numpy as np');
strScrList.Add('import os');
strScrList.Add('from glob import glob');
strScrList.Add('import re');
strScrList.Add('from skimage.feature import hog');
strScrList.Add('import joblib');
//カタカナラベル
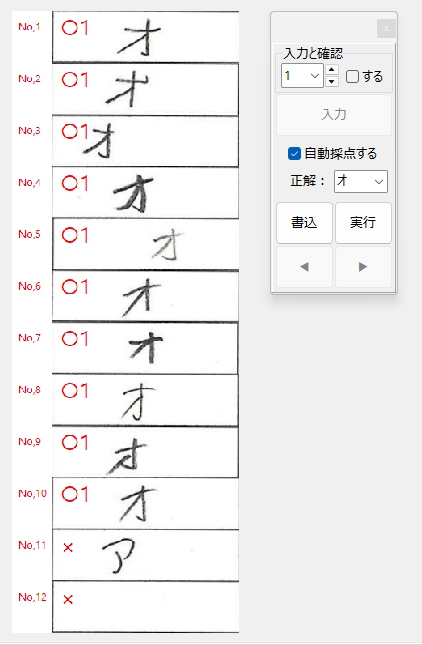
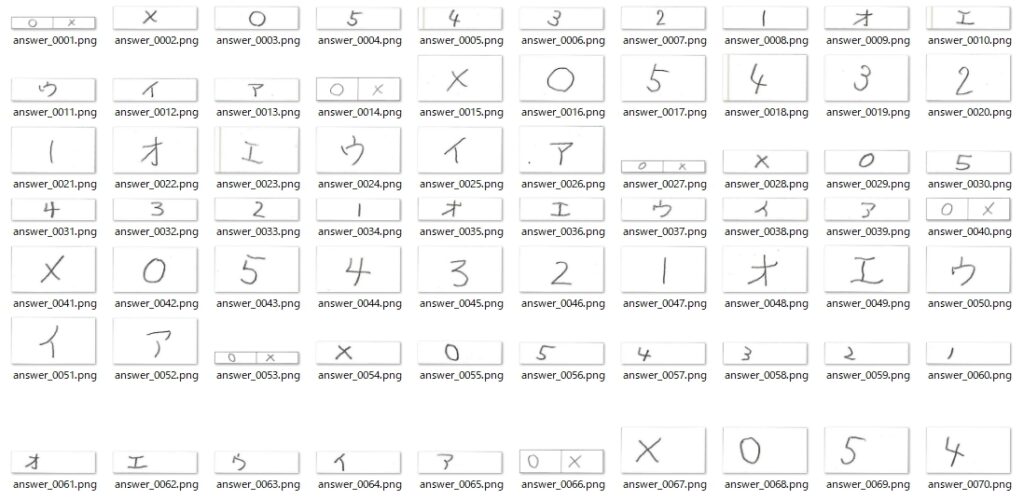
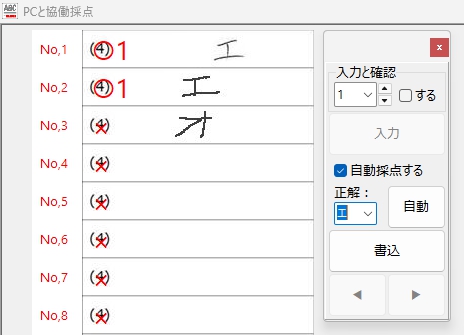
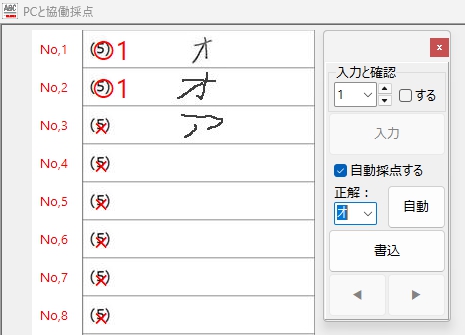
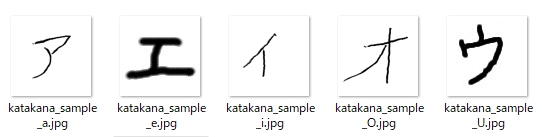
if (cmbAL.Text = 'ア') or (cmbAL.Text = 'イ') or (cmbAL.Text = 'ウ') or (cmbAL.Text = 'エ') or (cmbAL.Text = 'オ') then
begin
strScrList.Add('CATEGORIES = ["ア", "イ", "ウ", "エ", "オ"]');
end;
//○×ラベル
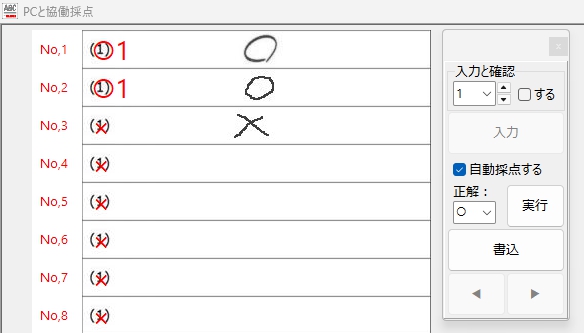
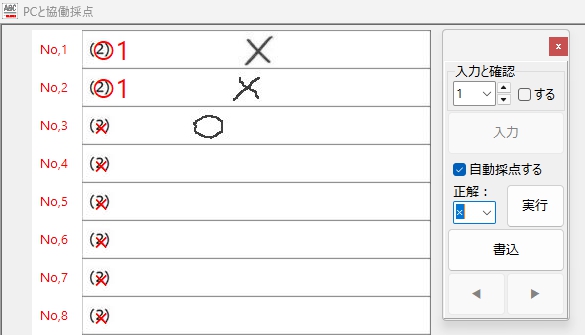
if (cmbAL.Text = '○') or (cmbAL.Text = '×') then
begin
strScrList.Add('CATEGORIES = ["○", "×"]');
end;
//HOG特徴量抽出
strScrList.Add('def extract_hog_features(img):');
strScrList.Add(' features = hog(img, orientations=9, pixels_per_cell=(4, 4), cells_per_block=(2, 2), block_norm="L2-Hys")');
strScrList.Add(' return features');
//UTF-8 パス対応の画像読み込み
strScrList.Add('def imread_utf8(path):');
strScrList.Add(' stream = np.fromfile(path, dtype=np.uint8)');
strScrList.Add(' return cv2.imdecode(stream, cv2.IMREAD_COLOR)');
//傾き補正
strScrList.Add('def deskew(img):');
strScrList.Add(' m = cv2.moments(img)');
strScrList.Add(' if abs(m["mu02"]) < 1e-2:');
strScrList.Add(' return img.copy()');
strScrList.Add(' skew = m["mu11"] / m["mu02"]');
strScrList.Add(' M = np.float32([[1, skew, -0.5 * 28 * skew], [0, 1, 0]])');
strScrList.Add(' return cv2.warpAffine(img, M, (28, 28), flags=cv2.WARP_INVERSE_MAP, borderValue=255)');
//ファイル名から数値を抽出(crop_Img12.png → 12)
strScrList.Add('def extract_number(path):');
strScrList.Add(' filename = os.path.basename(path)');
strScrList.Add(' match = re.search(r"crop_Img(\d+)", filename)');
strScrList.Add(' return int(match.group(1)) if match else float("inf")');
//文字認識処理
strScrList.Add('def predict_character(img, model):');
strScrList.Add(' hog_features = extract_hog_features(img)');
strScrList.Add(' label = model.predict([hog_features])[0]');
strScrList.Add(' return CATEGORIES[label]');
//モデル読み込み
//カタカナラベル
if (cmbAL.Text = 'ア') or (cmbAL.Text = 'イ') or (cmbAL.Text = 'ウ') or (cmbAL.Text = 'エ') or (cmbAL.Text = 'オ') then
begin
strScrList.Add('model_path = r".\Python39-32\katakana_hog_svm_model.pkl"');
end;
//○×ラベル
if (cmbAL.Text = '○') or (cmbAL.Text = '×') then
begin
strScrList.Add('model_path = r".\Python39-32\mb_hog_svm_model.pkl"');
end;
strScrList.Add('if not os.path.exists(model_path):');
strScrList.Add(' raise FileNotFoundError(f"モデルファイルが見つかりません: {model_path}")');
strScrList.Add('model = joblib.load(model_path)');
//入力・出力フォルダ
//strScrList.Add('base_path = r".\imgAuto\src"');
strScrList.Add('input_folder = r".\imgAuto\src"');
//strScrList.Add('folder_path = os.path.join(base_path, CORRECT_LABEL)');
strScrList.Add('output_folder = os.path.join(input_folder, "'+ cmbAL.Text +'")');
strScrList.Add('os.makedirs(output_folder, exist_ok=True)');
//対象画像を取得
strScrList.Add('image_extensions = ["*.jpg", "*.jpeg", "*.png"]');
strScrList.Add('image_files = []');
strScrList.Add('for ext in image_extensions:');
strScrList.Add(' image_files.extend(glob(os.path.join(input_folder, ext)))');
strScrList.Add('image_files.sort(key=extract_number)');
strScrList.Add('results = []');
strScrList.Add('index = 1');
strScrList.Add('for image_path in image_files:');
strScrList.Add(' image = imread_utf8(image_path)');
strScrList.Add(' if image is None:');
strScrList.Add(' print(f"読み込めない画像: {image_path}")');
strScrList.Add(' continue');
strScrList.Add(' h, w = image.shape[:2]');
strScrList.Add(' gray_for_line = cv2.cvtColor(image, cv2.COLOR_BGR2GRAY)');
strScrList.Add(' edges = cv2.Canny(gray_for_line, 50, 150, apertureSize=3)');
strScrList.Add(' raw_lines = cv2.HoughLinesP(edges, 1, np.pi / 180, threshold=100, minLineLength=min(w, h) // 3, maxLineGap=10)');
strScrList.Add(' filtered_lines = []');
strScrList.Add(' if raw_lines is not None:');
strScrList.Add(' for line in raw_lines:');
strScrList.Add(' x1, y1, x2, y2 = line[0]');
strScrList.Add(' angle = abs(np.arctan2(y2 - y1, x2 - x1) * 180 / np.pi)');
strScrList.Add(' length = np.hypot(x2 - x1, y2 - y1)');
strScrList.Add(' if (angle < 10 or angle > 170) and length < w // 2:');
strScrList.Add(' continue');
strScrList.Add(' filtered_lines.append([[x1, y1, x2, y2]])');
strScrList.Add(' if filtered_lines:');
strScrList.Add(' for line in filtered_lines:');
strScrList.Add(' x1, y1, x2, y2 = line[0]');
strScrList.Add(' if abs(x2 - x1) < 10 or abs(y2 - y1) < 10:');
strScrList.Add(' cv2.line(image, (x1, y1), (x2, y2), (255, 255, 255), thickness=3)');
strScrList.Add(' if w > h:');
strScrList.Add(' offset = w // 4');
strScrList.Add(' cropped = image[:, offset:w - offset]');
strScrList.Add(' else:');
strScrList.Add(' offset = h // 4');
strScrList.Add(' cropped = image[offset:h - offset, :]');
strScrList.Add(' gray = cv2.cvtColor(cropped, cv2.COLOR_BGR2GRAY)');
strScrList.Add(' _, thresh = cv2.threshold(gray, 200, 255, cv2.THRESH_BINARY_INV)');
strScrList.Add(' kernel = cv2.getStructuringElement(cv2.MORPH_RECT, (10, 10))');
strScrList.Add(' dilated = cv2.dilate(thresh, kernel, iterations=1)');
strScrList.Add(' contours, _ = cv2.findContours(dilated, cv2.RETR_EXTERNAL, cv2.CHAIN_APPROX_SIMPLE)');
strScrList.Add(' if contours:');
strScrList.Add(' all_points = np.vstack(contours)');
strScrList.Add(' x, y, w_box, h_box = cv2.boundingRect(all_points)');
//strScrList.Add(' padding = 20');
strScrList.Add(' padding = 5');
strScrList.Add(' if w > h:');
strScrList.Add(' x += offset');
strScrList.Add(' else:');
strScrList.Add(' y += offset');
strScrList.Add(' x1 = max(0, x - padding)');
strScrList.Add(' y1 = max(0, y - padding)');
strScrList.Add(' x2 = min(w, x + w_box + padding)');
strScrList.Add(' y2 = min(h, y + h_box + padding)');
strScrList.Add(' trimmed = image[y1:y2, x1:x2]');
strScrList.Add(' trimmed_gray = cv2.cvtColor(trimmed, cv2.COLOR_BGR2GRAY)');
strScrList.Add(' trimmed_blur = cv2.GaussianBlur(trimmed_gray, (3, 3), 0)');
strScrList.Add(' h_trim, w_trim = trimmed_blur.shape[:2]');
strScrList.Add(' scale = 20.0 / max(h_trim, w_trim)');
strScrList.Add(' new_w = int(w_trim * scale)');
strScrList.Add(' new_h = int(h_trim * scale)');
strScrList.Add(' resized = cv2.resize(trimmed_blur, (new_w, new_h), interpolation=cv2.INTER_AREA)');
strScrList.Add(' canvas = np.full((28, 28), 255, dtype=np.uint8)');
strScrList.Add(' x_offset = (28 - new_w) // 2');
strScrList.Add(' y_offset = (28 - new_h) // 2');
strScrList.Add(' canvas[y_offset:y_offset + new_h, x_offset:x_offset + new_w] = resized');
strScrList.Add(' deskewed = deskew(canvas)');
strScrList.Add(' M = cv2.moments(deskewed)');
strScrList.Add(' if M["m00"] != 0:');
strScrList.Add(' cx = int(M["m10"] / M["m00"])');
strScrList.Add(' cy = int(M["m01"] / M["m00"])');
strScrList.Add(' shift_x = 14 - cx');
strScrList.Add(' shift_y = 14 - cy');
strScrList.Add(' trans_mat = np.float32([[1, 0, shift_x], [0, 1, shift_y]])');
strScrList.Add(' deskewed = cv2.warpAffine(deskewed, trans_mat, (28, 28), borderValue=255)');
strScrList.Add(' canvas = deskewed');
strScrList.Add(' predicted_char = predict_character(canvas, model)');
strScrList.Add(' results.append(str(predicted_char))');
strScrList.Add(' else:');
strScrList.Add(' results.append("")');
strScrList.Add(' canvas = np.full((28, 28), 255, dtype=np.uint8)');
strScrList.Add(' save_path = os.path.join(output_folder, f"{index:04d}.png")');
strScrList.Add(' is_success, encoded_img = cv2.imencode(".png", canvas)');
strScrList.Add(' if is_success:');
strScrList.Add(' encoded_img.tofile(save_path)');
strScrList.Add(' index += 1');
strScrList.Add('var1.Value = ";".join(results)');
try
PythonEngine1.ExecStrings(strScrList);
except
on E: Exception do
begin
ShowMessage('Pythonスクリプトの実行中にエラーが発生しました: ' + E.Message);
Exit;
end;
end;
strAnsList.Clear;
if Assigned(PythonDelphiVar1) then
begin
s := PythonDelphiVar1.ValueAsString;
if s <> '' then
begin
results := SplitString(s, ';');
for s in results do
strAnsList.Add(s);
end else begin
ShowMessage('sは空欄!');
end;
end else begin
ShowMessage('PythonDelphiVar1 が未定義です');
end;
if Assigned(PythonDelphiVar1) then
begin
for j := 0 to strAnsList.Count - 1 do
begin
if cmbAL.Text = strAnsList[j] then
StringGrid1.Cells[intCols,j+1] := cmbRendo.Text
else
StringGrid1.Cells[intCols,j+1] := '0';
end;
end else begin
ShowMessage('PythonDelphiVar1 が未定義です');
Exit;
end;
finally
//StringListの解放
strScrList.Free;
strAnsList.Free;
end;
// ・・・ 略 ・・・
end;
      strAnsList.Clear;

      if Assigned(PythonDelphiVar1) then
      begin
        s := PythonDelphiVar1.ValueAsString;
        if s <> '' then
        begin
          results := SplitString(s, ';');
          for s in results do
            strAnsList.Add(s);
        end else begin
          ShowMessage('sは空欄!');
        end;
      end else begin
        ShowMessage('PythonDelphiVar1 が未定義です');
      end;

      if Assigned(PythonDelphiVar1) then
      begin
        for j := 0 to strAnsList.Count - 1 do
        begin
          if cmbAL.Text = strAnsList[j] then
            StringGrid1.Cells[intCols,j+1] := cmbRendo.Text  //得点を指定
          else
            StringGrid1.Cells[intCols,j+1] := '0';
        end;
      end else begin
        ShowMessage('PythonDelphiVar1 が未定義です');
        Exit;
      end;
生成 AI なんてまだなかったあの頃・・・(知らないところで、それは・・・ ほぼ出来上がりつつあったのだろうけれど・・・。 そう、考えると同時期にレベルの差はあれど、まったく同じ研究をやったと言うことで、たまらなく誇らしいような、いや、それはただの偶然の一致で・・・ 一方は AI というカタチで見事にモノになり、僕のは無駄な努力で終わり・・・もし、プログラムが当時のまま、今後進化しないのであれば・・・ みたいな複雑な気持ちではありますが )、いずれにしても、その時、僕は Google 先生を頼りに『 機械学習の真似事 』を行い、右も、左も、わからないまま、結局 keras や Lobe のお近づきになれたよーな・・・ なれなかったよーな・・・
import cv2
import pytesseract
import re
import os
# Tesseract-OCRのパス設定
pytesseract.pytesseract.tesseract_cmd = r"C:\Python39-32\Tesseract-OCR\tesseract.exe"
def preprocess_image(image_path):
""" 画像を前処理してOCRに適した状態にする """
# グレースケール化
image = cv2.imread(image_path, cv2.IMREAD_GRAYSCALE)
# 二値化
_, binary = cv2.threshold(image, 128, 255, cv2.THRESH_BINARY_INV + cv2.THRESH_OTSU)
return binary
def extract_katakana(image):
""" OCRでカタカナを認識する """
custom_oem_psm = "--oem 3 --psm 10 -l jpn"
text = pytesseract.image_to_string(image, config=custom_oem_psm)
# カタカナ1文字のみを抽出
# match = re.search(r'[アイウエオ]', text)
return match.group(0) if match else "N"
def process_images_in_folder(folder_path):
""" 指定フォルダ内のすべての画像を処理 """
image_extensions = (".png", ".jpg", ".jpeg", ".bmp", ".tif", ".tiff")
for filename in os.listdir(folder_path):
# 画像ファイルのみ処理
if filename.lower().endswith(image_extensions):
image_path = os.path.join(folder_path, filename)
processed_image = preprocess_image(image_path)
result = extract_katakana(processed_image)
print(f"{filename}: OCR結果 -> {result}")
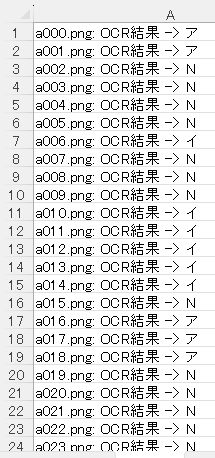
if __name__ == "__main__":
# 画像が入っているフォルダのパス
folder_path = "Images_Tegaki\img1_a"
process_images_in_folder(folder_path)
結果は次の通り。
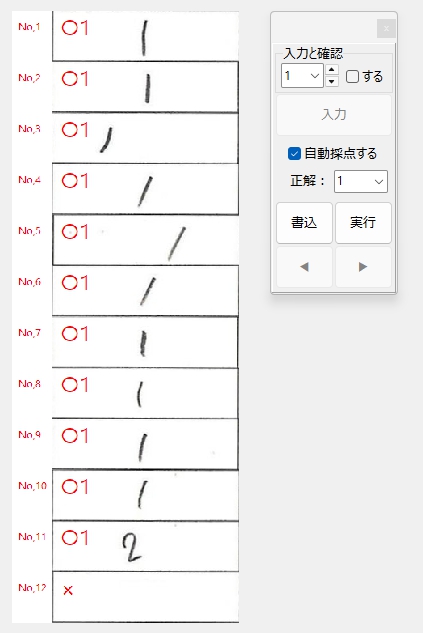
画像は、全部カタカナの「ア」なんだけどなー。 「N」はともかく、なんで「イ」があるのかなー?
全体の集計では・・・
正解率は 23.3 % ・・・
ただ、「ウ・エ・オ」はありませんでした。そこで・・・
match = re.search(r'[ア]', text)
「ア」1文字で勝負してみました。結果はまったく同じでありました!
よくよく考えれば、同じ文字認識アルゴリズムで「ア」を判定しているのですから、これは当然です。
64 bit バージョンの方は最新版が「最近の日付」でしたから、これより良い結果が得られる可能性があるような気がしますが、僕が使いたい 32 bit バージョンに限っての話をしていますので、この時点で手書き文字の認識に Tesseract-OCR の 32 bit バージョンを使用するか、否か、という問題は、はっきり「 否 」と答えが出ました。
過去の記事にも書きましたが、これは「手書き文字の認識(それも「ア」1文字)」に限った話であり、他のカタカナ文字については実験もしておりませんし、これを持って、Tesseract-OCR 32 bit バージョンの総合的な「手書き文字」を認識する性能を否定する意図はまったくありません。
C:\>cd Python39-32

C:\Python39-32>python -m pip install --upgrade pip
Requirement already satisfied: pip in c:\python39-32\lib\site-packages (22.3.1)
Collecting pip
  Using cached pip-25.0.1-py3-none-any.whl (1.8 MB)
Installing collected packages: pip
  Attempting uninstall: pip
    Found existing installation: pip 22.3.1
    Uninstalling pip-22.3.1:
      Successfully uninstalled pip-22.3.1
  WARNING: The scripts pip.exe, pip3.9.exe and pip3.exe are installed in 'C:\Python39-32\Scripts' which is not on PATH.
  Consider adding this directory to PATH or, if you prefer to suppress this warning, use --no-warn-script-location.
Successfully installed pip-25.0.1
C:\Python39-32>python.exe -m pip install C:\Python39-32\scikit_learn-0.24.2-cp39-cp39-win32.whl
Processing c:\python39-32\scikit_learn-0.24.2-cp39-cp39-win32.whl
Requirement already satisfied: numpy>=1.13.3 in c:\python39-32\lib\site-packages (from scikit-learn==0.24.2) (1.21.5)
Collecting scipy>=0.19.1 (from scikit-learn==0.24.2)
  Using cached scipy-1.13.1.tar.gz (57.2 MB)
  Installing build dependencies ... done
  Getting requirements to build wheel ... done
ERROR: Exception:
Traceback (most recent call last):
  File "C:\Python39-32\lib\site-packages\pip\_internal\cli\base_command.py", line 106, in _run_wrapper
    status = _inner_run()
  File "C:\Python39-32\lib\site-packages\pip\_internal\cli\base_command.py", line 97, in _inner_run
    return self.run(options, args)
  File "C:\Python39-32\lib\site-packages\pip\_internal\cli\req_command.py", line 67, in wrapper
    return func(self, options, args)
  File "C:\Python39-32\lib\site-packages\pip\_internal\commands\install.py", line 386, in run
    requirement_set = resolver.resolve(
  File "C:\Python39-32\lib\site-packages\pip\_internal\resolution\resolvelib\resolver.py", line 95, in resolve
    result = self._result = resolver.resolve(
  File "C:\Python39-32\lib\site-packages\pip\_vendor\resolvelib\resolvers.py", line 546, in resolve
    state = resolution.resolve(requirements, max_rounds=max_rounds)
  File "C:\Python39-32\lib\site-packages\pip\_vendor\resolvelib\resolvers.py", line 427, in resolve
    failure_causes = self._attempt_to_pin_criterion(name)
  File "C:\Python39-32\lib\site-packages\pip\_vendor\resolvelib\resolvers.py", line 239, in _attempt_to_pin_criterion
    criteria = self._get_updated_criteria(candidate)
  File "C:\Python39-32\lib\site-packages\pip\_vendor\resolvelib\resolvers.py", line 230, in _get_updated_criteria
    self._add_to_criteria(criteria, requirement, parent=candidate)
  File "C:\Python39-32\lib\site-packages\pip\_vendor\resolvelib\resolvers.py", line 173, in _add_to_criteria
    if not criterion.candidates:
  File "C:\Python39-32\lib\site-packages\pip\_vendor\resolvelib\structs.py", line 156, in __bool__
    return bool(self._sequence)
  File "C:\Python39-32\lib\site-packages\pip\_internal\resolution\resolvelib\found_candidates.py", line 174, in __bool__
    return any(self)
  File "C:\Python39-32\lib\site-packages\pip\_internal\resolution\resolvelib\found_candidates.py", line 162, in <genexpr>
    return (c for c in iterator if id(c) not in self._incompatible_ids)
  File "C:\Python39-32\lib\site-packages\pip\_internal\resolution\resolvelib\found_candidates.py", line 53, in _iter_built
    candidate = func()
  File "C:\Python39-32\lib\site-packages\pip\_internal\resolution\resolvelib\factory.py", line 187, in _make_candidate_from_link
    base: Optional[BaseCandidate] = self._make_base_candidate_from_link(
  File "C:\Python39-32\lib\site-packages\pip\_internal\resolution\resolvelib\factory.py", line 233, in _make_base_candidate_from_link
    self._link_candidate_cache[link] = LinkCandidate(
  File "C:\Python39-32\lib\site-packages\pip\_internal\resolution\resolvelib\candidates.py", line 304, in __init__
    super().__init__(
  File "C:\Python39-32\lib\site-packages\pip\_internal\resolution\resolvelib\candidates.py", line 159, in __init__
    self.dist = self._prepare()
  File "C:\Python39-32\lib\site-packages\pip\_internal\resolution\resolvelib\candidates.py", line 236, in _prepare
    dist = self._prepare_distribution()
  File "C:\Python39-32\lib\site-packages\pip\_internal\resolution\resolvelib\candidates.py", line 315, in _prepare_distribution
    return preparer.prepare_linked_requirement(self._ireq, parallel_builds=True)
  File "C:\Python39-32\lib\site-packages\pip\_internal\operations\prepare.py", line 527, in prepare_linked_requirement
    return self._prepare_linked_requirement(req, parallel_builds)
  File "C:\Python39-32\lib\site-packages\pip\_internal\operations\prepare.py", line 642, in _prepare_linked_requirement
    dist = _get_prepared_distribution(
  File "C:\Python39-32\lib\site-packages\pip\_internal\operations\prepare.py", line 72, in _get_prepared_distribution
    abstract_dist.prepare_distribution_metadata(
  File "C:\Python39-32\lib\site-packages\pip\_internal\distributions\sdist.py", line 56, in prepare_distribution_metadata
    self._install_build_reqs(finder)
  File "C:\Python39-32\lib\site-packages\pip\_internal\distributions\sdist.py", line 126, in _install_build_reqs
    build_reqs = self._get_build_requires_wheel()
  File "C:\Python39-32\lib\site-packages\pip\_internal\distributions\sdist.py", line 103, in _get_build_requires_wheel
    return backend.get_requires_for_build_wheel()
  File "C:\Python39-32\lib\site-packages\pip\_internal\utils\misc.py", line 702, in get_requires_for_build_wheel
    return super().get_requires_for_build_wheel(config_settings=cs)
  File "C:\Python39-32\lib\site-packages\pip\_vendor\pyproject_hooks\_impl.py", line 196, in get_requires_for_build_wheel
    return self._call_hook(
  File "C:\Python39-32\lib\site-packages\pip\_vendor\pyproject_hooks\_impl.py", line 402, in _call_hook
    raise BackendUnavailable(
pip._vendor.pyproject_hooks._impl.BackendUnavailable: Cannot import 'mesonpy'
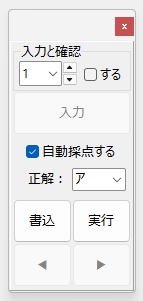
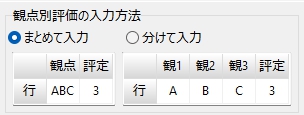
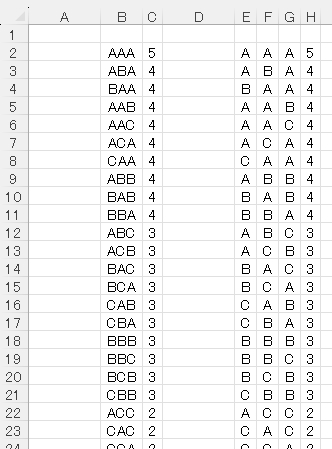
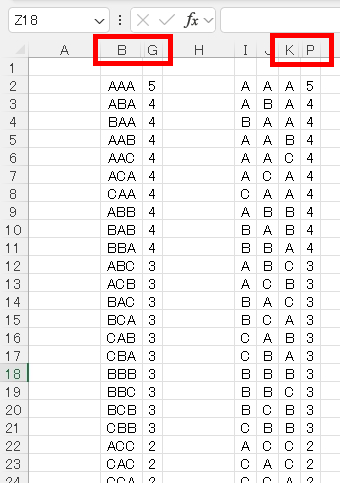
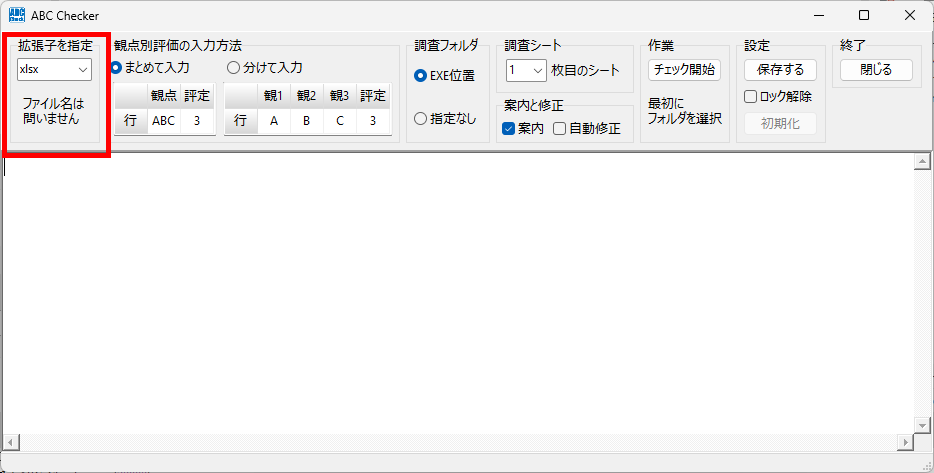
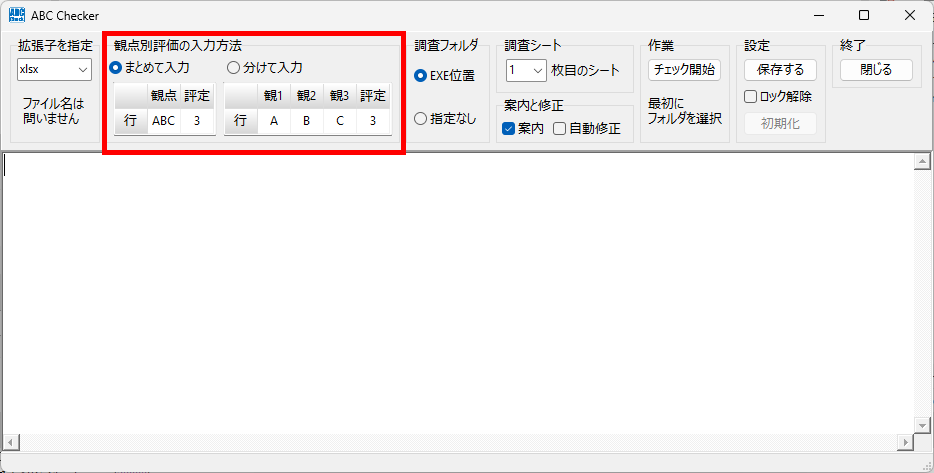
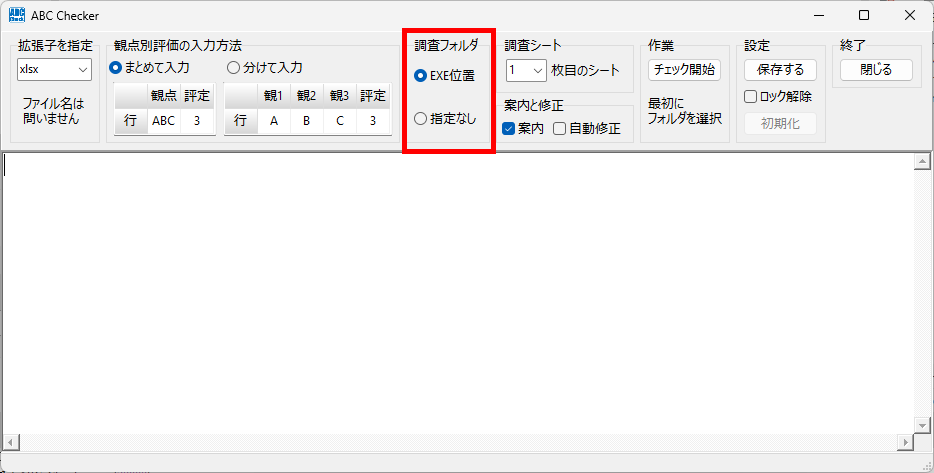
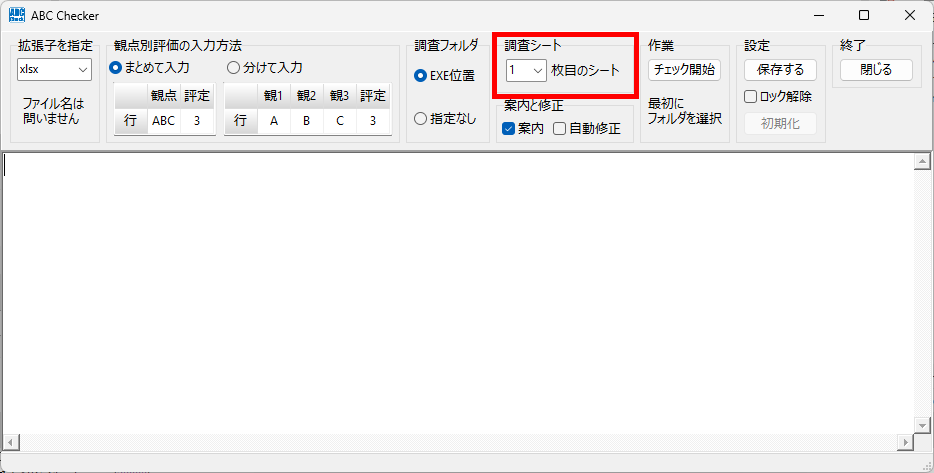
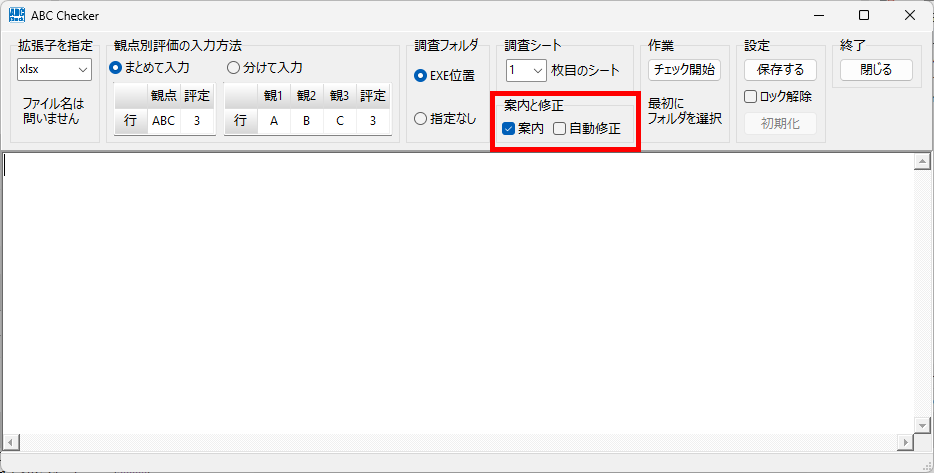
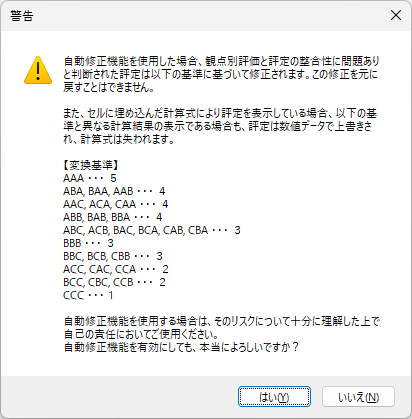
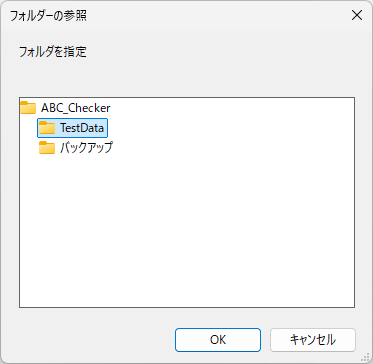
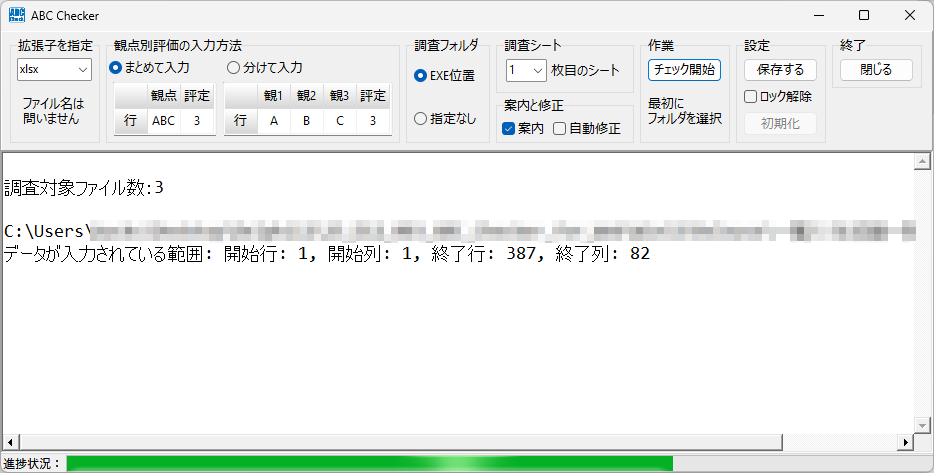
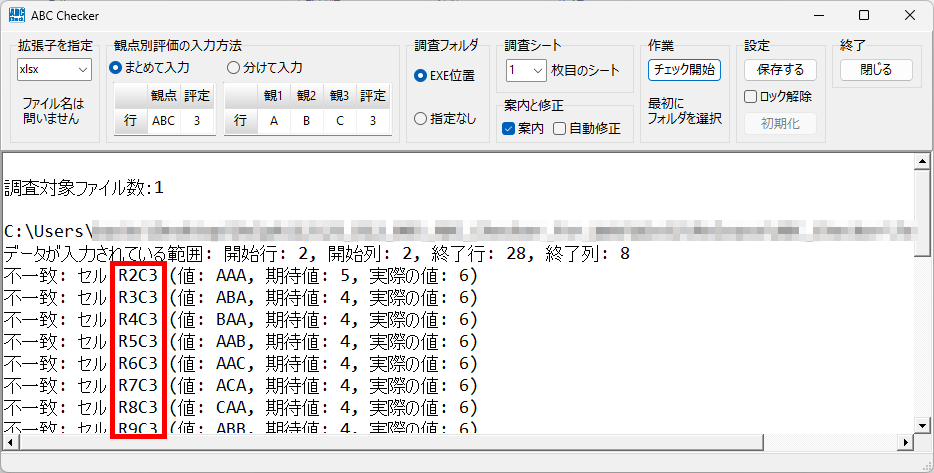
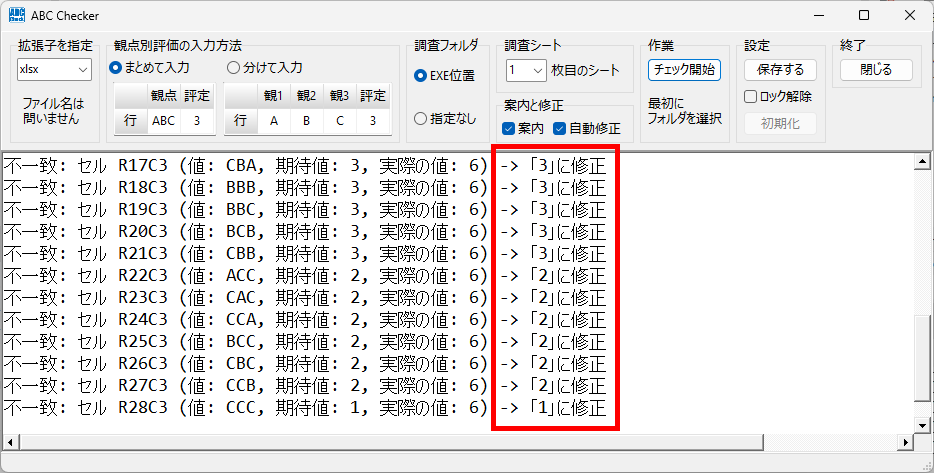
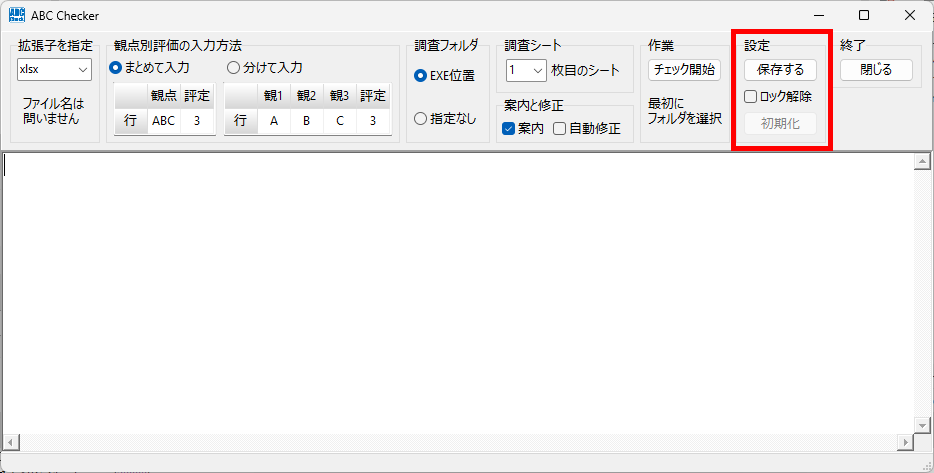
そこで、観点別評価と評定を入力したファイル( Excel Book の拡張子が xls, xlsx, xlsm いずれかのファイル)を任意のフォルダに入れ(もちろん、複数個入っていてもよい)、ここで紹介する「観点別評価と評定の整合性をチェックするプログラム」を起動、フォルダを選択するだけで、データのセル番地など、一切指定しなくても各々のファイルに入力された観点別評価と評定の整合性を全自動でチェック(整合性に問題がある場合、オプションで指定すれば観点別評価に基づいて評定を自動修正)してくれるプログラムを書いてみました。
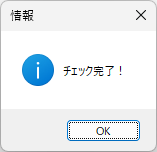
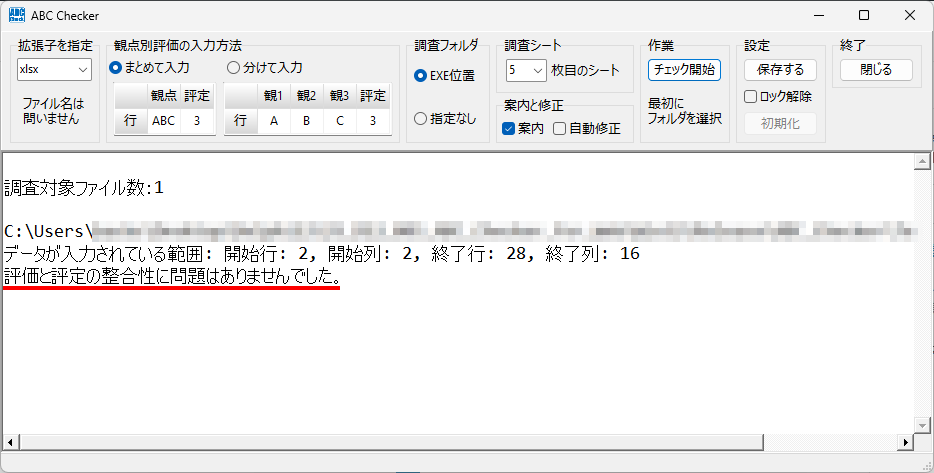
チェック完了時、問題がなかった場合に表示される画面
実際に使ってもらい、「これはイイ!」と評価していただけましたので、ここでフリーソフトとして公開します。「 Excel Book に入力された観点別評価と評定の整合性をチェックするよい方法はないか?」と、悩んでいらっしゃる方にお使いいただけたら、何よりの幸いです。気がついた不具合はすべて解消してありますが、未発見のバグがまだどこかにあるかもしれません。このプログラムはあくまでも「素人」が、「趣味」で書いたものであり、思い込みや勘違いによる誤りを内包している可能性があります。大変、申し訳ないのですが、どうか、そこだけはご了承ください。
お手数をお掛けして申し訳ありませんが、信頼できる発行元になるために必要なデジタル署名を取得する費用等を考えますと、個人レベルで、その申請手続きを行うことは私の場合、無理と言わざるを得ません。開発に使用している IDE ( Delphi 12.3 )のサブスクリプション費用の支払いだけは Object Pascal の発展を願う1ユーザーとしての気持ちからずっと続けていますが・・・。
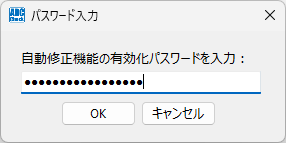
なお、最初にアップロードした実行形式ファイルで「自動修正」を有効にした状態で設定を保存すると、次回起動時に Form が表示される前に自動修正を有効化する処理が行われてしまい、「無効/非表示ウィンドウにはフォーカスを設定できません。」というエラーメッセージが表示されてしまうバグがあることに気づき、「自動修正」を有効にした状態で設定を保存しても、次回起動時に Form の表示が完全に行われてから、自動修正を有効化する処理が実行されるように、プログラムを修正しました。