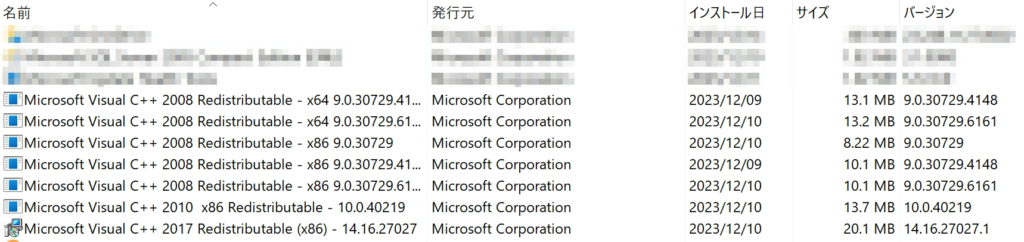
お使いのPCで、Visual C++ ランタイム ライブラリのインストール状況を確認するには、[スタート] ボタンを右クリックし、「ファイル名を指定して実行」をクリックして、appwiz.cpl と入力して[Enter]を押します。Python環境を組み込んだ MS_Reader が動作する環境であれば、システムにインストールされている Microsoft Visual C++ ランタイム ライブラリが以下のように表示されるはずです。
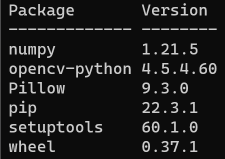
現在、私のシステム(Windows 11 Pro 23H2)にインストールされているC++ランタイムライブラリの一覧。 もちろん、このシステムでPython環境を組み込んだマークシートリーダーが正常に動作しています。
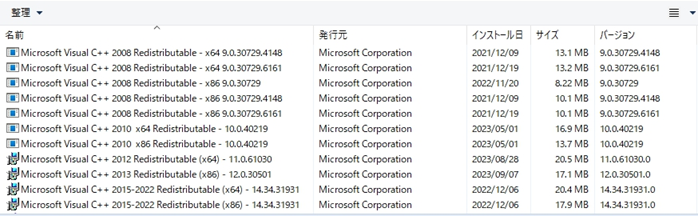
エラーを解決するには、Visual C++ランタイムライブラリをインストールすればいいわけですが、上の例のように Visual C++ ランタイムはたくさんあるので、手動でひとつひとつダウンロードしてインストールするより、Visual C++ ランタイムインストーラーを使って全ての Visual C++ ランタイムを一括インストールする方が簡単です。
システムをリカバリする前は、次のようにして Visual C++ ランタイムをインストールしていました。
【ご注意願います!】
ここで紹介する方法で Visual C++ ランタイムをインストールする場合、他のプログラムの実行環境との整合性は、一切保証できません。また、最悪の場合、Windowsが起動しなくなるトラブルが発生することも十分に考えられます。インストール作業の全てが自己責任であることを十分ご理解の上、重大な問題が発生した場合は元の環境に戻せるよう、システムのバックアップを取る・現在の設定をメモに記録する等、不具合の発生に備え、必要かつ十分な準備を整えた上で、Visual C++ ランタイムのインストールを行ってください。
以下のサイトから「Visual C++ v56.exe」をダウンロードしてインストール(私の環境にインストールする分には、なんの問題も起きませんでした。もちろん、マークシートリーダーも問題なく起動し、安定動作しました)。
ここから先は、上記のインストーラーを用いて Visual C++ ランタイムをインストールした際、私が実際に経験したトラブル?です(最終的にインストールは成功しました)。
お決まりのUAC起動後(PCの設定によっては)管理者ID 及びパスワードの入力が求められますが、これを入力すると、そのままPCがフリーズしたような状態になり、数分待機しても進展が見られないので、いったん作業を Ctrl+Alt+Delete でキャンセルし、再度、「Visual C++ v56.exe」を起動して Visual C++ ランタイムのインストール作業を実行、今度はトラブルなくインストールに成功する事例です。これは「ある特定のAD環境下にあるPCのすべてに共通して見られた」現象です。現在もその原因はわかりませんが、ご参考まで。
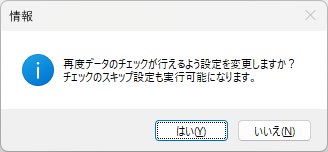
この初期化を「するか・しないか」で、MS_Reader 起動後、初めてマークを「読む」ボタンをクリックした際のプログラムの挙動がまるで違ったものになります。初期化を行った場合は、ごくスムーズにマーク読み取りが始まるのに対し、行わなかった場合は PC が一瞬フリーズしたような状態になり、その後、息を吹き返すかのようにマークの読み取りが始まります。
Python Engine の初期化コードです。
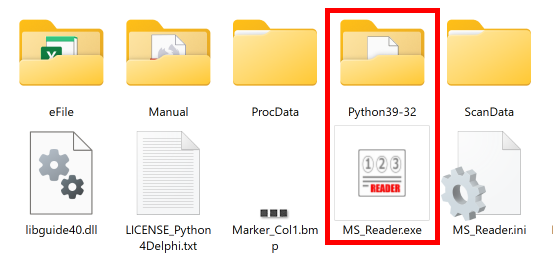
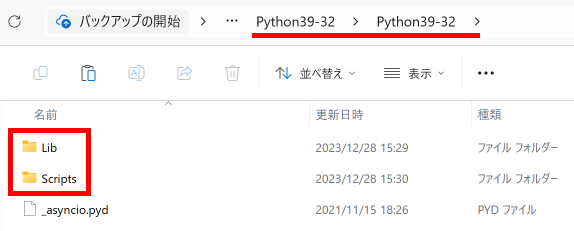
  AppDataDir:=ExtractFilePath(Application.ExeName)+'Python39-32';

  if DirectoryExists(AppDataDir) then
  begin
    //フォルダが存在したときの処理
    CheckPython.Enabled:=True;
    CheckPython.Checked:=True;
    PythonEngine1.AutoLoad:=True;
    PythonEngine1.IO:=PythonGUIInputOutput1;
    PythonEngine1.DllPath:=AppDataDir;
    PythonEngine1.SetPythonHome(PythonEngine1.DllPath);
    PythonEngine1.LoadDll;
    PythonDelphiVar1.Engine:=PythonEngine1;
    PythonDelphiVar1.VarName:=AnsiString('var1');
    PythonEngine1.Py_Initialize;
    //イニシャライズされたことを記憶
    P4D_ini:=True;
  end else begin
    CheckPython.Checked:=False;
    CheckPython.Enabled:=False;
    PythonEngine1.AutoLoad:=False;
    P4D_ini:=False;
  end;
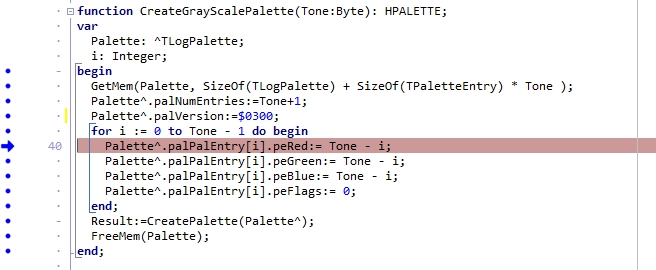
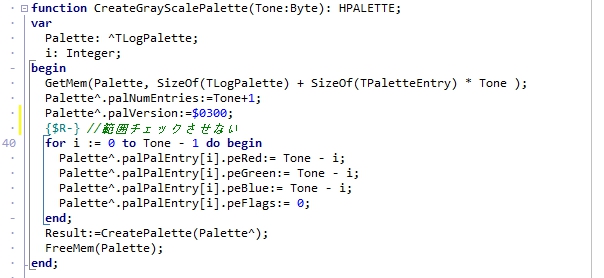
(どこに問題があるのでしょうか?)
PC によっては、この Python Engine の初期化に非常に長い時間を要することがあるようです(エラーメッセージは出ません。この沈黙の時間が終わった後、プログラムは問題なく動作します)。偶然、ある PC でこの現象に巡り合い、あわてて時間を計ってみたところ、その PC では初期化に4分必要でした! なぜ、このような現象が発生するのか、その理由がわからないのですが、「そのようなことがある」ことだけは経験的に明らかですので、ここに書いておくことにしました。
Excel Book への読み取り結果の書き出しは、自分用に(あれば便利かなー☆)と思って作成したものです。ですので、式の入ったセルを保護する等、第三者が使うことへの配慮は何一つ行っていません。セルに入力された式やVBAの内容をご自身でメンテナンスできる方なら、お使いいだけるかな? という程度のシロモノです。
添付した Excel Book はこれまでに何度も「実際に使用して動作に誤りがないことを確認済み」ですが、誤って式を削除したりした場合は(当然ですが)意図した通りに動作しません。ですので、こちらも動作保証は一切ありません。ご使用はあくまでも自己責任でお願いします。この Excel Book に対しても、このプログラムの使用要件にあります免責事項がそのまま適用されますことを申し添えます。
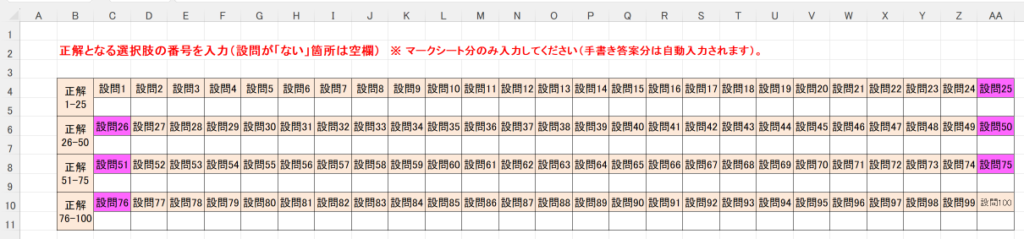
以下、試験実施前に行っておくとよい採点準備作業です。
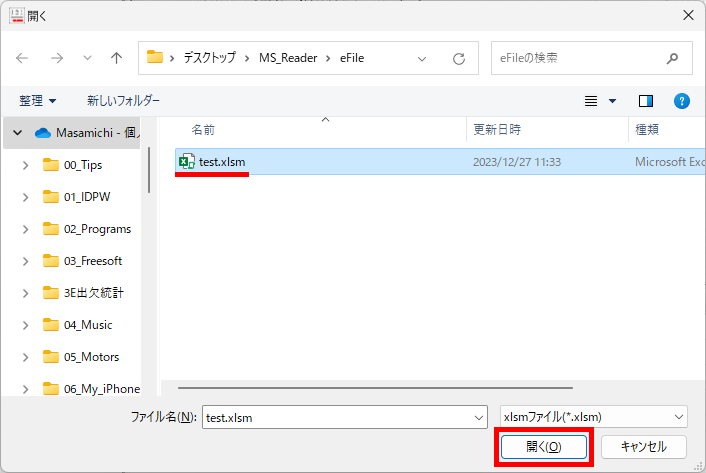
eFile フォルダに「一般用マークと手書き併用採点シート.xltm」というマクロ有効テンプレートがあります。これをダブルクリックすると「一般用マークと手書き併用採点シート1.xlsx」という名前で新しい Excel Book が作られます。拡張子に注意してください。「.xlsx」です。このままでは期待通りに動作しませんので、適切な名前を付け、拡張子を「.xlsm」(マクロが有効な Excel Book )に変更して eFile フォルダ(必ずこのフォルダに保存してください!)に保存します。
ここでは test.xlsm という名前で保存したことにして説明を続けます。
「コンテンツの有効化」をクリックしてマクロが実行できるようにしてください。
【インターネットからダウンロードしたマクロ有効 Excel Book の取り扱い】
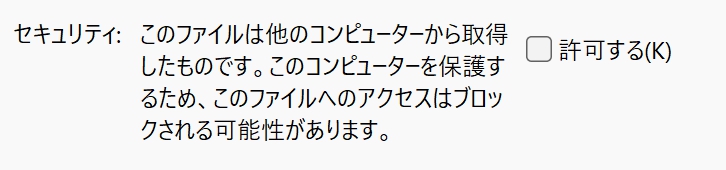
いつからこうなったのか、わかりませんが、インターネットからダウンロードした拡張子 xlsm の Excel Book をダブルクリックして開くと、次のメッセージが表示されるようになりました。
「編集を有効にする」をクリックすると・・・マクロを動かすことができません!
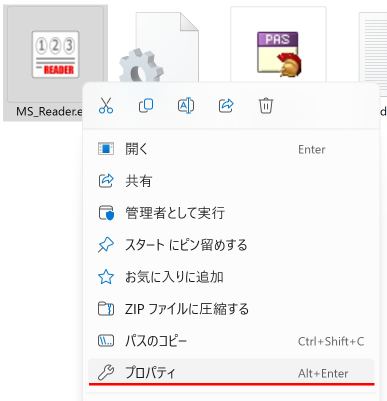
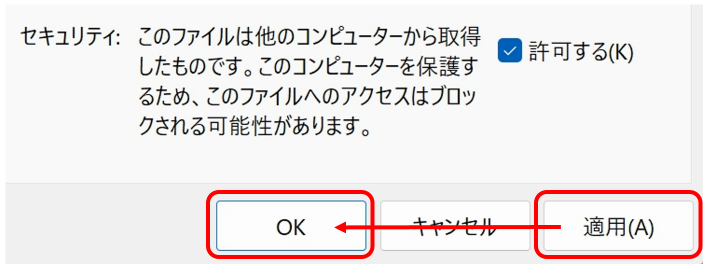
こうなった時は、いったん Book を閉じて、その Excel ファイルを右クリックして表示されるサブメニューのプロパティをクリックして、全般タブのいちばん下にある「セキュリティ:」の「許可する」にチェックします(チェックする=マクロの実行をご自身の責任で行うことになります。どうか、ご注意ください)。
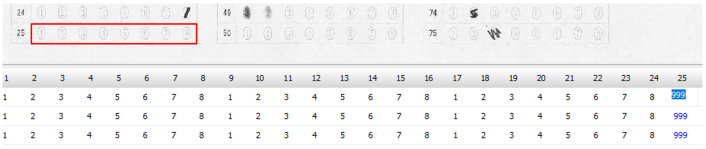
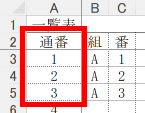
Excel Book を利用して採点する場合、大変重要な注意事項があります。それは欠席者がいた場合の処理です。該当試験に欠席者がいる場合は、その欠席者の出席番号位置に未使用のマークシートを挿入し、シートが確実に出席番号順に並んでいることを確認してから、スキャナーでスキャンしてください。 ※ 可能であれば、この用途専用に未使用のマークシートを複数枚、最初から手元に準備しておくとよいと思います。
Excel へデータを書き込む際は、上記注意事項を必ずお守りください。この注意を忘れて Excel が起動したまま、Excel Book への書き込みを実行すると最悪の場合、Excel のプロセスが幽霊のように残り、これを終了することが出来なくなって、復旧するには、システムの再起動しかない状態になります。未保存の重要なデータがあるような場合、当然そのデータは失われます。Excel Book へのデータ書き込み時は、Excel が起動していないことを(タスクバーに眠っている Excel Book がないことも含めて)十分確認した上で、書き込み作業を行ってください。
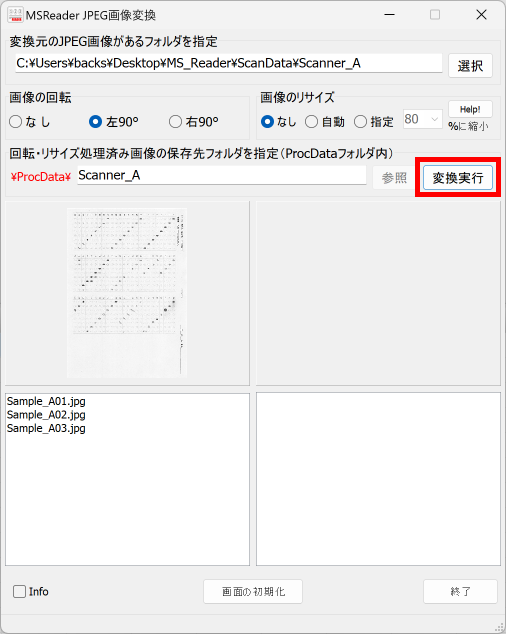
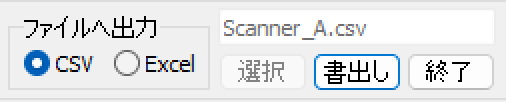
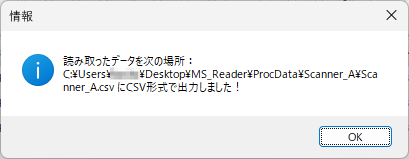
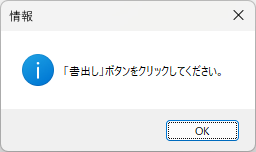
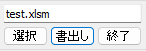
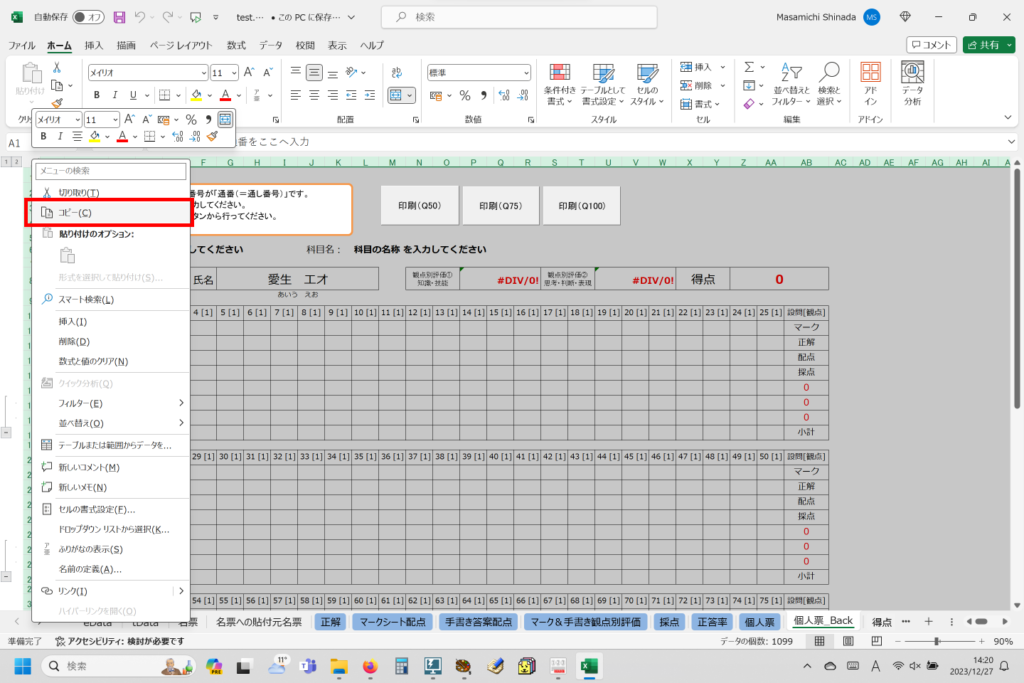
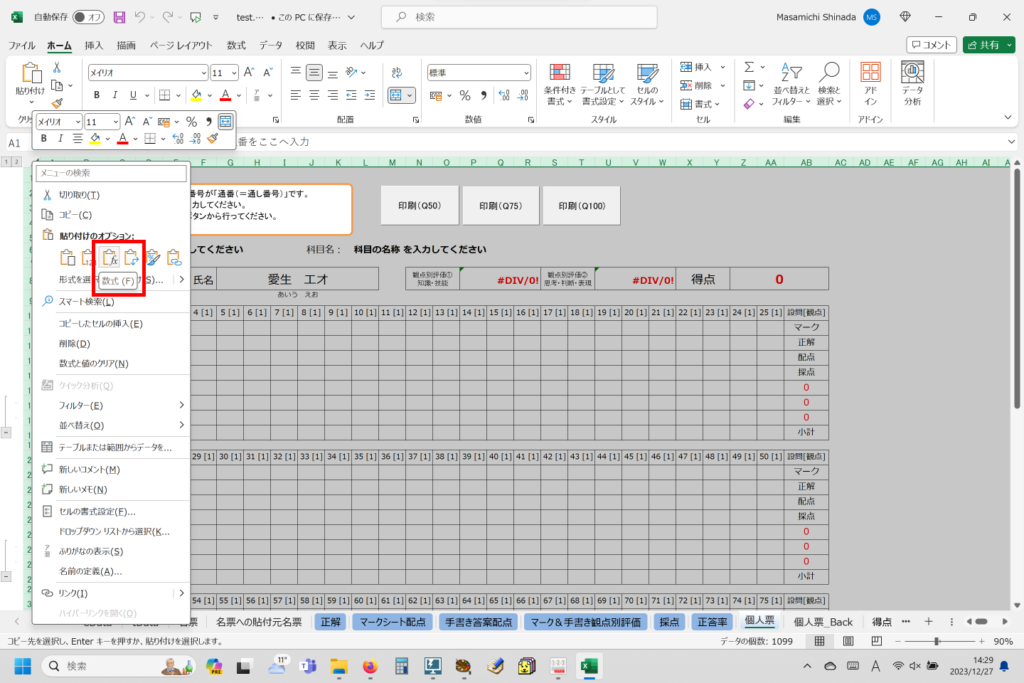
【書き出し処理】
マークシートを読み取り後、読み取り結果のチェックまで完了したら、Excel Book への読み取り結果の書き出しが可能となります。次のようにマークシートリーダーを操作してください。
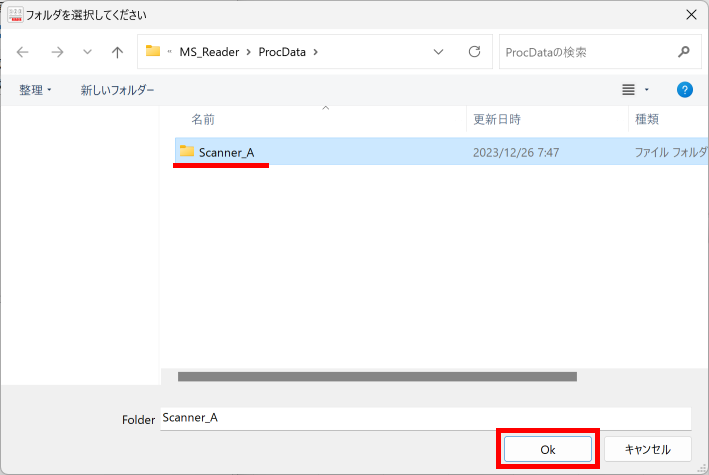
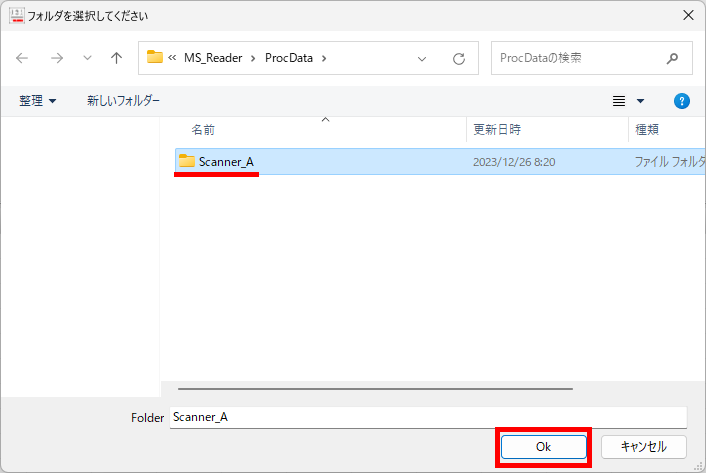
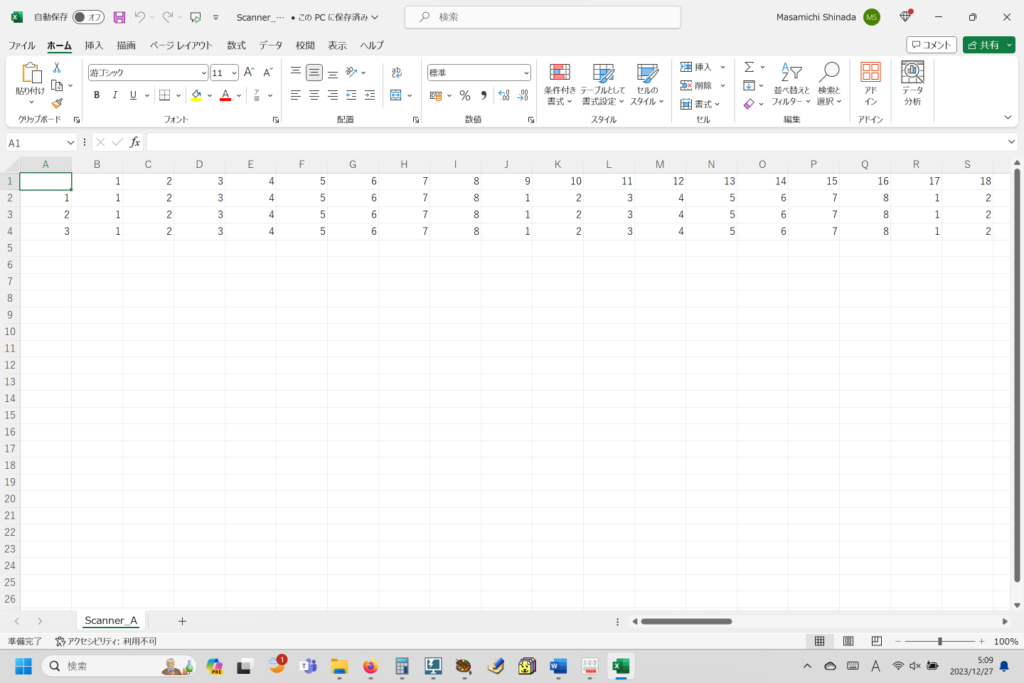
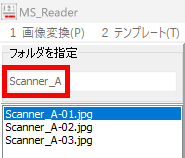
ファイル名がなぜ「Scanner_A.xlsm」になったかというと、マークシートの読み取り元フォルダとして選択したのが、ProcData\Scanner_A であったためです。プログラムは、マークシートの読み取り元フォルダの名称をそのまま、原本「test.xlsm」をコピーして生成する読み取り結果書き込み先 Excel Book の名称として利用します。
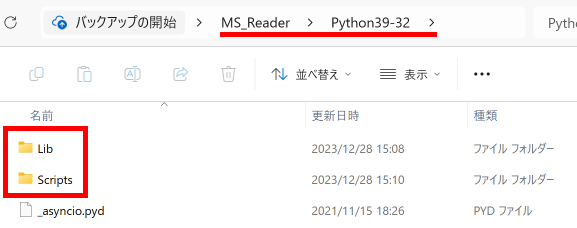
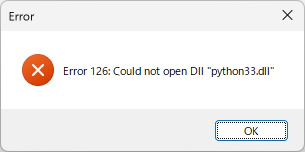
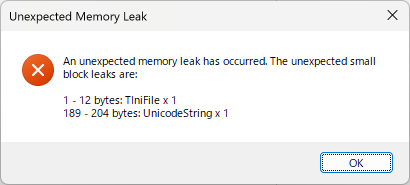
Delphi用とPython用のOpenCVでは、起動時に設定するパラメータの一部が異なっている。Python環境の有無で(具体的にはPython39-32フォルダの有無で判断)、当然デフォルト・パラメータ設定を変えて起動させなければならない。その部分のプログラムを見直していて ini ファイルに「もし、読みだすべきセクション(名)そのものがなかったら?」という場合も想定しておいた方がいいことに、僕は初めて気がついた。
ちなみに、これまで書いてきたのは次のコード。これでも第2引数に指定したキーがなかった場合に加え、第1引数に指定したセクションそのものがなかった場合にも、第3引数に指定したデフォルト値が変数にセットされるから、エラーにはならないのだけれど・・・、ユーザーには「セクションそのものがない」ということが伝わらない。ユーザーがデフォルト値として設定されたパラメータを調整・保存して初めて ini ファイルに「Section1」が生まれる・・・。
uses
  System.IniFiles;

procedure TFrmMain.FormCreate(Sender: TObject);
var
  Ini: TIniFile;
  str01, str02: String;
begin
  //iniファイルからデータを読込み
  Ini := TIniFile.Create(ChangeFileExt(Application.ExeName, '.ini'));
  try
    str01:=Ini.ReadString('Section1', '文字列型_XXX', 'ABC');
    str02:=Ini.ReadString('Section1', '文字列型_YYY', 'DEF');
  finally
    Ini.Free;
  end;
  AAA.Text:=str01;
  BBB.Text:=str02;
end;
つまり、これまでの僕のプログラムは、各パラメータ値の設定とデフォルト・パラメータの設定を記録したセクションが「必ず ini ファイル内にある」という大前提で動いていたわけだ。Ini.ReadString の第3引数で「セクション」や「キー」がなかった場合のデフォルト値を指定してあるから、ini ファイル内にそれらがなくてもエラーは発生しないのだけれど、ほんとうにそれでいいのか? って、そう考えるとそれは「よくない」気がして・・・ならないし。
private
    { Private 宣言 }
    //Python4Delphiの有無を知るフラグ
    P4D_Exist:Boolean;

procedure TFormMSReader.CMShowingChanged(var Msg: TMessage);
var
  strMsg: string;
begin
  inherited; {通常の CMShowingChagenedをまず実行}
  if Visible then
  begin
    Update; {完全に描画}
    if not P4D_Exist then
    begin
      strMsg:='読み取りパラメータの設定が、デフォルト値となっています。'+#13#10+
      '必要に応じて読み取りパラメータの調整を行い、'+
      '「設定を保存」ボタンがアクティブな状態で保存してください。';
      Application.MessageBox(PChar(strMsg), PChar('情報'), MB_ICONINFORMATION);
    end;
  end;
end;
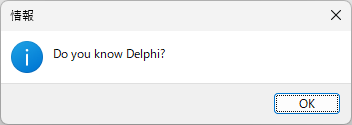
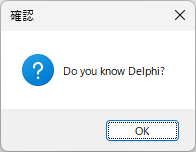
function MessageBox(const Text, Caption: PChar; Flags: Longint = MB_OK): Integer;
所有者ウィンドウへのハンドルが確かに省略されている。
実際のコードで、Windows.MessageBox とした場合には・・・
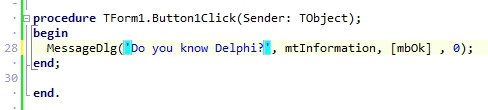
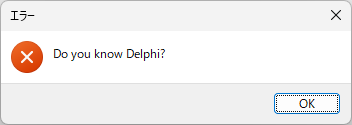
procedure TForm1.Button4Click(Sender: TObject);
begin
  Winapi.Windows.MessageBox(Handle, PChar('Do you know Delphi?'), PChar('情報'), MB_OK or MB_ICONINFORMATION);
end;
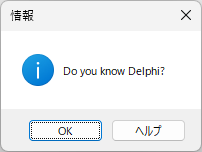
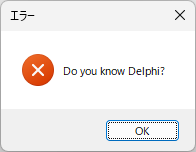
だったのが、第一引数の Handle は必要なくなり、( OK ボタンのみの表示でよければ)MB_OK も省略できるようなので、次のように
procedure TForm1.Button3Click(Sender: TObject);
begin
  Application.MessageBox(PChar('Do you know Delphi?'), PChar('情報'), MB_ICONINFORMATION);
end;
・・・とずい分、短くなる。それどころか、PChar型への型変換も省略可能なようで・・・
procedure TForm1.Button5Click(Sender: TObject);
begin
  Application.MessageBox('Do you know Delphi?', '情報', MB_ICONINFORMATION);
end;
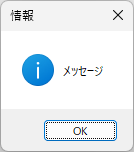
var
  strMsg:string;
begin
  strMsg:='メッセージ';
  Application.MessageBox(PChar(strMsg), PChar('情報'), MB_ICONINFORMATION);
end;
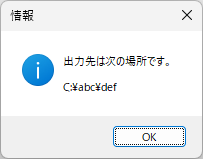
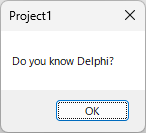
別の文字列型変数をさらに代入したり、また、改行を含む表示も、
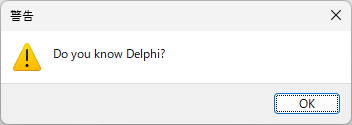
procedure TForm1.Button2Click(Sender: TObject);
var
  strMsg, strPath:string;
begin
  strPath:='C:\abc\def';
  strMsg:='出力先は次の場所です。' + #13#10 + #13#10 + strPath;
  Application.MessageBox(PChar(strMsg), PChar('情報'), MB_ICONINFORMATION);
end;
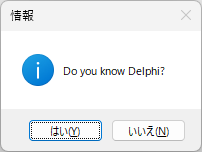
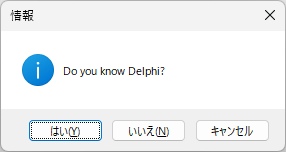
複数のボタンを表示。例えば、「はい」・「いいえ」の二択なら、
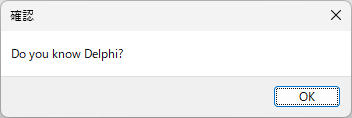
procedure TForm1.Button3Click(Sender: TObject);
begin
  //Information
  if Application.MessageBox(PChar('Do you know Delphi?'), PChar('情報'), MB_YESNO or MB_ICONINFORMATION) = mrYes then
  begin
    //[はい]が選ばれた時
    Application.MessageBox(PChar('Gooooooooooooood!'), PChar('情報'), MB_ICONINFORMATION);
  end else begin
    //[いいえ]が選ばれた時
    Application.MessageBox(PChar('No!'), PChar('情報'), MB_ICONINFORMATION);
  end;
end;
二択だから「キャンセルはない」 (閉じるボタンは自動的に無効になる)
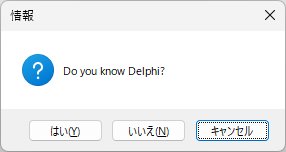
ユーザーに「キャンセル」も許可するなら、
procedure TForm1.Button4Click(Sender: TObject);
var
StrMsg: String;
intRet: Integer;
begin
StrMsg := 'Do you know Delphi?';
intRet := Application.MessageBox(PChar(StrMsg), PChar('情報'),
MB_YESNOCANCEL or MB_ICONQUESTION);
if intRet = mrYes then begin
//[はい]を選択した時の処理
end else
if intRet = mrNo then begin
//[いいえ]を選択した時の処理
end else
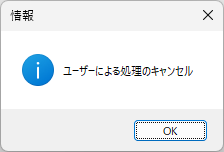
if intRet = mrCancel then begin
//[キャンセル]を選択した時の処理
Application.MessageBox(PChar('ユーザーによる処理のキャンセル'), PChar('情報'), MB_ICONINFORMATION);
end;
end;
procedure TForm1.Button5Click(Sender: TObject);
begin
  Application.MessageBox('Do you know Delphi?', '情報', MB_OK or MB_RETRYCANCEL or MB_ICONINFORMATION);
end;
2023年11月8日、RAD Studio 12.0(僕にとってはDelphi 12.0)がリリースされた(ようです)。 アップデート・サブスクリプションの支払いを終え(個人で購入しているのは僕くらいだろうが・・・)、届いたメールの製品アップデートリンクをクリックして、最新の更新をチェックしたら、12.0が!
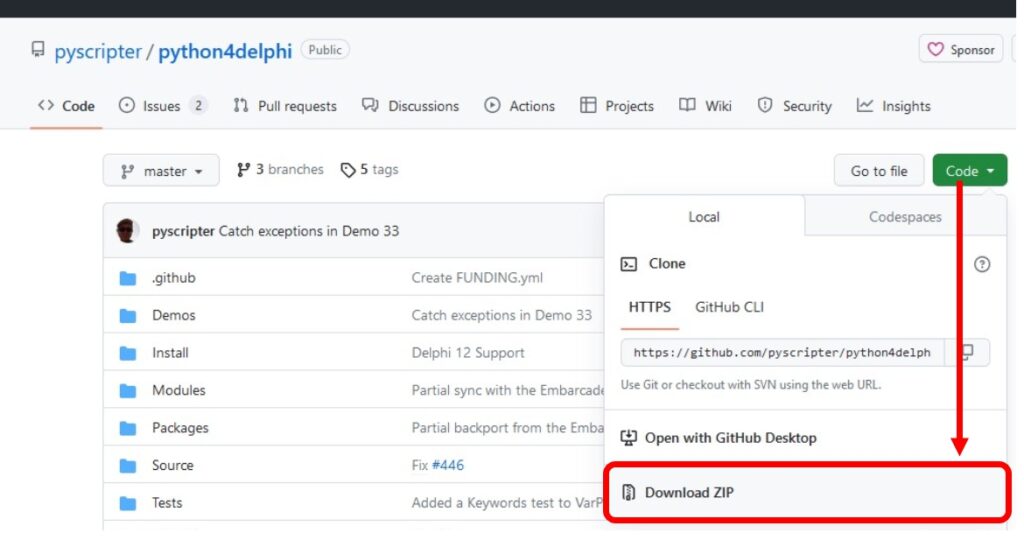
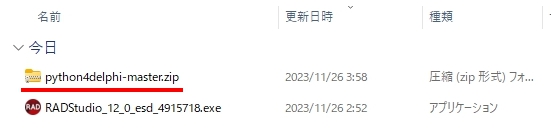
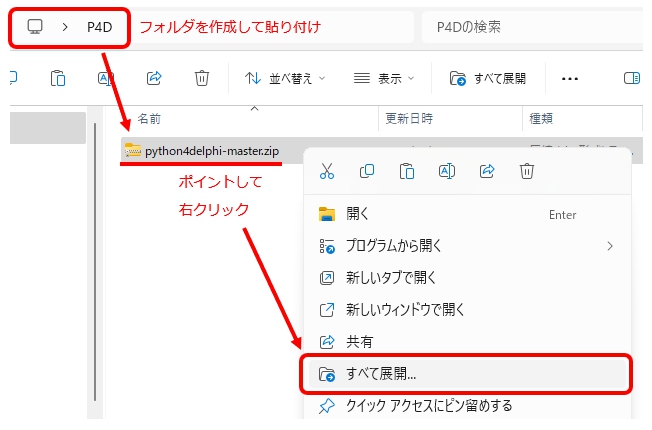
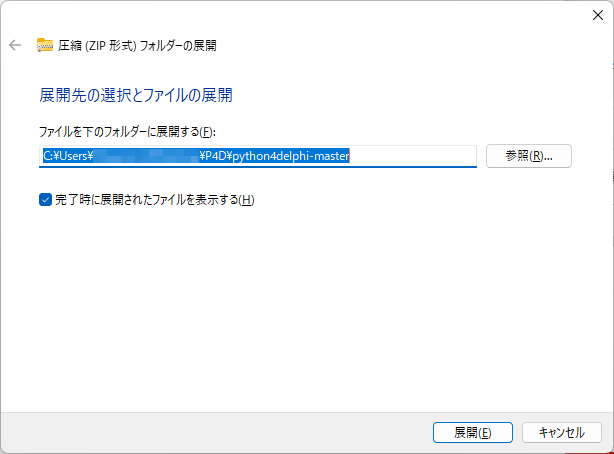
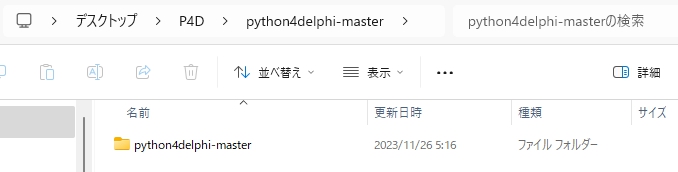
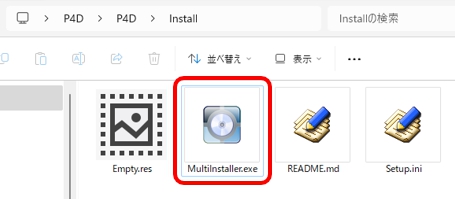
## P4D Installation using [MultiInstaller](https://github.com/pyscripter/MultiInstaller)
Use for Delphi Seattle (10.4) or later to install all packages in one step.
1. Clone or copy the Python4Delphi git repository to a folder of your choice. **The setup.ini file assumes that the folder is called "P4D"**. If you chose to name your folder differently then modify the "Folder" option in setup.ini.
2. Close all Delphi IDEs running.
3. Run MultiInstaller.exe
4. Select the packages you want and press Next
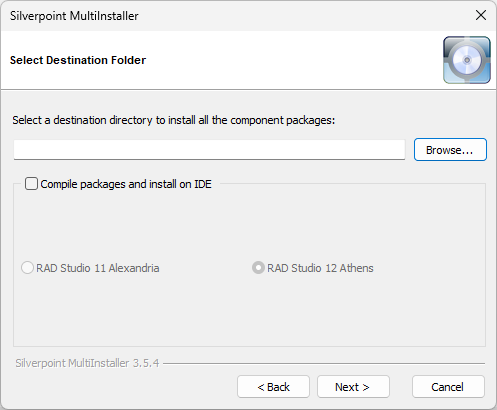
5. In the dialog box specify the _**parent folder**_ of "P4D" (i.e. the folder containing the directory to which you have copied Python4Delphi) and the Delphi target version. Then press Next to install the components
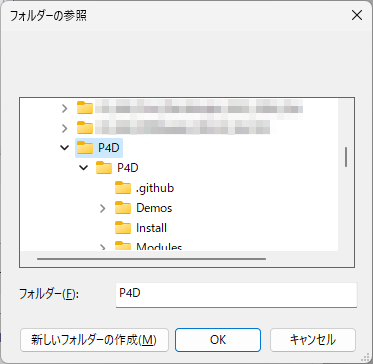
RAD Studio 12.0 対応版のP4D付属 MultiInstaller.exe を起動して表示されるフォルダの選択ダイアログは、前掲の通り。
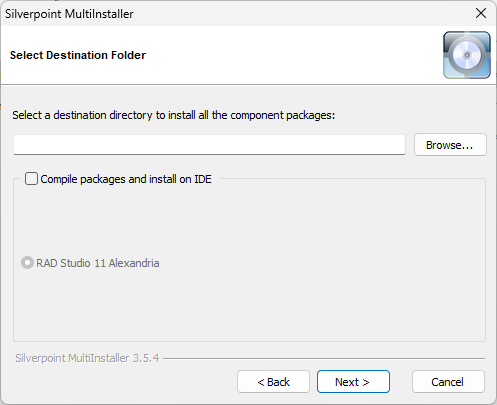
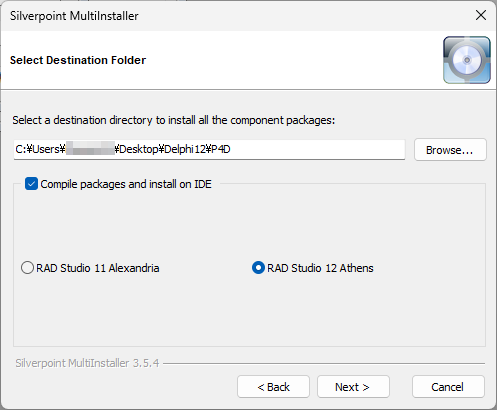
Browseボタンをクリックして・・・
Compile packages ~の欄には RAD Studio 12 Athens が増えましたが、欄の上下に「まだまだ余裕」があります。これを見て、先ほどの予感は大きく自信を得て・・・「これはつまり、今後数十年以上先までDelphiのメジャーバージョンアップが続々と行われることを見通して、必要十分と思われる余白を予め用意した先見の明溢れる非常に大胆な先進的設計である」という確信に変わりました。
implementation
uses
FMX.Platform, FMX.DialogService;
{$R *.fmx}
procedure TForm1.Button1Click(Sender: TObject);
var
ASyncService:IFMXDialogServiceASync;
begin
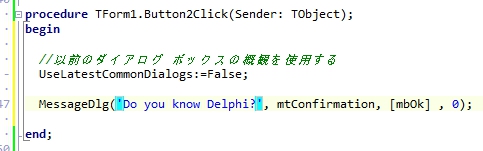
//mtConfirmationだとBeep音が鳴らないが、mtInformationだとBeep音が鳴る
if TPlatformServices.Current.SupportsPlatformService (IFMXDialogServiceAsync,
IInterface(ASyncService)) then
begin
TDialogService.MessageDialog('Do you know Delphi?',
TMsgDlgType.mtInformation, [TMsgDlgBtn.mbOK], TMsgDlgBtn.mbOK, 0,
procedure(const AResult: TModalResult)
begin
if AResult = mrOK then
begin
end;
end);
end;
end;
実行すると・・・
ここにたどり着くまで、結構長かった・・・ ほんとに、ようやくって感じ。
調べてわかったことは・・・
var
  ASyncService:IFMXDialogServiceASync;
・・・と宣言するためには、
uses
  FMX.Platform;
uses に FMX.Platform が必要で、さらに、サポートの有無を調査するif文の・・・
if TPlatformServices.Current.SupportsPlatformService (IFMXDialogServiceAsync,
    IInterface(ASyncService)) then
procedure TForm1.MsgDlgProc(const AResult: TModalResult);
begin
  //何もしない手続き

end;
応答が「OK」のみの場合は、これを呼び出し。
procedure TForm1.Button2Click(Sender: TObject);
var
  ASyncService:IFMXDialogServiceASync;
begin
  if TPlatformServices.Current.SupportsPlatformService (IFMXDialogServiceAsync, IInterface(ASyncService)) then begin
    TDialogService.MessageDialog('Do you know Delphi?',
      TMsgDlgType.mtInformation,
      [TMsgDlgBtn.mbOK], TMsgDlgBtn.mbOK, 0, MsgDlgProc);
  end;
end;
コードが短くなって、なんとなくすっきりした。
でも、「はい」・「いいえ」・「キャンセル」のようにボタンを複数表示するとそうもいかない。
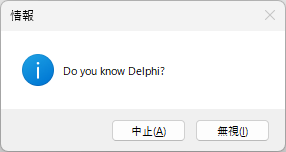
procedure TForm1.Button3Click(Sender: TObject);
var
  ASyncService:IFMXDialogServiceASync;
begin
  if TPlatformServices.Current.SupportsPlatformService (IFMXDialogServiceAsync, IInterface(ASyncService)) then
  begin
    TDialogService.MessageDialog('Do you know Delphi?',
      TMsgDlgType.mtInformation, [TMsgDlgBtn.mbYes, TMsgDlgBtn.mbNo, TMsgDlgBtn.mbCancel], TMsgDlgBtn.mbYes, 0,
      procedure(const AResult: TModalResult)
      begin
        if AResult = mrYes then
        begin
          ShowMessage('Goooooooood!');
        end;
        if AResult = mrNo then
        begin
          ShowMessage('No Good!');
        end;
        if AResult = mrCancel then
        begin
          ShowMessage('Cancel');
        end;
      end);
  end;
end;
case文でもよいようだ。
procedure TForm1.Button3Click(Sender: TObject);
var
  ASyncService:IFMXDialogServiceASync;
begin
  if TPlatformServices.Current.SupportsPlatformService (IFMXDialogServiceAsync, IInterface(ASyncService)) then
  begin
    TDialogService.MessageDialog('Do you know Delphi?',
      TMsgDlgType.mtInformation, [TMsgDlgBtn.mbYes, TMsgDlgBtn.mbNo, TMsgDlgBtn.mbCancel], TMsgDlgBtn.mbYes, 0,
      procedure(const AResult: TModalResult)
      begin
        case AResult of
          mrYes:ShowMessage('Goooooooood!');
          mrNo:ShowMessage('No Good!');
          mrCancel:ShowMessage('Cancel');
        end;
      end);
  end;
end;
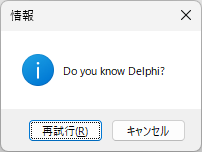
procedure TForm1.Button7Click(Sender: TObject);
var
  ASyncService:IFMXDialogServiceASync;
begin
  if TPlatformServices.Current.SupportsPlatformService (IFMXDialogServiceAsync, IInterface(ASyncService)) then
  begin
    TDialogService.MessageDialog('Do you know Delphi?',
      TMsgDlgType.mtInformation,[TMsgDlgBtn.mbRetry],TMsgDlgBtn.mbRetry,0,
      procedure(const AResult: TModalResult)
      begin
        case AResult of
          mrOK:ShowMessage('OK!:了解');
          mrCancel:ShowMessage('Cancel:取消');
          mrAbort:ShowMessage('Abort:中止');
          mrRetry:ShowMessage('Retry:再試行');
          mrIgnore:ShowMessage('Ignore:無視');
          mrYes:ShowMessage('Yes:はい');
          mrNo:ShowMessage('No:いいえ');
          mrClose:ShowMessage('Close:閉じる');
          mrHelp:ShowMessage('Help:要援助');
          mrAll:ShowMessage('All:すべて');
          mrNoToAll:ShowMessage('NoToAll:すべていいえ');
          mrYesToAll:ShowMessage('YesToAll:すべてはい');
        else
          //ないと思うけど、
          ShowMessage(IntToStr(AResult));
        end;
      end);
  end;
end;
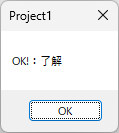
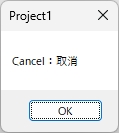
procedure TForm1.Button9Click(Sender: TObject);
var
  ASyncService:IFMXDialogServiceASync;
begin
  if TPlatformServices.Current.SupportsPlatformService (IFMXDialogServiceAsync, IInterface(ASyncService)) then
  begin
    TDialogService.MessageDialog('Do you know Delphi?',
      TMsgDlgType.mtInformation, [TMsgDlgBtn.mbOK], TMsgDlgBtn.mbOK, 0,
      procedure(const AResult: TModalResult)
      begin
        case AResult of
          mrOK:ShowMessage('OK!:了解');
          mrCancel:ShowMessage('Cancel:取消');
          mrAbort:ShowMessage('Abort:中止');
          mrRetry:ShowMessage('Retry:再試行');
          mrIgnore:ShowMessage('Ignore:無視');
          mrYes:ShowMessage('Yes:はい');
          mrNo:ShowMessage('No:いいえ');
          mrClose:ShowMessage('Close:閉じる');
          mrHelp:ShowMessage('Help:要援助');
          mrAll:ShowMessage('All:すべて');
          mrNoToAll:ShowMessage('NoToAll:すべていいえ');
          mrYesToAll:ShowMessage('YesToAll:すべてはい');
        else
          ShowMessage(IntToStr(AResult));
        end;
      end);
  end;
end;
procedure TForm1.btnGetSquareClick(Sender: TObject);
var
  //PythonのScriptを入れる
  strScrList:TStringList;
  //Pythonから送られたデータを保存する -> グローバル変数化
  //strAnsList:TStringList;
  //Sort
  i,j:integer;
  //strFileName:string;
  strList:TStringList;

  //画像の等幅分割
  //切り出し領域
  top_x, top_y:integer;
  yHeight:integer;
  //xの増分
  xWidth, iMax:integer;
  //for Imageの読み込み
  sourceImage: PIplImage;
  //画像データのファイル名
  p1:PAnsiChar;

  //x座標の補正
  str1, str2, str3, str4:string;

begin

  //画像分割処理なし(初期状態)
  {
  //初期化
  Memo1.Clear;
  //Scriptを入れるStringList
  strScrList:=TStringList.Create;
  //結果を保存するStringList
  strAnsList:=TStringList.Create;

  try
    //Python Script
    strScrList.Add('import cv2');
    strScrList.Add('import numpy as np');
    strScrList.Add('from PIL import Image');
    //strScrList.Add('img = cv2.imread("./ProcData/sample2.jpg")');
    //strScrList.Add('img = cv2.imread(r"'+StatusBar1.SimpleText+'")');
    strScrList.Add('pil_img = Image.open(r"'+StatusBar1.SimpleText+'")');
    strScrList.Add('img = np.array(pil_img)');
    strScrList.Add('gray = cv2.cvtColor(img, cv2.COLOR_BGR2GRAY)');
    strScrList.Add('gray = 255 - gray');
    strScrList.Add('ret, bin_img = cv2.threshold(gray, 20, 255, cv2.THRESH_BINARY)');
    strScrList.Add('contours, hierarchy = cv2.findContours(bin_img, cv2.RETR_LIST, cv2.CHAIN_APPROX_SIMPLE)');
    strScrList.Add('contours = list(filter(lambda x: cv2.contourArea(x) > '+cmbThreshold.Text+', contours))');
    strScrList.Add('for i in range(len(contours)):');
    strScrList.Add('    im_con = img.copy()');
    strScrList.Add('    x, y, w, h = cv2.boundingRect(contours[i])');
    strScrList.Add('    var1.Value =str(x)+","+str(y)+","+str(x+w)+","+str(y+h)');
    //Scriptを表示
    Memo1.Lines.Assign(strScrList);
    //「0による浮動小数点数除算」のエラーを出ないようにするおまじない
    MaskFPUExceptions(True);
    //Execute
    PythonEngine1.ExecStrings(Memo1.Lines);
    //結果を表示
    Memo2.Lines.Assign(strAnsList);
  finally
    //StringListの解放
    strAnsList.Free;
    strScrList.Free;
  end;
  }

  //画像分割処理ここから

  //初期化
  //Memo1.Clear;
  Memo2.Clear;
  MemoTemp.Clear;

  //初期化(定数的に利用する)
  top_y:=0;

  //分割数
  iMax:=StrToInt(cmbPartition.Text);

  //結果を保存するStringList
  strAnsList:=TStringList.Create;

  //初期化
  xWidth:=0;

  try

    for i := 0 to iMax-1 do
    begin

      //画像を読み込む(Bitmap・JPEGどちらも読み込み可能)
      p1:=PAnsiChar(AnsiString(StatusBar1.SimpleText));
      sourceImage := cvLoadImage(p1, CV_LOAD_IMAGE_ANYDEPTH or CV_LOAD_IMAGE_ANYCOLOR);

      //intとTruncは小数点以下を切り捨て。異なるのは、戻り値がintは実数、Truncは整数になること
      xWidth:=Trunc(SimpleRoundTo(sourceImage.Width/iMax,0));
      yHeight:=sourceImage.Height;

      //切り出す座標を指定
      top_x:= xWidth * i;

      try

        //指定範囲の画像を切り出して保存
        //cvRect(x, y, Width, Height)
        cvSetImageROI(sourceImage,cvRect(top_x, top_y, xWidth, yHeight));

        //String 型の文字列を PAnsiChar 型の文字列に変換
        //AnsiString 型でキャストして更に PAnsiChar でキャスト
        p1:=PAnsiChar(AnsiString('CutImage0'+IntToStr(i)+'.jpg'));
        //画像を保存する
        cvSaveImage(p1, sourceImage);

      finally
        //イメージの解放
        cvReleaseImage(sourceImage);
      end;

    end;

    for i := 0 to iMax-1 do
    begin

      //Scriptを入れるStringList
      strScrList:=TStringList.Create;

      //x座標の補正値を計算
      top_x:= xWidth * i;

      try
        //Python Script
        strScrList.Add('import cv2');
        strScrList.Add('import numpy as np');
        strScrList.Add('from PIL import Image');
        //strScrList.Add('img = cv2.imread("./ProcData/sample2.jpg")');
        //strScrList.Add('img = cv2.imread(r"'+StatusBar1.SimpleText+'")');
        //strScrList.Add('pil_img = Image.open(r"'+StatusBar1.SimpleText+'")');
        strScrList.Add('pil_img = Image.open(r"'+'CutImage0'+IntToStr(i)+'.jpg'+'")');
        strScrList.Add('img = np.array(pil_img)');
        strScrList.Add('gray = cv2.cvtColor(img, cv2.COLOR_BGR2GRAY)');
        strScrList.Add('gray = 255 - gray');
        strScrList.Add('ret, bin_img = cv2.threshold(gray, 20, 255, cv2.THRESH_BINARY)');
        strScrList.Add('contours, hierarchy = cv2.findContours(bin_img, cv2.RETR_LIST, cv2.CHAIN_APPROX_SIMPLE)');
        strScrList.Add('contours = list(filter(lambda x: cv2.contourArea(x) > '+cmbThreshold.Text+', contours))');
        strScrList.Add('for i in range(len(contours)):');
        strScrList.Add('    im_con = img.copy()');
        strScrList.Add('    x, y, w, h = cv2.boundingRect(contours[i])');
        strScrList.Add('    var1.Value =str(x)+","+str(y)+","+str(x+w)+","+str(y+h)');
        //Scriptを表示
        Memo1.Clear;
        Memo1.Lines.Assign(strScrList);
        //「0による浮動小数点数除算」のエラーを出ないようにするおまじない
        MaskFPUExceptions(True);
        //Execute
        PythonEngine1.ExecStrings(Memo1.Lines);
        //結果を表示
        if RadioButton1.Checked then
        begin
          //x座標を補正する
          MemoTemp.Lines.Assign(strAnsList);
          if i<>0 then
          begin
            for j := 0 to MemoTemp.Lines.Count-1 do
            begin
              //値を取得
              str1:=GetTokenIndex(MemoTemp.Lines[j],',',0);
              str2:=GetTokenIndex(MemoTemp.Lines[j],',',1);
              str3:=GetTokenIndex(MemoTemp.Lines[j],',',2);
              str4:=GetTokenIndex(MemoTemp.Lines[j],',',3);
              //カンマ区切りの文字列の1,3番目にtop_x値を加える(座標を修正)
              str1:=IntToStr(StrToInt(str1)+top_x);
              str3:=IntToStr(StrToInt(str3)+top_x);
              //書き戻し
              MemoTemp.Lines[j]:=str1+','+str2+','+str3+','+str4;
            end;
          end;
        end else begin
          Memo2.Lines.Assign(strAnsList);
        end;
      finally
        //StringListの解放
        //strAnsList.Free;
        strAnsList.Clear;
        strScrList.Free;
      end;

      //横書きの場合のみ実行
      if RadioButton1.Checked then
      begin

        //strFileName:=ExtractFilePath(StatusBar1.SimpleText)+'Temp.csv';
        //MemoTemp.Lines.SaveToFile(strFileName);

        strList := TStringList.Create;
        try
          for j := 0 to MemoTemp.Lines.Count-1 do
          begin
            strList.Add(MemoTemp.Lines[j]);
          end;
          //並び替え 降順 -> True
          //if RadioButton1.Checked then
          //begin
            fAscending := False;
            fIndex := 1; //2番目の項目を
            fStyle := ssInteger; //整数型でソート
            strList.CustomSort(MyCustomSort); //ソート開始
          //end else begin
          //  fAscending := True;
          //  fIndex := 0; //1番目の項目を
          //  fStyle := ssInteger; //整数型でソート
          //  strList.CustomSort(MyCustomSort); //ソート開始
          //end;

          //データ抽出
          //Memo2.Clear;
          for j := 0 to strList.Count - 1 do
          begin
            Memo2.Lines.Add(strList[j]);
          end;
        finally
          MemoTemp.Clear;
          strList.Free;
        end;
      end;
    end;

  finally
    //StringListの解放
    strAnsList.Free;
  end;

  //画像分割処理ここまで

  //縦書きの場合のみ実行
  if RadioButton2.Checked then
  begin

    //strFileName:=ExtractFilePath(StatusBar1.SimpleText)+'Temp.csv';
    //Memo2.Lines.SaveToFile(strFileName);

    strList := TStringList.Create;
    try
      for i := 0 to Memo2.Lines.Count-1 do
      begin
        strList.Add(Memo2.Lines[i]);
      end;
      //並び替え 降順 -> True
      //if RadioButton2.Checked then
      //begin
      //  fAscending := False;
      //  fIndex := 1; //2番目の項目を
      //  fStyle := ssInteger; //整数型でソート
      //  strList.CustomSort(MyCustomSort); //ソート開始
      //end else begin
        fAscending := True;
        fIndex := 0; //1番目の項目を
        fStyle := ssInteger; //整数型でソート
        strList.CustomSort(MyCustomSort); //ソート開始
      //end;

      //データ抽出
      Memo2.Clear;
      for i := 0 to strList.Count - 1 do
      begin
        //Memo2.Lines.Add(GetCommaText(strList.Strings[i],fIndex));
        Memo2.Lines.Add(strList[i]);
      end;
    finally
      strList.Free;
    end;

  end;

  if RadioButton2.Checked then
  begin
    ScrollBox1.HorzScrollBar.Position:=ScrollBox1.HorzScrollBar.Range;
  end else begin
    //ScrollBarが表示されていなくてもエラーにならない
    ScrollBox1.HorzScrollBar.Position:=0;
  end;

  //表示
  LBRow.Visible:=True;
  LBRow2.Visible:=True;

  //操作可能に設定
  btnOpen.Enabled:=True;
  btnSave.Enabled:=True;

  //操作不可に設定
  btnGetSquare.Enabled:=False;

  //先頭へスクロール
  Memo2.Perform(WM_VSCROLL,SB_TOP,0);

  //先頭行へ
  Memo2.SelStart:=SendMessage(Memo2.Handle, EM_LineIndex, 0, 0);
  Memo2.Perform(EM_SCROLLCARET, 0, 0);  //キャレット位置までスクロール
  Memo2.SetFocus;

  GetLinePos;

  //矩形を表示
  Memo2Click(Sender);

end;
ちなみに、最後の解答欄矩形を表示する処理は・・・
procedure TForm1.Memo2Click(Sender: TObject);
var
  i:integer;
  //x1,x2,x3,x4:integer;
  //y1,y2,y3,y4:integer;
  p1,p2:TPoint;
  //文字列切り分け///////////////////////////////////////////////////////////////
  function RemoveToken(var s:string;delimiter:string):string;
  var
    p:Integer;
  begin
    p:=Pos(delimiter,s);
    if p=0 then Result:=s
    else Result:=Copy(s,1,p-1);
    s:=Copy(s,Length(Result)+Length(delimiter)+1,Length(s));
  end;

  function GetTokenIndex(s:string;delimiter:string;index:Integer):string;
  var
    i:Integer;
  begin
    Result:='';
    for i:=0 to index do
      Result:=RemoveToken(s,delimiter);
  end;

begin

  if not EditTF then
  begin

    //座標を取得
    i:=Memo2.Perform(EM_LINEFROMCHAR, Memo2.SelStart, 0);
    //ShowMessage(IntToStr(i));

    //エラー対策
    if Memo2.Lines[i]='' then Exit;

    x1:=StrToInt(GetTokenIndex(Memo2.Lines[i],',',0));
    y1:=StrToInt(GetTokenIndex(Memo2.Lines[i],',',1));
    x2:=StrToInt(GetTokenIndex(Memo2.Lines[i],',',2));
    y2:=StrToInt(GetTokenIndex(Memo2.Lines[i],',',3));

    if Assigned(plImage1) then begin
      FreeAndNil(plImage1);
    end;

    //コンポーネントを生成し,イベントを定義し,位置を指定して画像を表示
    plImage1:=TplResizeImage.Create(Self);
    plImage1.Parent:=ScrollBox1;
    plImage1.TransEvent:=True;
    //クライアント座標をスクリーン座標へ変換
    //GetSystemMetrics(SM_CYCAPTION) -> タイトルバーの高さ
    //GetSystemMetrics(SM_CYFRAME) -> ウィンドウの枠幅
    p1.X:=x1-(GetSystemMetrics(SM_CYFRAME) div 2);
    p1.Y:=y1-GetSystemMetrics(SM_CYCAPTION)-(GetSystemMetrics(SM_CYFRAME) div 2);
    p2.X:=x2-(GetSystemMetrics(SM_CYFRAME) div 2);
    p2.Y:=y2-GetSystemMetrics(SM_CYCAPTION)-(GetSystemMetrics(SM_CYFRAME) div 2);
    p1:=Image1.ClientToScreen(p1);
    p2:=Image1.ClientToScreen(p2);
    plImage1.SetBounds(p1.X, p1.Y, p2.X-p1.X, p2.Y-p1.Y);

    //SelectedプロパティをTrueにするとラバーバンドとグラブハンドルが表示される
    plImage1.Selected := True;
    plImage1.BringToFront;

  end;

end;
procedure TForm1.FormCreate(Sender: TObject);
var
dllFileName:string;
begin
//リソースからDLLを(なければ)生成
dllFileName:=ExtractFilePath(Application.ExeName)+'XXX.dll';
//ファイルの存在を確認
if not FileExists(dllFilename) then
begin
//リソースを再生
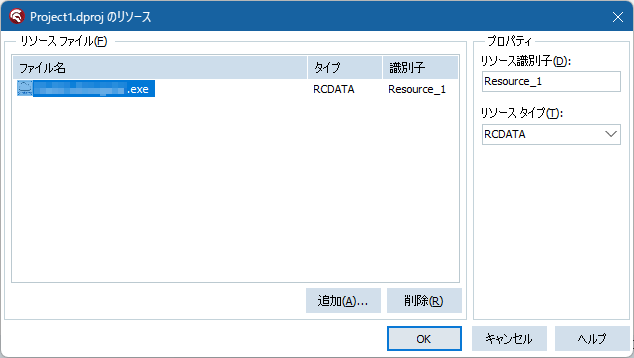
with TResourceStream.Create(hInstance, 'Resource_1', RT_RCDATA) do
begin
try
SaveToFile(dllFileName);
finally
Free;
end;
end;
end;
end;
private
{ Private 宣言 }
Setup_FolderPath:string;
Setup_ExeName:string;
implementation
{$R *.dfm}
uses
Winapi.ShlObj, Vcl.FileCtrl, System.UITypes, plShortcutUtils;
//ShlObjはSHGetKnownFolderPath関数を使用するために追加
//ShellExecute関数を使用してフォルダを開いて表示する場合はWinapi.ShellAPIも追加する
//Vcl.FileCtrlは、新しいフォルダ作成ボタン付きフォルダの選択ダイアログの表示に必要
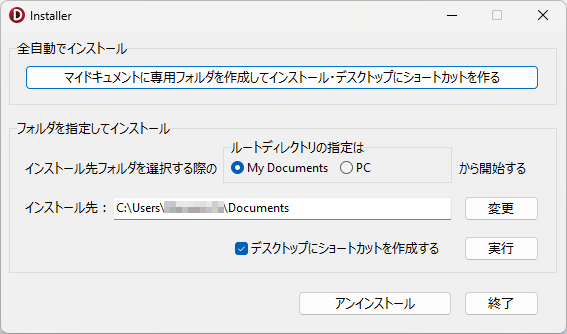
procedure TForm1.btnAutoClick(Sender: TObject);
var
FolderID:TGUID;
FolderPath:PChar;
rsFileName:string;
LDir:String;
begin
//マイドキュメントフォルダへのPathを取得する
FolderID:=StringToGUID('{FDD39AD0-238F-46AF-ADB4-6C85480369C7}');
if SHGetKnownFolderPath(FolderID,0,0,FolderPath)= S_OK then
begin
Setup_FolderPath := FolderPath;
end;
//インストール先フォルダの有無を調査->なければ作成
if not System.SysUtils.DirectoryExists(ExtractFileDir(Setup_FolderPath+'\'+Setup_ExeName+'\')) then
begin
//フォルダ階層を作成
System.SysUtils.ForceDirectories(ExtractFileDir(Setup_FolderPath+
'\'+Setup_ExeName+'\'));
end;
//Path
rsFileName:=Setup_FolderPath+'\'+Setup_ExeName+'\'+Setup_ExeName+'.exe';
//ファイルがある場合は削除
if FileExists(rsFilename) then
begin
//ファイルが存在したときの処理
DeleteFile(rsfileName);
end;
//リソースを再生
with TResourceStream.Create(hInstance, 'Resource_1', RT_RCDATA) do
begin
try
SaveToFile(rsFileName);
finally
Free;
end;
end;
//デスクトップにこのプログラムのショートカットを作成
if CheckCreateShortCut.Checked then
begin
//plShortcutUtilsユニット内の関数類を使用
//CSIDL_DESKTOP等の定数名の使用にはusesにShlObjが必要
//CSIDLの値からフルパスを取得
//ショートカットを作成する場所
LDir := GetDirectoryFromCSIDL(CSIDL_DESKTOP);
if CreateShortCutLink(rsFileName, LDir, Setup_ExeName) then begin
//ショートカットの作成場所によっては,以下のコードで更新が必要
//SendMessage(HWND_BROADCAST, WM_SETTINGCHANGE, 0, 0);
end;
MessageDlg('Done!', mtInformation, [mbOk] , 0);
end;
end;
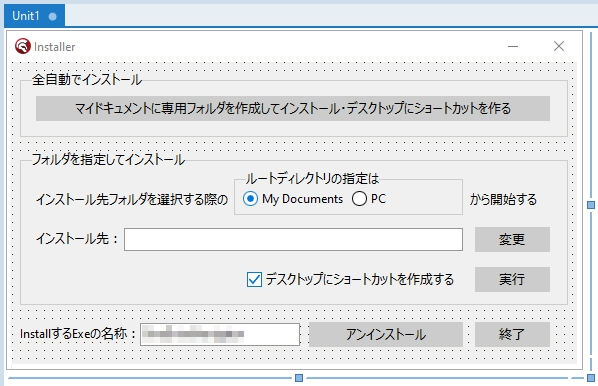
procedure TForm1.FormCreate(Sender: TObject);
var
  FolderID:TGUID;
  FolderPath:PChar;
begin

  //インストールするEXEの名前
  Setup_ExeName:=EditExeName.Text;

  //マイドキュメントフォルダへのPathを取得する
  FolderID:=StringToGUID('{FDD39AD0-238F-46AF-ADB4-6C85480369C7}');

  if SHGetKnownFolderPath(FolderID,0,0,FolderPath)= S_OK then
  begin
    Setup_FolderPath := FolderPath;
    EditPath.Text:= Setup_FolderPath;
  end;

end;
procedure TForm1.RadioGroup1Click(Sender: TObject);
var
  FolderID:TGUID;
  FolderPath:PChar;
begin

  case RadioGroup1.ItemIndex of
    0:begin
      //マイドキュメントフォルダへのPathを取得する
      FolderID:=StringToGUID('{FDD39AD0-238F-46AF-ADB4-6C85480369C7}');
      if SHGetKnownFolderPath(FolderID,0,0,FolderPath)= S_OK then
      begin
        Setup_FolderPath := FolderPath;
        EditPath.Text:= Setup_FolderPath;
      end;
    end;
    1:begin
      //マイコンピュータへのPathを取得する
      Setup_FolderPath := 'C:\';
      EditPath.Text:= Setup_FolderPath;
    end;
  end;

end;
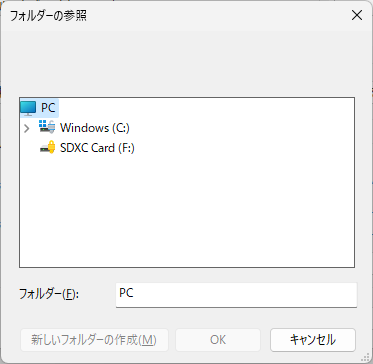
ちなみに、PCを選択した場合に表示される「フォルダーの参照」ダイアログは・・・
PCのフォルダ構成に詳しい人向きの表示になります・・・
で、インストール先を選ぶ「変更」ボタンをクリックした際の挙動は・・・
procedure TForm1.btnGetPathClick(Sender: TObject);
var
  SelectDir: String;
begin

  case RadioGroup1.ItemIndex of
    0:begin
      //フォルダを選択 -> MyDocumentsを指定
      //if SelectDirectory('', '::' + GUIDToString(CLSID_MyDocuments), SelectDir) then

      //MyDocumentsを指定 -> MyDocumentsを指定 & 新しいフォルダ作成ボタン付き
      if SelectDirectory('', '::' + GUIDToString(CLSID_MyDocuments), SelectDir,
        [sdNewUI, sdNewFolder, sdShowEdit], Self) then
      begin
        EditPath.Text:=SelectDir;
        Setup_FolderPath:=EditPath.Text;
      end;
    end;
    1:begin
      //フォルダを選択 -> を指定
      //if SelectDirectory('', '::' + GUIDToString(CLSID_MyComputer), SelectDir) then

      //MyMyComputerを指定 -> MyMyComputerを指定 & 新しいフォルダ作成ボタン付き
      if SelectDirectory('', '::' + GUIDToString(CLSID_MyComputer), SelectDir,
        [sdNewUI, sdNewFolder, sdShowEdit], Self) then
      begin
        EditPath.Text:=SelectDir;
        Setup_FolderPath:=EditPath.Text;
      end;
    end;
  end;

end;
procedure TForm1.btnOKClick(Sender: TObject);
var
  rsFileName:string;
  LDir:String;
begin

  //Path
  rsFileName:=Setup_FolderPath+'\'+Setup_ExeName+'.exe';

  //ファイルがある場合は削除
  if FileExists(rsFilename) then
  begin
   //ファイルが存在したときの処理
    DeleteFile(rsfileName);
  end;

  //リソースを再生
  with TResourceStream.Create(hInstance, 'Resource_1', RT_RCDATA) do
  begin
    try
      SaveToFile(rsFileName);
      //MessageDlg('Generate!', mtInformation, [mbOk] , 0);
    finally
      Free;
    end;
  end;

  //デスクトップにこのプログラムのショートカットを作成
  if CheckCreateShortCut.Checked then
  begin
    //plShortcutUtilsユニット内の関数類を使用
    //CSIDL_DESKTOP等の定数名の使用にはusesにShlObjが必要
    //CSIDLの値からフルパスを取得
    //ショートカットを作成する場所
    LDir := GetDirectoryFromCSIDL(CSIDL_DESKTOP);

    if CreateShortCutLink(rsFileName, LDir, Setup_ExeName) then begin
      //ショートカットの作成場所によっては,以下のコードで更新が必要
      //SendMessage(HWND_BROADCAST, WM_SETTINGCHANGE, 0, 0);
    end;

    MessageDlg('Done!', mtInformation, [mbOk] , 0);
  end;

end;
procedure TForm1.chkPWClick(Sender: TObject);
begin
if chkPW.Checked then
begin
EditPW.PasswordChar := #0;
end else begin
EditPW.PasswordChar := '*';
end;
end;
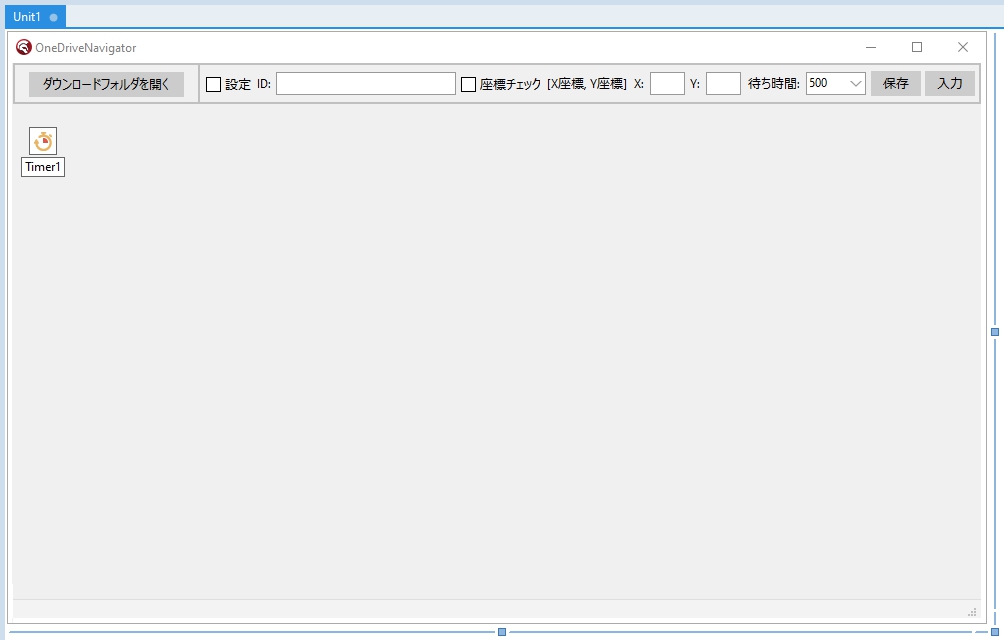
procedure TForm1.chkZahyoClick(Sender: TObject);
begin
if chkZahyo.Checked then
begin
//Enabled
Timer1.Enabled:=True;
end else begin
//Enabled
Timer1.Enabled:=False;
LabelXY.Caption:='[X座標, Y座標]';
end;
end;
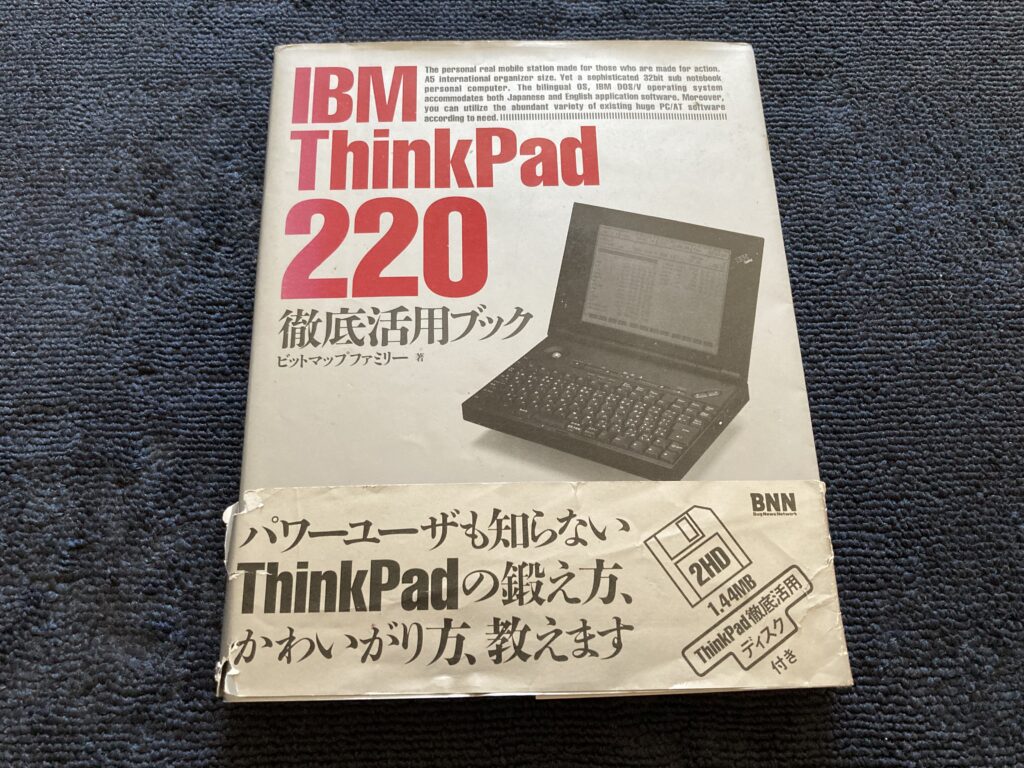
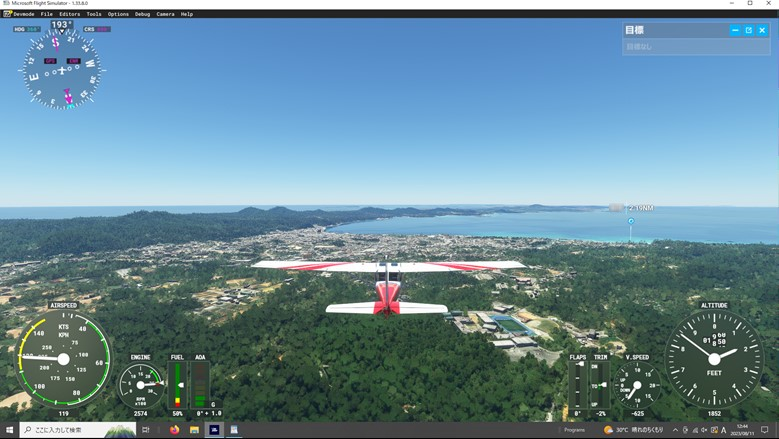
この本「徹底活用ブック」と銘打つだけあって、ThinkPad220に関するありとあらゆる情報が掲載されている感があり、どこから読んでも面白い本だった。新幹線の車内で電源を確保する方法など「こんなことやって、ほんとに大丈夫なのか?」と思っちゃったりもしたけど、そのゲーム機としての利用案内で知ったのが「Microsoft Flight Simulator Version 4」
(こんなん、あるんだー!)
それが「Flight Simulator」なるモノと、僕の出会いだった。
FS2020
FS98、FS2004どちらも楽しく遊べた。FS2004はWindowsXP時代のソフトで、インストールディスクなしで動かすには fs9.exe そのものを入れ替えるという裏技も必要だったりしたけど、ヤフオクで「Microsoft Force FeedBack2」なるジョイスティックも入手。現実世界では絶対に実現できない「火酒」を片手に操縦桿を握るという楽しみも、僕はこのFS2004で覚えた・・・。
procedure TForm1.chkSettingClick(Sender: TObject);
begin
if chkSetting.Checked then
begin
LabelID.Visible:=True;
btnCopy.Visible:=True;
btnCopy.Enabled:=True;
Edit1.Visible:=True;
LabelX.Visible:=True;
EditX.Visible:=True;
LabelY.Visible:=True;
EditY.Visible:=True;
btnSave.Visible:=True;
chkZahyo.Visible:=True;
LabelXY.Visible:=True;
LabelWaitTime.Visible:=True;
cmbWaitTime.Visible:=True;
end else begin
LabelID.Visible:=False;
btnCopy.Visible:=False;
Edit1.Visible:=False;
LabelX.Visible:=False;
EditX.Visible:=False;
LabelY.Visible:=False;
EditY.Visible:=False;
btnSave.Visible:=False;
chkZahyo.Visible:=False;
LabelXY.Visible:=False;
LabelWaitTime.Visible:=False;
cmbWaitTime.Visible:=False;
end;
end;
(3)入力値の保存/読み込みと暗号化
各VCLコントロールに入力された値は、必要な個所は暗号化してiniファイルに保存する。
uses
System.IniFiles;
procedure TForm1.btnSaveClick(Sender: TObject);
var
strID:string;
Ini:TIniFile;
begin
//入力の有無をCheck
if Edit1.Text='' then
begin
MessageDlg('IDとして利用するメールアドレスを入力してください', mtInformation, [mbOk] , 0);
Edit1.SetFocus;
Exit;
end;
if (EditX.Text='') or (EditY.Text='') then
begin
if EditX.Text='' then
begin
MessageDlg('自動クリックするX座標を入力してください', mtInformation, [mbOk] , 0);
EditX.SetFocus;
end;
if EditY.Text='' then
begin
MessageDlg('自動クリックするY座標を入力してください', mtInformation, [mbOk] , 0);
EditY.SetFocus;
end;
Exit;
end;
if cmbWaitTime.Text='' then
begin
MessageDlg('カーソル移動の待機時間をミリ秒単位で入力してください', mtInformation, [mbOk] , 0);
cmbWaitTime.SetFocus;
Exit;
end;
//暗号化
strID:=EDText(Edit1.Text, IntToStr(HashOf('XXXXXXXX')), True);
//iniファイルに保存
Ini := TIniFile.Create(ChangeFileExt(Application.ExeName, '.ini'));
try
//保存
Ini.WriteString('Section', 'ID', strID);
Ini.WriteString('Section', 'IchiX', EditX.Text);
Ini.WriteString('Section', 'IchiY', EditY.Text);
Ini.WriteString('Section', 'WaitTime', cmbWaitTime.Text);
//Userに通知
MessageDlg('現在の設定を保存しました!', mtInformation, [mbOk] , 0);
if not btnCopy.Enabled then btnCopy.Enabled:=True;
finally
Ini.Free;
end;
end;
コードの中で使用しているEDText関数はテキスト暗号化の関数。
private
{ Private 宣言 }
//HashNameMBCS(Create hashed values from a Unicode string)
//MBCS:Multibyte Character Set=マルチバイト文字セット
function HashOf(const key: string): cardinal;
//テキスト暗号化/復号化
Function EDText(KeyStr,PassW:string; EncOrDec:Boolean):string;
//KeyStr:平文 or 暗号化文のいずれかを指定
//PassW:パスワード
//EncOrDec:True -> Encode / False -> Decode
public
{ Public 宣言 }
end;
function TForm1.HashOf(const key: string): cardinal;
var
I: integer;
begin
Result := 0;
for I := 1 to length(key) do
begin
Result := (Result shl 5) or (Result shr 27);
Result := Result xor Cardinal(key[I]);
end;
end;
function TForm1.EDText(KeyStr, PassW: string; EncOrDec: Boolean): string;
var
{暗号化用変数}
Source, Dest, Password:TStringBuilder;
lpSource, lpPass:Integer;
PassValue, SourceValue, EDValue:Word;
{共用変数}
//乱数の種
Seed1,Seed2,Seed3:integer;
//実数の一様乱数
RandNum:Double;
//秘密鍵Seed
Seed:string;
{復号化用変数}
DecSource:string;
begin
//1.シード値を準備
// (1)Passwordを整数へ変換→シード値1へ代入
Password := TStringBuilder.Create;
//Seed1を初期化
//Seed1:=0;
try
Password.Append(PassW);
PassValue := 0;
for lpPass := 0 to Password.Length - 1 do
begin
//パスワード→整数
PassValue := PassValue + Word(Password.Chars[lpPass]);
end;
Seed1:=PassValue;
finally
Password.Free;
end;
// (2)パスワード文字列の長さを取得→シード値2へ代入
Seed2:= ElementToCharLen(PassW,Length(PassW));
// (3)シード値1とシード値2の排他的論理和を計算して、シード値3へ代入
Seed3 := Seed1 xor Seed2;
//2.実数の一様乱数を計算
//---------------------------------------------------------------------------
// 0より大きく1より小さい実数の一様乱数を発生する関数
// B.A.Wichmann and I.D.Hill, Applied Statistics, 31, 1982, p.188 に基づく
// Seed1-3に入れる初期値(整数)は16bit長(maxint=32767)で十分
// Seed1-3には1から30000までの任意の整数値を準備する(0ではいけない)
//---------------------------------------------------------------------------
//Seed1:=171*Seed1 mod 30269 と同値
Seed1:=(Seed1 mod 177)*171-(Seed1 div 177)* 2;
if Seed1<0 then Seed1:=Seed1+30269;
//Seed2:=172*Seed1 mod 30307 と同値
Seed2:=(Seed2 mod 176)*172-(Seed2 div 176)* 35;
if Seed2<0 then Seed2:=Seed2+30307;
//Seed1:=170*Seed1 mod 30323 と同値
Seed3:=(Seed3 mod 178)*170-(Seed3 div 178)* 63;
if Seed3<0 then Seed3:=Seed3+30323;
//See1-3それぞれの乱数を0<RandNum<1となるように
//計算結果が0より大きく、1未満の実数に直し、和の小数部分をとる
RandNum:=(Seed1/30269.0) + (Seed2/30307.0) + (Seed3/30323.0);
while RandNum>=1 do RandNum:=RandNum-1;
//3.秘密鍵を生成
//整数の一様乱数の上限値を決めて、整数の一様乱数を生成し、
//これに上で計算した実数の一様乱数を加えて秘密鍵を生成する
//Seedが秘密鍵(文字列として利用)となる
Seed:= FloatToStr(RandNum + trunc((Seed1+Seed2+Seed3)*RandNum));
//4.暗号化 / 復号化
if (EncOrDec) then
begin
//暗号化(Encode)
Source := TStringBuilder.Create;
Dest := TStringBuilder.Create;
Password := TStringBuilder.Create;
try
Source.Append(KeyStr);
//秘密鍵をセット
Password.Append(Seed);
lpPass := 0;
//テキストのエンコード
for lpSource := 0 to Source.Length - 1 do
begin
//パスワード→整数
if Password.Length = 0 then
PassValue := 0
else begin
PassValue := Word(Password.Chars[lpPass]);
Inc(lpPass);
if lpPass >= Password.Length then lpPass := 0;
end;
//テキスト→整数
SourceValue := Word(Source.Chars[lpSource]);
//XOR演算
EDValue := PassValue xor SourceValue;
//16進数文字列に変換
Dest.Append(IntToHex(EDValue, 4));
//処理結果を返り値にセット
Result:=Dest.ToString;
end;
finally
Password.Free;
Dest.Free;
Source.Free;
end;
end else begin
//復号化(Decode)
DecSource:=keyStr;
Dest := TStringBuilder.Create;
Password := TStringBuilder.Create;
try
//暗号化テキストのデコード
Dest.Clear;
Password.Clear;
//秘密鍵をセット
Password.Append(Seed);
lpPass := 0;
for lpSource := 1 to Length(DecSource) div 4 do
begin
SourceValue := StrToInt('$' + Copy(DecSource, (lpSource - 1) * 4 + 1, 4));
if Password.Length = 0 then
PassValue := 0
else
begin
PassValue := Word(Password.Chars[lpPass]);
Inc(lpPass);
if lpPass >= Password.Length then lpPass := 0;
end;
EDValue := SourceValue xor PassValue;
Dest.Append(Char(EDValue));
end;
//処理結果を返り値にセット
Result:=Dest.ToString;
finally
Password.Free;
Dest.Free;
end;
end;
end;
procedure TForm1.FormCreate(Sender: TObject);
var
Ini: TIniFile;
strID, strX, strY, strWaitTime: String;
i:integer;
begin
//Formを最大化して表示
Form1.WindowState:=wsMaximized;
//待ち時間の選択肢(100~3000ミリ秒を100ミリ秒単位で用意)
for i := 1 to 30 do
begin
cmbWaitTime.Items.Add(IntToStr(i*100));
end;
//iniファイルの存在を確認
if FileExists(ChangeFileExt(Application.ExeName, '.ini')) then
begin
//iniファイルからデータを読込み
Ini := TIniFile.Create(ChangeFileExt(Application.ExeName, '.ini'));
try
strID:=Ini.ReadString('Section', 'ID', '');
strX:=Ini.ReadString('Section', 'IchiX', '580');
strY:=Ini.ReadString('Section', 'IchiY', '420');
strWaitTime:=Ini.ReadString('Section', 'WaitTime', '500');
finally
Ini.Free;
end;
//復号して表示
Edit1.Text:=EDText(strID, IntToStr(HashOf('XXXXXXXX')), False);
EditX.Text:=strX;
EditY.Text:=strY;
cmbWaitTime.Text:=strWaitTime;
end;
//Navigate
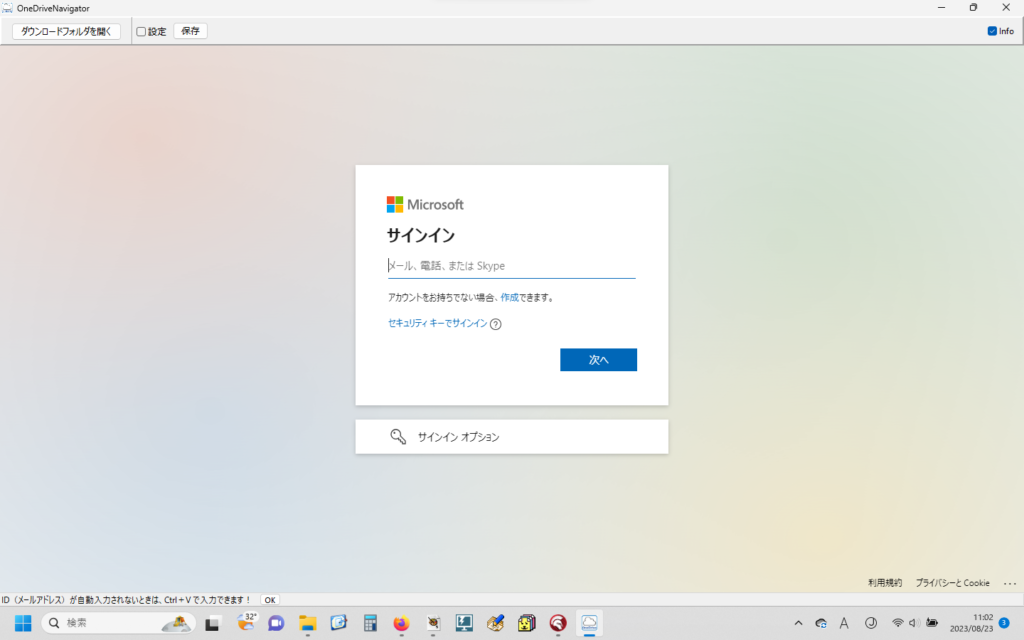
EdgeBrowser1.Navigate('https://onedrive.live.com/about/ja-jp/signin/');
end;
(4)カーソル位置の座標を取得
マウスのカーソルが現在置かれている位置のスクリーン座標を取得してLabelに表示。
procedure TForm1.chkZahyoClick(Sender: TObject);
begin
  if chkZahyo.Checked then
  begin
    //Enabled
    Timer1.Enabled:=True;
  end else begin
    //Enabled
    Timer1.Enabled:=False;
    LabelXY.Caption:='[X座標, Y座標]';
  end;
end;
procedure TForm1.FormCreate(Sender: TObject);
var
Ini: TIniFile;
strID, strX, strY, strWaitTime: String;
i:integer;
dllFileName:string;
begin
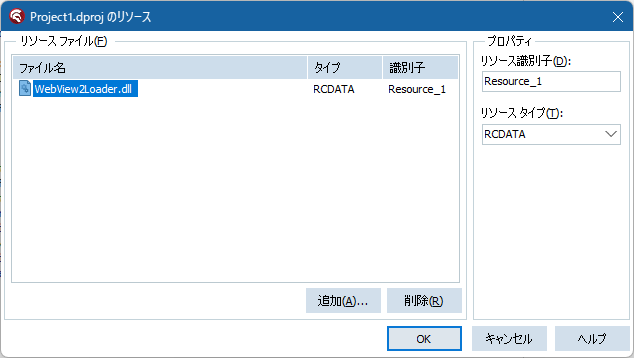
//リソースからDLLを(なければ)生成
//rijnファイルの位置を指定
dllFileName:=ExtractFilePath(Application.ExeName)+'WebView2Loader.dll';
//rijnファイルの存在を確認
if not FileExists(dllFilename) then
begin
//リソースを再生
with TResourceStream.Create(hInstance, 'Resource_1', RT_RCDATA) do
begin
try
SaveToFile(dllFileName);
finally
Free;
end;
end;
end;
・・・
end;
procedure TForm1.chkInfoClick(Sender: TObject);
var
strInfo:string;
strWidth:integer;
begin
if chkInfo.Checked then
begin
//表示する文字列
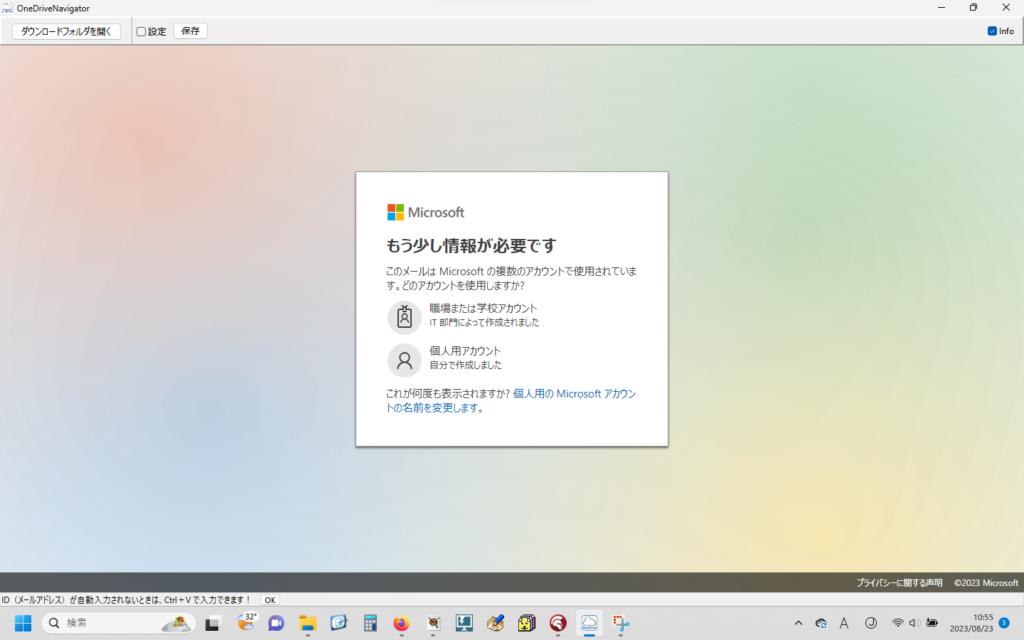
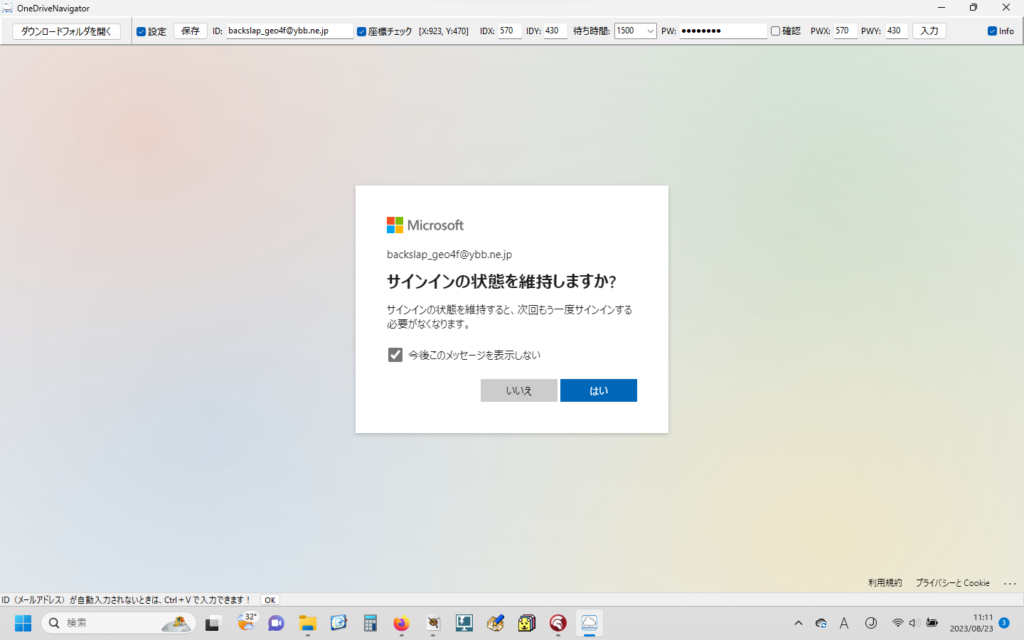
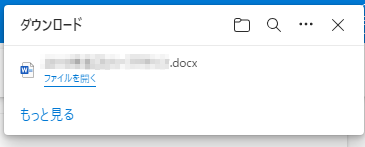
strInfo:='ID(メールアドレス)が自動入力されないときは、Ctrl+V で入力できます!';
strWidth:=StatusBar1.Canvas.TextWidth(strInfo);
btnOK.Visible:=True;
with btnOK do
begin
Parent:=StatusBar1;
Left:=strWidth-20;
Top:=1;
end;
//StatusBar1の設定(重要:このプロパティがFalseだとStatusBarにテキストが表示されない)
StatusBar1.SimplePanel:=True;
//Info
StatusBar1.SimpleText:=strInfo;
end else begin
StatusBar1.SimpleText:='';
btnOK.Visible:=False;
end;
end;
案内を「表示する」が選ばれていた場合はFormCreate時に案内表示を出すよう設定。
procedure TForm1.FormCreate(Sender: TObject);
var
  Ini: TIniFile;
  strID, strX, strY, strWaitTime: String;
  i:integer;
  dllFileName:string;
  strWidth:Integer;
  strInfo:string;
  boolInfo:boolean;
begin

  if chkInfo.Checked then
  begin
    //表示する文字列
    strInfo:='ID(メールアドレス)が自動入力されないときは、Ctrl+V で入力できます!';
    strWidth:=StatusBar1.Canvas.TextWidth(strInfo);
    with btnOK do
    begin
      Parent:=StatusBar1;
      Left:=strWidth-20;
      Top:=1;
    end;
    //StatusBar1の設定(重要:このプロパティがFalseだとStatusBarにテキストが表示されない)
    StatusBar1.SimplePanel:=True;
    //Info
    StatusBar1.SimpleText:=strInfo;
  end;

  ・・・

  //iniファイルの存在を確認
  if FileExists(ChangeFileExt(Application.ExeName, '.ini')) then
  begin
    //iniファイルからデータを読込み
    Ini := TIniFile.Create(ChangeFileExt(Application.ExeName, '.ini'));
    try
      strID:=Ini.ReadString('Section', 'ID', '');
      strX:=Ini.ReadString('Section', 'IchiX', '580');
      strY:=Ini.ReadString('Section', 'IchiY', '420');
      strWaitTime:=Ini.ReadString('Section', 'WaitTime', '500');
      boolInfo:=Ini.ReadBool('Section','Info',True);
    finally
      Ini.Free;
    end;
    //復号して表示
    Edit1.Text:=EDText(strID, IntToStr(HashOf('adminy')), False);
    EditX.Text:=strX;
    EditY.Text:=strY;
    cmbWaitTime.Text:=strWaitTime;
    chkInfo.Checked:=boolInfo;
  end;

  ・・・

end;
案内そのものを表示したくない場合は、ユーザーの自由意思でその設定も可能に。
procedure TForm1.btnSaveClick(Sender: TObject);
var
  strID:string;
  Ini:TIniFile;
begin

  //入力の有無をCheck
  ・・・

  //暗号化
  strID:=EDText(Edit1.Text, IntToStr(HashOf('adminy')), True);

  //iniファイルに保存
  Ini := TIniFile.Create(ChangeFileExt(Application.ExeName, '.ini'));
  try
    //保存
    Ini.WriteString('Section', 'ID', strID);
    Ini.WriteString('Section', 'IchiX', EditX.Text);
    Ini.WriteString('Section', 'IchiY', EditY.Text);
    Ini.WriteString('Section', 'WaitTime', cmbWaitTime.Text);
    Ini.WriteBool('Section','Info',chkInfo.Checked);
    //Userに通知
    MessageDlg('現在の設定を保存しました!', mtInformation, [mbOk] , 0);

    if not btnCopy.Enabled then btnCopy.Enabled:=True;

  finally
    Ini.Free;
  end;

end;